Run Android Emulator on AMD processors running Windows 10
Hello ${username}!
I want to share a solution to a problem that many novice Android developers have on AMD processors running Windows 10/11 Home.
This instruction will be useful for those who, after installing Android Studio, tried to run Android Emulator, but encountered an error “The emulator process for AVD has terminated”.

This error most often occurs due to problems with virtualization. To solve them you need:
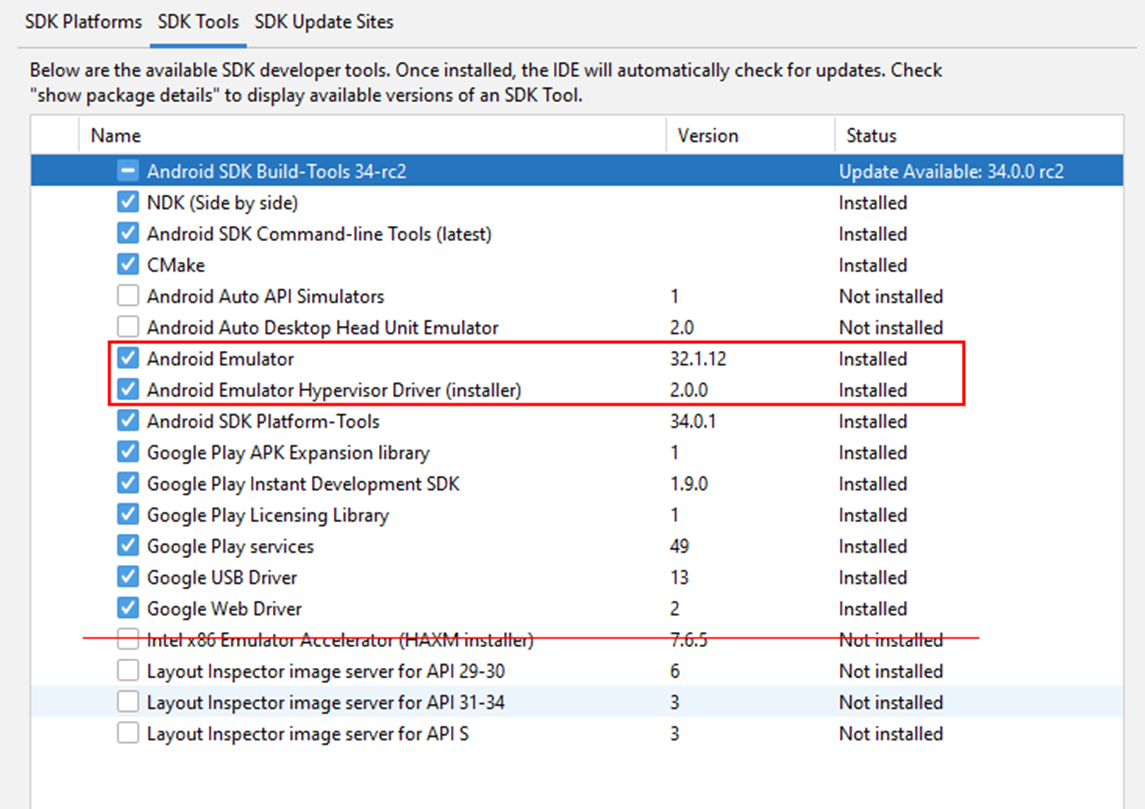
1) First remove all virtualization tools in Android Studio. To do this, go to the menu Tools -> SDK Manager -> SDK Tools Tab and uncheck the boxes next to all virtualization tools:

Apply the changes, close Android Studio and restart your computer.
2) At the time of reboot, you need to enter the BIOS to make sure that virtualization technologies on your system are enabled. The terminology and abbreviations in this case depends on the manufacturer of your motherboard, so I recommend reading the instructions for it.
As a rule, the parameter you are interested in is called VT (Virtualization technology) / AMD-V / AMD SVM (Secure Virtual Machine)but there may be other parameters that affect the operation of virtual machines in the system that should be enabled, for example AMD IOMMU.
In general, if you encounter errors during the installation or launch of the emulator, you should return to this paragraph, study the instructions for your motherboard, and possibly update the BIOS.
3) After downloading, you need to install the Hyper-V component in system. Windows 10/11 users Pro editions can do it through the GUI, through the tool “Turn Windows features on or off”but on Windows editions Homespecified components not included in deliveryso we take out a small tambourine and solve this problem as follows:
Create a hyperv.bat file, open it with notepad and paste the following script into it:
pushd "%~dp0"
dir /b %SystemRoot%\servicing\Packages\*Hyper-V*.mum >hyper-v.txt
for /f %%i in ('findstr /i . hyper-v.txt 2^>nul') do dism /online /norestart /add-package:"%SystemRoot%\servicing\Packages\%%i"
del hyper-v.txt
Dism /online /enable-feature /featurename:Microsoft-Hyper-V -All /LimitAccess /ALL
pause
save it and run as administrator. This will be followed by the installation of Hyper-V, which will take some time (about two minutes, in my case). After installation is complete, the system should be rebooted.
4) After the system boots, you can follow the path Control Panel -> Programs and Features -> Turn Windows features on or off and make sure the following Windows features are enabled:

5) And finally, open Android Studio, again go to the menu Tools -> SDK Manager -> SDK Tools tab and check the boxes next to the virtualization tools, except Intel x86 Emulator Accelerator (HAXM installer):
6) We accept the changes and, after installation, proceed to create a virtual device, for which we go to the menu Tools -> Device manager and click the Create button.
Next, choose a device with the screen resolution you are interested in, API level and architecture. If during the development process you will use Google Play services, then select a device with its support (in my case, the Google One Tap SignIn function did not work on emulators without Google Play support).
7) Launch the device and dive into the world of Android development! 🎉

PS If errors occur during the build and deployment process, make sure that all SDK and emulator folder, installed in a directory located along the path without using Cyrillic characters.
Typically, the Android Studio installer places them in a folder .android user directory, respectively, if your user is named using Cyrillic, then you will surely encounter errors during assembly.
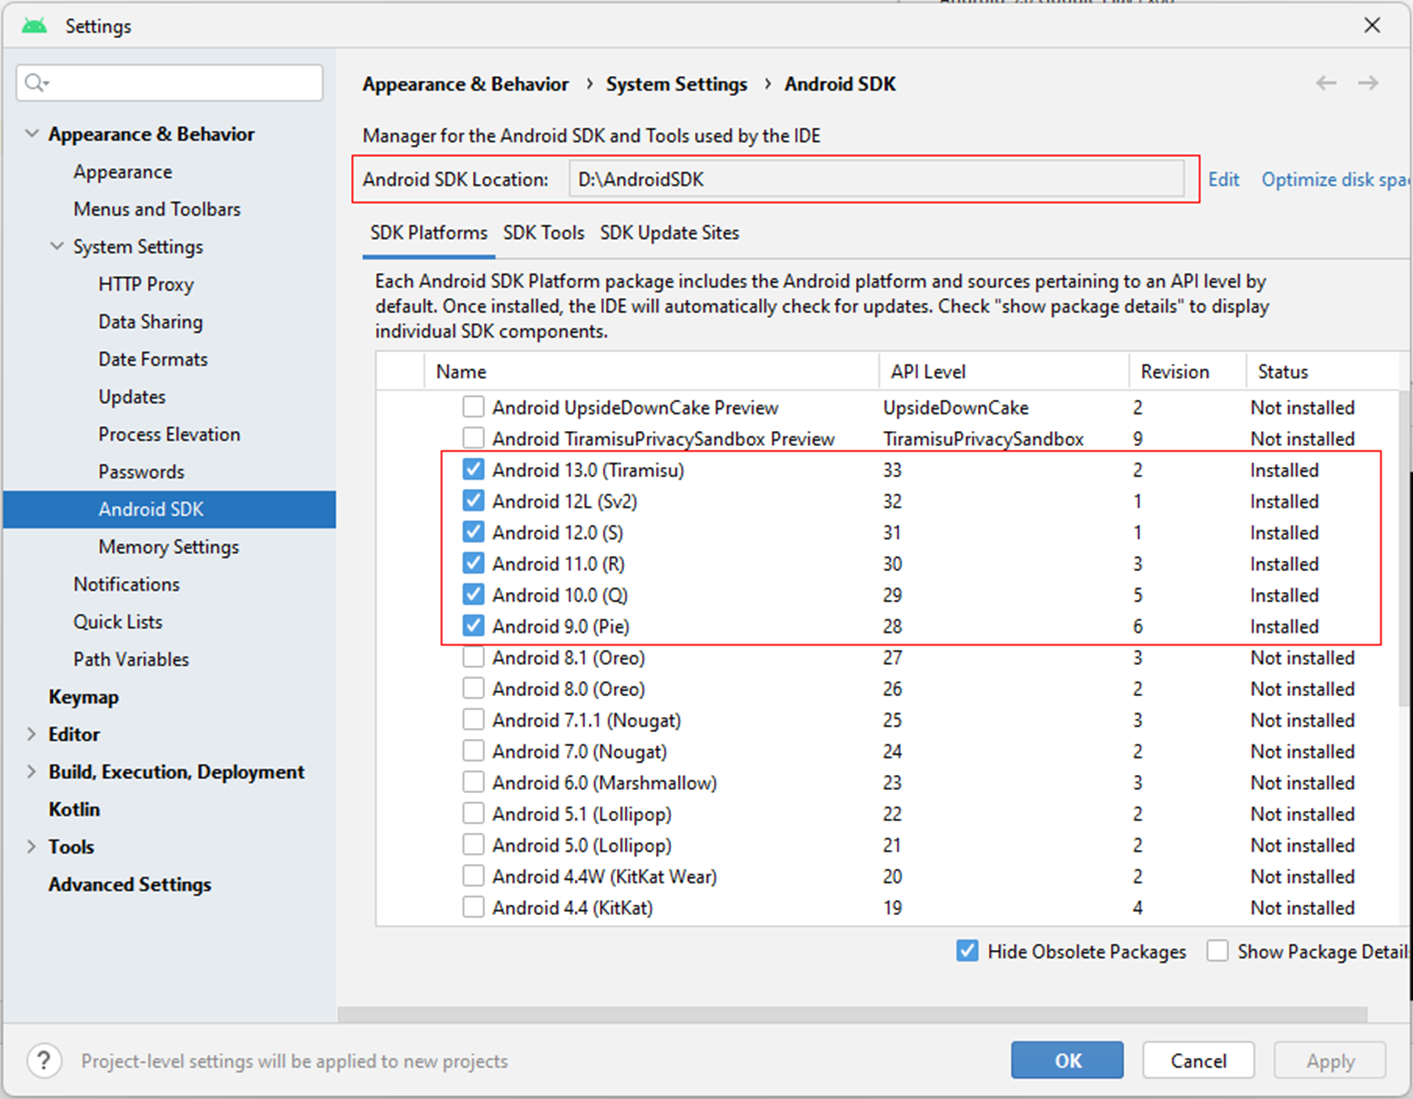
In Android Studio go to menu Tools -> SDK Manager and ask Android SDK Location without Cyrillic. Also make sure you have enough disk space. For clarity, the SDK I’m using is 10.7 GB on disk + 10.3 GB per Android virtual device:
I hope I was able to help you, good luck in your endeavors!