Recognition of movements with a white cane from scratch. Part one
Do you want to create a simple capsule that can recognize the natural movement of a cane? Do you want to implement machine learning / artificial intelligence on microcontrollers and other devices? We’ll show you how to create GesturePod is a self-adjusting device that recognizes movements in real time. This instruction clearly shows how to use GesturePod to make any “white cane” interactive. GesturePod makes it easier to access smartphones and other home devices for the visually impaired and the elderly. With the GesturePod, you can control devices by moving the cane. For example, answer an incoming call by swinging the cane twice from side to side.
The design of the capsule and the diagram of the electronic subsystem are given here [гиперссылка будет добавлена]. The mechanism is distributed under the MIT open license, the text of which can be found Here. The data for learning to recognize 5 movements is described in our publications for UIST 2019 and available Here.
In this tutorial, we will connect an MPU6050 gyroscope and accelerometer sensor module (IMU) to an MKR1000 (ARM Cortex M0+ class microcontroller), and deploy a pre-trained model that recognizes 5 movements – double tap, turn right, turn left, rotate and double wiggle . These movements are then transmitted to the smartphone via Bluetooth Low Energy (BLE).
Don’t have time to build hardware? Try running this on your computer simulation.
In the second part of this tutorial, you will see how to develop and train a machine learning model to recognize your movements.
One image is worth a thousand words – but a video is worth more! Therefore, we offer three small video instructions to help:
- Video “Assembling the GesturePod capsule without power” (Raw set-up).
- Video: Assemble the GesturePod Self-Powered Capsule (Stand-alone GesturePod).
As you can see from the instructions and text, the difference in the options shown in the first and second videos is in the presence of a battery and a switch and, accordingly, in the presence of an autonomous power supply or the need to use a power supply.
Components and Tools
Electronics
- microcontroller Arduino MKR1000.
- MPU6050 sensor.
- HM-10 BLE module.
- 3.3V 700mAh lithium polymer battery (optional) with JST 2.0 PH two-pin adapter.
As an alternative to the HM-10, you can use the HC-05 Bluetooth module. Keep in mind that when deploying a battery powered system, traditional Bluetooth consumes more power than Bluetooth Low Energy (BLE).
Housing and fasteners
- The electronic filling described above is sewn into a case that can be printed on a 3D printer from these design layout files.
- Metal clamps for secure attachment of the capsule to the reed.
- Screws for fixing the case.
- Switch to turn the system on and off.
After that, the capsule is fixed on a “white cane”, as shown in the video. You can also dispense with the capsule body and tape the system to any stick or tube. If the axis alignment of the MPU6050 is consistent, everything will work fine.
Software
Get the latest version Arduino IDE. We tested this tutorial with Arduino 1.8.5 on Windows 10. A good tutorial on how to work with the MKR1000 can be found Here. To check the system, we recommend running the example blink.
Tools
- Pistol soldering iron.
- screws.
- Curly screwdriver (“asterisk”).
- Insulating tape.
1. Connection

We have prepared video instructions for two types of installation: (a) “Assembling the GesturePod capsule without power” (Raw set-up) – the first video is dedicated to herand (b) Stand-alone GesturePod Stand-alone Capsule Assembly – dedicated to second video.
Building the capsule without power will allow you to fully implement the entire machine learning algorithm without loss of functionality. The connection is as follows:
MKR1000   ----------------> HM10
VCC       ----------------> VCC
GND       ----------------> GND
0 (DO)    ----------------> RX
1 (D1)    ----------------> TX

MKR1000   ----------------> MPU6050
VCC       ----------------> VCC
GND       ----------------> GND
SDA (D11) ----------------> SDA
SCL (D12) ----------------> SCL
When assembling a self-powered capsule, the structure from the first video is integrated with a battery and a switch. This allows you to use the system without being connected to a power supply and conserve battery power when the system is turned off.
To verify the connection of the MPU6050, we recommend running the example testMPU.ino.
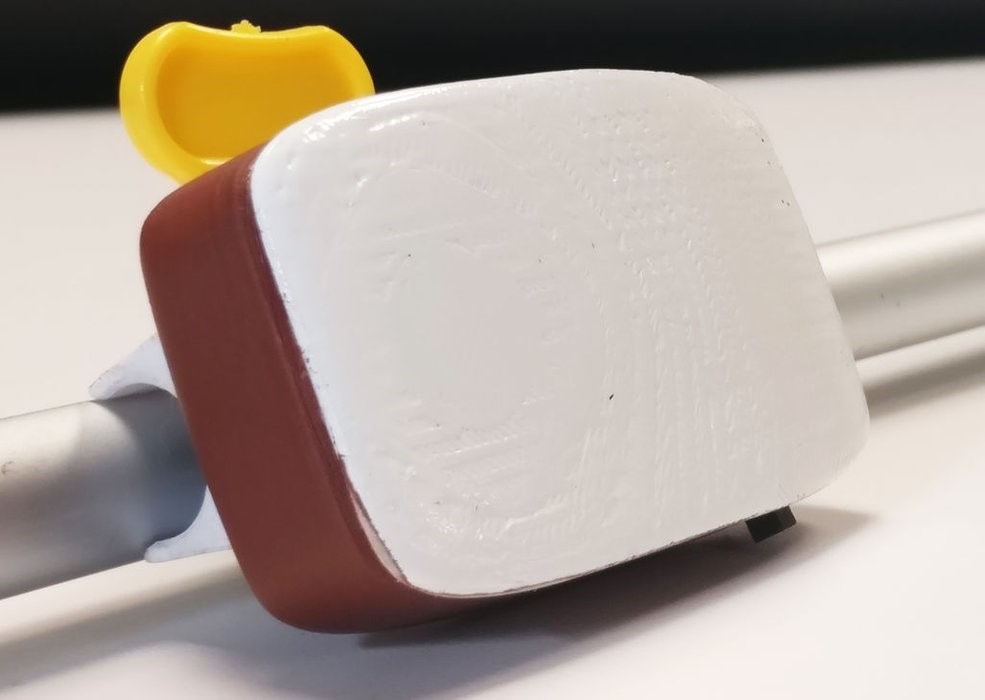
2. Mounting the capsule in the body
After making sure that the data from the sensor can be obtained by polling, you can mount the electronic stuffing in a housing that can be printed on a 3D printer using these files.
Make sure you have 3 details:
- base of the capsule.
- Capsule cap.
- Clip-clamp.
First, the MPU6050 sensor is installed in the recess in the base of the capsule. Then, on top of the MPU6050, the MKR1000 is inserted into the case
Here is a discrepancy between the original text and the author’s video instruction. The original says that the microcontroller is mounted on support columns (columnar supports), but as we can see, in all the author’s video instructions (see. https://drive.google.com/file/d/13BYBcYroHY_c4nu1DdYQr4B14SrqJtRL/view 1:50 and/or https://drive.google.com/file/d/1JnsX-Kr7Nm77E2ReGSzVNo0cjskrdD8r/view 1:00) there are no columns: between the MK and the sensor, the author glues a piece of tape and puts the MK, hanging on wires, over the sensor, and then screws it to the base of the capsule with screws.
The HM-10 BLE module is suspended between the tabs in the capsule cover. Then the cover and the base of the capsule are fastened with wedge connections. The design is additionally fixed with screws. After attaching the collar to the capsule, the system can be secured with the collar to the cane as shown in the figure.
The MPU6050 must be aligned with the axis of the capsule as shown in the instruction video.
3. MKR1000 encoding and phone connection
Now you have only one step left to implement the motion recognition function on the peripheral device…
Download the code or clone the repository onMKR1000.ino. Build and upload the code using the Arduino IDE. Don’t forget to select MKR1000 as the board. Open the serial monitor and set the speed BAUD equal to 115200. Now you can see the predicted classes. Perform the movements as shown in the video “Integrating GesturePod and Reeds”corresponding movements will be predicted.
Detected movements are also transmitted via BLE. You can use the application nrF Connect app to connect via BLE and send motion data to your phone. To use these motions to trigger the corresponding actions on your phone, you can download and install the “Interactive Cane” app from [ссылка скоро появится…]. Don’t forget to give all necessary permissions and turn on Bluetooth and location services.
If you are using BLE, you need a BLE-enabled phone.
What’s next?
This tutorial focused on building a GesturePod and deploying a pre-trained machine learning model for motion recognition. In the next tutorial, you’ll learn how to train and deploy a machine learning model to recognize your movements. Have you already learned enough to get started? Then go linkto start training a new model to recognize your own movements.
The Things Network Conference – even shorter guide
Paul Foster made up the guide is shorter (and better?) this for the workshop at The Things Network Conference, UK (2019). Instead of MKR1000, Adafruit Trinket M0 is used. In addition, this basic GesturePod shows recognizable movements (following British spelling rules as the conference was held in the UK) using the RGB LED on the Adafruit Trinket M0, rather than via Bluetooth as with the full implementation of the GesturePod. The tutorial also covers how to train a new model with custom motions.
Data Science and Machine Learning
Python, web development
Mobile development
Java and C#
From basics to depth
And