ORB_SLAM3 on raspberry pi 4
The nuances of installing ORB_SLAM3 on a single-board PC – raspberry pi 4 with Raspbian buster OS are considered,
a superficial analysis of the capabilities of the algorithm is carried out, taking into account the limitations of raspberry, possible ways to optimize performance are shown, among other things, ROS noetic is used as a link between imu, csi camera raspberry pi and ORB_SLAM3. The article does not pretend to be scientific, the author’s opinion is stated based on the experimental base.
Introduction.
An interesting task appeared: to build a route in a room, building, etc., so that it would be possible to “walk and return back” along this route. Ultra-precision is not important, but understanding of space and route. By “pass” is meant the movement of a visually impaired person with a certain device in his hand.
The first thing that came to mind was, of course, lidars and depth cameras. However, these solutions have been shelved as costly and/or inconvenient.
It was decided to look away
which has “ripe” the 3rd version (with updates in 2021).
Since I had previously worked with ORB_SLAM2, but the performance left much to be desired on weak hardware (raspberry pi3), I got the impression that the updated ORB_SLAM3 should start on raspberry pi4.
Let’s see what came of it.
But first –
Install ROS noetic.
ROS – robot operation system will be needed to link the data coming from the gyroscope / accelerometer, raspberry pi camera and ORB_SLAM.
How to install ROS will not be described in detail here, we will only give a link to the source article, following which you can install ROS on raspbian buster –
,
as well as a summary of the commands from the article at the link provided.
Minor clarifications, further will be given with the “*” sign.
ROS is distinguished by names, each of which is “tied” to certain distributions. So for raspbian buster is suitable – ROS noetic.
sudo sh -c 'echo "deb http://packages.ros.org/ros/ubuntu buster main" > /etc/apt/sources.list.d/ros-noetic.list'
sudo apt-key adv --keyserver 'hkp://keyserver.ubuntu.com:80' --recv-key C1CF6E31E6BADE8868B172B4F42ED6FBAB17C654
sudo apt update
sudo apt-get install -y python-rosdep python-rosinstall-generator python-wstool python-rosinstall build-essential cmake
sudo rosdep init
rosdep update
mkdir ~/ros_catkin_ws && cd ~/ros_catkin_ws
sudo apt install -y python3-rosdep python3-rosinstall-generator python3-wstool python3-rosinstall build-essential cmake
rosinstall_generator desktop --rosdistro noetic --deps --wet-only --tar > noetic-ros_comm-wet.rosinstall
*rosinstall_generator ros_comm --rosdistro noetic --deps --wet-only --tar > noetic-ros_comm-wet.rosinstall
wstool init src noetic-ros_comm-wet.rosinstall
rosdep install -y --from-paths src --ignore-src --rosdistro noetic -r --os=debian:buster
sudo src/catkin/bin/catkin_make_isolated --install -DCMAKE_BUILD_TYPE=Release --install-space /opt/ros/noetic -j1 -DPYTHON_EXECUTABLE=/usr/bin/python3

check:
source /opt/ros/noetic/setup.bash
roscd
roscore
*team
rosinstall_generator ros_comm --rosdistro noetic --deps --wet-only --tar > noetic-ros_comm-wet.rosinstallreplaced by another (preceding command) and should not be executed.
**swap file can not be increased if you have a raspberry pi with 8 GB of RAM.
We will also create a working environment in which we will install ROS packages in the future:
cd ~
mkdir -p ~/catkin_ws/src
cd ~/catkin_ws/
catkin_make
source devel/setup.bash
echo $ROS_PACKAGE_PATH
*outputs: /home/pi/catkin_ws/src:/opt/ros/noetic/share
usb camera node.
To communicate with the camera on the raspberry via ROS, you need it (the camera), the so-called node (node). Let’s install it, although this step can be skipped, since in the future we will install a “specialized” node specifically for raspberry – the raspicam node.
However, the usb camera node is more versatile, and if it doesn’t work with the raspicam node, this one should definitely work.
cd ~/catkin_ws/src
git clone https://github.com/bosch-ros-pkg/usb_cam.git
git clone https://github.com/ros-perception/image_common.git
git clone https://github.com/ros-perception/image_pipeline.git
git clone https://github.com/ros-perception/vision_opencv.git
cd ..
catkin_make
There are several packages, since the node requires additional dependencies.
Imu node (mpu650)
You can skip this step, one camera will be enough for ORB_SLAM (without imu running in parallel), however, the accuracy will be lame and it will not be possible to run the example with the inertial suffix.
At this stage, it is assumed that the node responsible for the gyroscope / accelerometer GY-521 (mpu-650) will be installed. This imu is cheap and fairly common. It is easy to buy and just as optional in its testimony. We will take this fact into account in what follows. Imu is also good because it is unpretentious and connects directly to the raspberry pi gpio using 5V instead of the required 3.
For imu to work, you need to add
sudo nano /etc/modulestwo lines:
i2c-bcm2708
i2c-dev
Reboot the system and you can look at the imu address:
sudo apt-get install i2c-tools python-smbus
i2cdetect -y -r 1
sudo i2cget -y 1 0x68 0x75
Typically, this is 0x68.
An article will also come in handy here, which will clarify certain points related to imu, and also allow you to check it for performance – here.
There is sometimes an error with imu:
Error: Could not set address to 0x68: Device or resource busyThe reasons for it may be different, but one of them may be the presence of an rtc clock that was once connected and “forgotten” about. To unload the clock, it will come in handy:
lsmod | grep rtc
sudo rmmod rtc-ds1307
After that, imu should work.
After making sure that imu is working and can give something to serial or another port, we will install a ROS node for it.
The package of the mpu6050 node will be taken as the basis – from here.
Attention! The installation order will differ from that described in the readme on github.
Further on the readme repo.
Here without changes:
sudo mkdir -p /usr/share/arduino/libraries
cd /usr/share/arduino/libraries
sudo git clone https://github.com/chrisspen/i2cdevlib.git
*This step will require a patch, which you can get from here – download.
cd /tmp
wget http://www.airspayce.com/mikem/bcm2835/bcm2835-1.59.tar.gz
cd bcm2835-1.59
tar zxvf bcm2835-1.59.tar.gz
patch -lNp1 --input=bcm2835_rpi4.patch
./configure
make
make check
sudo make install
Next, directly install the node itself for imu:
cd ~/catkin_ws
source devel/setup.bash
cd ~/catkin_ws/src
git clone https://github.com/chrisspen/ros_mpu6050_node
cd ..
catkin_make --pkg ros_mpu6050_node
Errors that can be expected:
—
Initializing I2C...
bcm2835_init: gpio mmap failed: Cannot allocate memory
[mpu6050_node-2] process has died [pid 3427, exit code -11,
Possible solutions are outlined
and
.
—
error FIFO overflow!Solution: increase the parameter in imu launch file:
<param name="frequency" type="int" value="10" />As a rule, it is enough to change to 100 or 200 from 10.
Do I need to calibrate the imu itself?
Here, the opinions in the sources differ, some say that it is enough to take readings from the datasheet and multiply by 10 for cheap imu, others suggest going through the calibration process. I’ll leave it for the last link.
Now that ROS is installed and the imu and camera nodes are installed, you can check that they are working.
You will need to open 3 terminals and run the commands separately:
bash -c "source /opt/ros/noetic/setup.bash; roscore" *launched the master node
bash -c "source /home/pi/catkin_ws/devel/setup.bash; roslaunch usb_cam usb_cam-test.launch"*launched the camera node
sudo bash -c "source /home/pi/catkin_ws/devel/setup.bash; roslaunch ros_mpu6050_node mpu6050.launch"*launched the imu node
If everything works, great! We move on.
Raspicam-node.
The Raspicam node is less resource intensive than the usb camera node we installed earlier. Therefore, it is recommended (by the author) to use it.
Here is a comparison of the computing power consumption of sister nodes with the same settings:
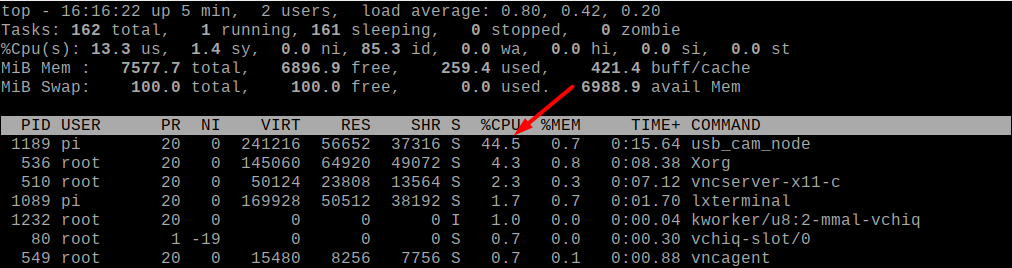

The installation is based on a repo − github.com/UbiquityRobotics/raspicam_nodehowever, is different.
sudo apt-get install libogg-dev libvorbis-dev libtheora-dev
cd catkin_ws/src
git clone https://github.com/ros-perception/image_transport_plugins
git clone https://github.com/UbiquityRobotics/raspicam_node.git
cd ..
catkin_make
The node is launched with the command:
roslaunch raspicam_node camerav2_1280x960.launchThe picture does not display, because. there is no image_viewer in the launch file, and to make sure everything works, you can either listen to the topic
rostopic echo rostopic echo /raspicam_node/image_rawor look in rviz by subscribing to the appropriate topic.
Setting ORB_SLAM3
.
The package is not installed in catkin_ws!
In order to save space and patience, we will describe the installation procedure in brief:
—libraries—
sudo apt-get install libboost-all-dev libboost-dev libssl-dev libpython2.7-dev libeigen3-dev—Pangolin—
cd ~
git clone https://github.com/stevenlovegrove/Pangolin
cd Pangolin
./scripts/install_prerequisites.sh recommended
cmake -B build -GNinja
cmake --build build
—opencv—
*https://qengineering.eu/install-opencv-4.5-on-raspberry-pi-4.html
wget https://github.com/Qengineering/Install-OpenCV-Raspberry-Pi-32-bits/raw/main/OpenCV-4-5-5.sh
sudo chmod 755 ./OpenCV-4-5-5.sh
./OpenCV-4-5-5.sh
—ORB_SLAM3—
git clone https://github.com/UZ-SLAMLab/ORB_SLAM3.git ORB_SLAM3
cd ORB_SLAM3
chmod +x build.sh
sed -i 's/++11/++14/g' CMakeLists.txt
./build.sh
ORB_SLAM is installed, but you still need to build ROS nodes for it, which are not automatically installed during installation (when you run ./build.sh):
1. Change CMakeLists.txt:
cd /home/pi/ORB_SLAM3/Examples_old/ROS/ORB_SLAM3
sed -i 's/++11/++14/g' CMakeLists.txt
here we will comment out AR nodes, because they are not going to:
# Node for monocular camera (Augmented Reality Demo)
#rosbuild_add_executable(MonoAR
#src/AR/ros_mono_ar.cc
#src/AR/ViewerAR.h
#src/AR/ViewerAR.cc
#)
#target_link_libraries(MonoAR
#${LIBS}
#)
here we add to the beginning of the CMakeLists.txt file:
project(ORB_SLAM3)2. Change build_ros.sh (/home/pi/ORB_SLAM3):
echo "Building ROS nodes"
cd Examples_old/ROS/ORB_SLAM3
mkdir build
cd build
cmake .. -DROS_BUILD_TYPE=Release -DPYTHON_EXECUTABLE=/usr/bin/python3
make -j
3. install the libraries:
---Sophus---
cd ~
git clone https://github.com/strasdat/Sophus.git
cd Sophus
mkdir build && cd build && cmake .. && sudo make install
---fmt---
sudo apt install libfmt-dev
Replace Sophus from /home/pi/ORB_SLAM3/Thirdparty/Sophus
on Sophus /home/pi/Sophus
*Delete the directory and copy the one that was built above.
4. Change the topics that ORB_SLAM3 will “listen to” so that the camera (raspicam_node) and ORB_SLAM communicate in the same topic:
nano /home/pi/ORB_SLAM3/Examples_old/ROS/ORB_SLAM3/src/ros_mono.cc
ros::Subscriber sub = nodeHandler.subscribe("/camera/image", 1, &ImageGrabber::GrabImage,&igb);
*you can not do it here, but then do a remap in the launch file with the camera. There will be a note below.
5. Collect ORB_SLAM3 nodes:
export ROS_PACKAGE_PATH=${ROS_PACKAGE_PATH}:/home/pi/ORB_SLAM3/Examples_old/ROS/ORB_SLAM3
source /opt/ros/noetic/setup.bash
cd ~/ORB_SLAM3
./build_ros.sh
Now that everything is ready, you can run all the necessary nodes, together with the ORB_SLAM3 nodes, using the 4th terminal already:
bash -c "source /opt/ros/noetic/setup.bash; roscore"bash -c "source /home/pi/catkin_ws/devel/setup.bash; roslaunch usb_cam usb_cam-test.launch"*or
bash -c "source /home/pi/catkin_ws/devel/setup.bash; roslaunch raspicam_node camerav2_1280x960.launch"bash -c "source /home/pi/catkin_ws/devel/setup.bash;cd /home/pi/ORB_SLAM3/Examples_old/ROS/ORB_SLAM3;
./Mono /home/pi/ORB_SLAM3/Vocabulary/ORBvoc.txt /home/pi/ORB_SLAM3/Examples/Monocular/TUM1.yaml"sudo bash -c "source /home/pi/catkin_ws/devel/setup.bash; roslaunch ros_mpu6050_node mpu6050.launch"Building a map with ORB_SLAM3.
ORB_SLAM build unique maps and it’s hard to get used to them at first. Especially if you are used to maps built by lidar or other “expensive” device.

The image shows several dozen “postal envelopes” – this is a camera. When moving it, you can also observe a cloud of points (it is not in the picture above), point cloud.
However, in order to move around the room, at least some kind of mobile device is needed.
You can take as a sample the following model, assembled on plywood from a mobile robot:


Two 18650 batteries last for 2-3 hours.
Before building a map, you need to work with the settings of the launch files of both the ORB_SLAM3 itself and the camera and imu nodes.
Let’s start with the camera.
nano /home/pi/catkin_ws/src/raspicam_node/launch/camerav2_512x512_fish.launchLet’s fix the raspicam_node launch file by lowering fps to 20 and set the enable_raw parameter to true, since ORB_SLAM3 does not digest compressed (image_compressed) images that raspicam_node sends by default.
<launch>
  <arg name="enable_raw" default="true"/>
  <arg name="enable_imv" default="false"/>
  <arg name="camera_id" default="0"/>
  <arg name="camera_frame_id" default="camera"/>
  <arg name="camera" default="camerav2_640x480"/>

  <node type="raspicam_node" pkg="raspicam_node" name="camera" output="screen">
    <param name="private_topics" value="true"/>

    <param name="camera_frame_id" value="$(arg camera_frame_id)"/>
    <param name="enable_raw" value="$(arg enable_raw)"/>
    <param name="enable_imv" value="$(arg enable_imv)"/>
    <param name="camera_id" value="$(arg camera_id)"/>

    <param name="camera_info_url" value="package://raspicam_node/camera_info/camerav2_640x480.yaml"/>
    <param name="camera" value="$(arg camera)"/>
    <param name="width" value="512"/>
    <param name="height" value="512"/>

    <param name="framerate" value="20"/>
    <!-- <remap from="/camera/image" to="/camera/image_raw"/> -->
    <!-- <remap from="/camera/image/compressed" to="/camera/image_raw"/> -->
  </node>
</launch>
It is better not to touch the resolution, since further in the ORB_SLAM parameter file the file with the camera calibration settings will be used exactly for the 512×512 image.
*Now, if we plan to use a gyroscope / accelerometer, we will correct the corresponding node.
nano /home/pi/catkin_ws/src/ros_mpu6050_node/launch/mpu6050.launch
Here you need to set the frequency – 100-200 Hz, and also remap (redirect) the topics so that imu publishes data to the topic that ORB_SLAM3 will listen to.
<!-- http://wiki.ros.org/roslaunch/XML/node -->
<launch>
   <node name="mpu6050_node" pkg="ros_mpu6050_node" type="mpu6050_node" output="screen">
      <!--<rosparam file="$(find mypackage)/config/example.yaml" command="load" />-->
      <param name="frequency" type="int" value="200" />
      <param name="frame_id" type="str" value="base_imu" />
      <param name="ax" type="int" value="0" />
      <param name="ay" type="int" value="0" />
      <param name="az" type="int" value="0" />
      <param name="gx" type="int" value="0" />
      <param name="gy" type="int" value="0" />
      <param name="gz" type="int" value="0" />
      <param name="ado" type="bool" value="false" />
      <param name="debug" type="bool" value="false" />
      <remap from="/imu/data" to="/imu"/>
   </node>
</launch>
The ORB_SLAM3 settings remain.
It’s a little more complicated here.
The parameters are stored in yaml format files, so you need to edit them. Which we will do.
If you have a Pinhole camera, then edit TUM1.yaml:
nano /home/pi/ORB_SLAM3/Examples/Monocular/TUM1.yamlif fish-eye, in terms of ORB_SLAM3, this is the KannalaBrandt8 type, then TUM-VI.yaml:
nano /home/pi/ORB_SLAM3/Examples/Monocular/TUM-VI.yamlIn general, the given TUM files have little difference in terms of content.
It is necessary to reduce ORBextractor.nLevels, pay attention to fps, resolution 512×512, as well as ORBextractor.nFeatures – the number of features to be extracted (here you need a balance of performance / quality – fewer features – it works faster, but it is positioned worse and vice versa).
%YAML:1.0

#--------------------------------------------------------------------------------------------
# Camera Parameters. Adjust them!
#--------------------------------------------------------------------------------------------
File.version: "1.0"

Camera.type: "KannalaBrandt8"

# Camera calibration and distortion parameters (OpenCV)
Camera1.fx: 190.978477
Camera1.fy: 190.973307
Camera1.cx: 254.931706
Camera1.cy: 256.897442

# Equidistant distortion 0.0034823894022493434, 0.0007150348452162257, -0.0020532361418706202, 0.0002029$
Camera1.k1: 0.003482389402
Camera1.k2: 0.000715034845
Camera1.k3: -0.002053236141
Camera1.k4: 0.000202936736

# Camera resolution
Camera.width: 512
Camera.height: 512

# Camera frames per second
Camera.fps: 20
# Color order of the images (0: BGR, 1: RGB. It is ignored if images are grayscale)
Camera.RGB: 1
#--------------------------------------------------------------------------------------------
# ORB Parameters
#--------------------------------------------------------------------------------------------
# ORB Extractor: Number of features per image
ORBextractor.nFeatures: 1000 # Tested with 1250
# ORB Extractor: Scale factor between levels in the scale pyramid
ORBextractor.nLevels: 3 #8

# ORB Extractor: Fast threshold
# Image is divided in a grid. At each cell FAST are extracted imposing a minimum response.
# Firstly we impose iniThFAST. If no corners are detected we impose a lower value minThFAST
# You can lower these values if your images have low contrast
ORBextractor.iniThFAST: 20
ORBextractor.minThFAST: 7

#--------------------------------------------------------------------------------------------
# Viewer Parameters
#--------------------------------------------------------------------------------------------
Viewer.KeyFrameSize: 0.05
Viewer.KeyFrameLineWidth: 1.0
Viewer.GraphLineWidth: 0.9
Viewer.PointSize: 2.0
Viewer.CameraSize: 0.08
Viewer.CameraLineWidth: 3.0
Viewer.ViewpointX: 0.0
Viewer.ViewpointY: -0.7
Viewer.ViewpointZ: -3.5
Viewer.ViewpointF: 500.0
Viewer.imageViewScale: 0.3
Let’s run everything (so far without the imu node):
1st terminal:
bash -c "source /opt/ros/noetic/setup.bash; roscore"2d:
bash -c "source /home/pi/catkin_ws/devel/setup.bash; roslaunch usb_cam usb_cam-test.launch"or
bash -c "source /home/pi/catkin_ws/devel/setup.bash; roslaunch raspicam_node camerav2_512x512_fish.launch"3d:
bash -c "source /home/pi/catkin_ws/devel/setup.bash;cd /home/pi/ORB_SLAM3/Examples_old/ROS/ORB_SLAM3;
./Mono /home/pi/ORB_SLAM3/Vocabulary/ORBvoc.txt /home/pi/ORB_SLAM3/Examples/Monocular/TUM-VI.yaml"
In general, raspberry does a good job:

However, with sharp turns, the power is clearly not enough.
However, if you move slowly and do not jerk the camera, you can build a “route”:

This is what it looks like to walk back and forth with a smooth camera turn.
Save the map by clicking on the gui button will not work. There is no such button. In order for the map to be registered, it is necessary to add a line to the TUM.yaml file before starting ORB_SLAM3:
System.SaveAtlasToFile: "my_01"where my_01 is the name of the map.
In this case, the map will be saved in /home/pi/ORB_SLAM3/Examples_old/ROS/ORB_SLAM3 and named my_01.osa.
To load a map at the start of ORB_SLAM, which was previously built in the same TUM file, specify:
System.LoadAtlasFromFile: "my_01"To be continued.