NLP for TensorFlow: Text Generation

Article author: Rustem Galiev
IBM Senior DevOps Engineer & Integration Architect. Official DevOps mentor and coach at IBM
One of the coolest and arguably most annoying applications of NLP is text generation. The ability to generate compelling text with AI has applications ranging from chatbots to creating fiction or fake news. Today we will look at the creation of fake fiction based on Lewis Carroll’s Alice in Wonderland.
From the requisites, you need Python and Tensorflow.
We are loading some imports for text processing and loading:
import tensorflow as tf

import numpy as np
import os
import time
import urllib.request
import re
tf.__version__
Loading a book from Project Gutenberg with:
url = "https://www.gutenberg.org/files/11/11-0.txt"
file = urllib.request.urlopen(url)
text = [line.decode('utf-8') for line in file]
text="".join(text)
text = re.sub(' +',' ',text)
text = re.sub(r'[^A-Za-z.,!\r ]+', '', text)
text = text[1150:]
text[:200]
After the book is downloaded, we load the text and clean it up with a regular expression using re.sub. We then fetch only the beginning of the book and dump it to the console.
Tokenize and encode
The text is loaded, now you can proceed to tokenization and encoding. To generate this text, we will be working with character tokens, not word tokens. By tokenizing characters, we reduce the learning space from a large vocabulary to something easier to learn.
We can extract a dictionary of character tokens from text with:
vocab = sorted(set(text))
",".join(vocab)
Then we create an encoding for characters and display functions with:
char2idx = {u:i for i, u in enumerate(vocab)}
idx2char = np.array(vocab)

text_as_int = np.array([char2idx[c] for c in text])
[f"{char} = {i}" for char,i in zip(char2idx, range(20))]
Display functions char2idx And idx2char map characters to indices and vice versa. These functions help us encode and then decode characters.
We can then build the training sets with:
seq_length = 100
examples_per_epoch = len(text)//(seq_length+1)

char_dataset = tf.data.Dataset.from_tensor_slices(text_as_int)

[idx2char[i.numpy()] for i in char_dataset.take(5)]
Variable example_per_epoch is the number of samples or text fragments that we will pass to the model. char_dataset is the encoding conversion text_as_int into tensors.
After marking up the text and encoded characters, we proceed to the construction of training sequences.
Let’s break our document into training sequences. Remember that RNN layers learn sequences of tokens. Our goal here is to pass sequences and offset sequences in order to train a text generation model.
Creating them is easy enough with:
sequences = char_dataset.batch(seq_length+1, drop_remainder=True)
[repr(''.join(idx2char[item.numpy()])) for item in sequences.take(5)]
Then we take and upload 5 training sequences as an example.
Since we are training the network with sequences, we will create an input sequence and then a target or destination. When using RNN, the target sequence will be the input sequence shifted by one symbol.
You can create input and target sequences using a simple map function:
@tf.autograph.experimental.do_not_convert
def split_input_target(chunk):
    input_text = chunk[:-1]
    target_text = chunk[1:]
    return input_text, target_text

dataset = sequences.map(split_input_target)
We can then take a look at the input and target sequence with:
for input_example, target_example in  dataset.take(1):
  print ('Input data: ', repr(''.join(idx2char[input_example.numpy()])))
  print ('Target data:', repr(''.join(idx2char[target_example.numpy()])))
Thus, when we train the network, the input symbol must always match the expected output symbol. An example of what this looks like is shown below:
for i, (input_idx, target_idx) in enumerate(zip(input_example[:5]target_example[:5])): print("Step {:4d}".format(i)) print(" input: {} ({:s})".format(input_idx, repr(idx2char[input_idx]))) print(" expected output: {} ({:s})".format(target_idx, repr(idx2char[target_i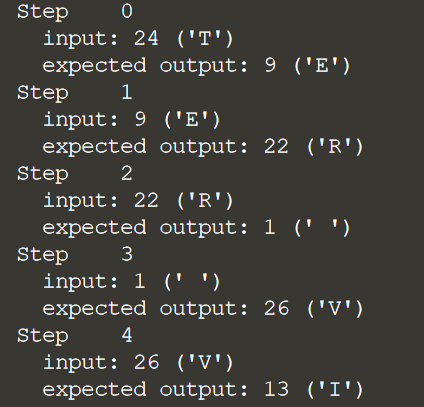
На каждом шаге примера показаны входные данные, а затем ожидаемые выходные данные, к которым мы будем обучать сеть.
Построение и обучение модели
Все данные готовы, поэтому мы можем перейти к построению модели и ее обучению.
Однако перед этим установим некоторые гиперпараметры с помощью:
BATCH_SIZE = 64
BUFFER_SIZE = 10000
dataset = dataset.shuffle(BUFFER_SIZE).batch(BATCH_SIZE, drop_remainder=True)
dataset

vocab_size = len(vocab)
embedding_dim = 256
rnn_units = 1024
rnn_units_2 = 512
Также в этом коде мы извлекаем данные в обучающие пакеты и выводим форму набора данных.
Далее можем создать модель с помощью:
model = tf.keras.Sequential([
  tf.keras.layers.Embedding(vocab_size, embedding_dim,
                            batch_input_shape=[BATCH_SIZE, None]), tf.keras.layers.GRU(rnn_units, return_sequences=True, stateful=True, recurrent_initializer="glorot_uniform"), tf.keras.layers.GRU(rnn_units_2, return_sequences=True, stateful=True, recurrent_initializer="glorot_uniform" ), tf.keras.layers.Dense(vocab_size) ]) model.summary()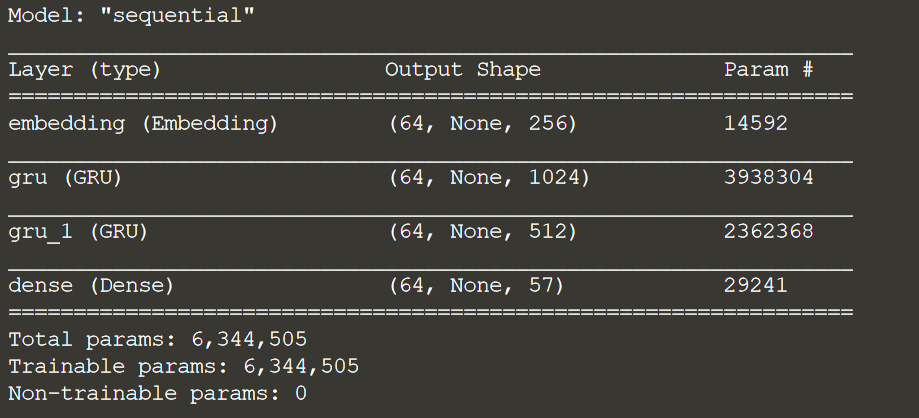
This model uses 2 levels of GRU type RNN or ventilated recurrent unit. GRU layers are simpler than LSTMs and require no state input.
For this example, let’s define a custom loss function and then compile the model like this:
def loss(labels, logits):
  return tf.keras.losses.sparse_categorical_crossentropy(labels, logits, from_logits=True)

model.compile(optimizer="adam", loss=loss)
We want to reuse the model to generate text later. Thus, we want to keep a copy of the model while it is being trained. You can save the model as checkpoints by creating a checkpoint callback function like this:
checkpoint_dir="./training_checkpoints"
checkpoint_prefix = os.path.join(checkpoint_dir, "ckpt_{epoch}")
checkpoint_callback=tf.keras.callbacks.ModelCheckpoint(
    filepath=checkpoint_prefix,
    save_weights_only=True)
RNNs are performance intensive and may take time to train on CPU servers. Therefore, several parameters have been defined below to determine the number of training periods:
epochs = 1
epochs = 5
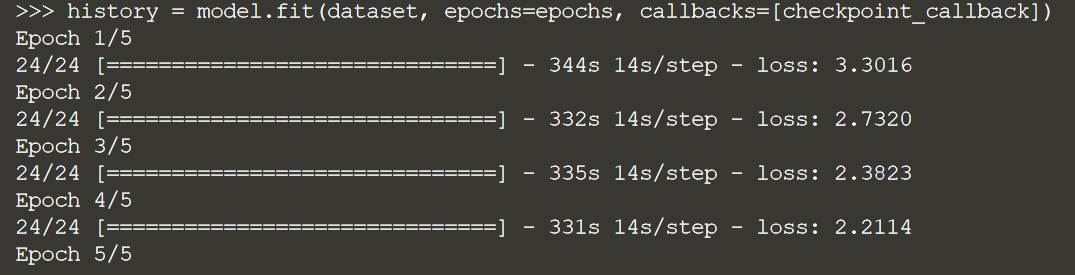
epochs = 10With the model built and a breakpoint set, we can move on to training the model with:
history = model.fit(dataset, epochs=epochs, callbacks=[checkpoint_callback])Note that RNN training is expensive and can take a long time. We are only training 5 epochs here for demonstration purposes. To get a well-tuned model, this example is best run with 50 epochs.
Having trained the text generation model, we can move on to creating a new interesting text.
First we need a custom function to query the model and generate text:
def generate_text(model, start_string, temp, gen_chars):
  input_eval = [char2idx[s] for s in start_string]
  input_eval = tf.expand_dims(input_eval, 0)
  text_generated = []
  model.reset_states()
  for i in range(gen_chars):
    predictions = model(input_eval)
    predictions = tf.squeeze(predictions, 0)
    predictions = predictions / temp
    predicted_id = tf.random.categorical(predictions, num_samples=1)[-1,0].numpy()
    input_eval = tf.expand_dims([predicted_id], 0)
    text_generated.append(idx2char[predicted_id])
  return (start_string + ''.join(text_generated))
This function takes as input the model, the initial string, the temperature, and the number of characters to generate. Temperature is used to determine the predictability of text. Lower temperature (0.25) creates smart text. While higher temperature (2.0) generates more unique text. Higher temperatures can result in meaningless text.
Now, let’s rebuild our model using only 1 input or batch. Once the model is built, we will load the previously trained weights and then build it with a 1 element input form as follows:
model = tf.keras.Sequential([
  tf.keras.layers.Embedding(vocab_size, embedding_dim,
                            batch_input_shape=[1, None]),
  tf.keras.layers.GRU(rnn_units,
                      return_sequences=True,
                      stateful=True,
                      recurrent_initializer="glorot_uniform"),
  tf.keras.layers.GRU(rnn_units_2,
                      return_sequences=True,
                      stateful=True,
                      recurrent_initializer="glorot_uniform"),
  tf.keras.layers.Dense(vocab_size)
])
model.summary()
model.load_weights(tf.train.latest_checkpoint(checkpoint_dir))
model.build(tf.TensorShape([1, None]))
With the model rebuilt, we can now generate some text:
generate_text(model, u"Alice said ", 1.0, 200)
generate_text(model, u"Alice said ", .25, 200)
generate_text(model, u"Alice said ", 2.0, 200)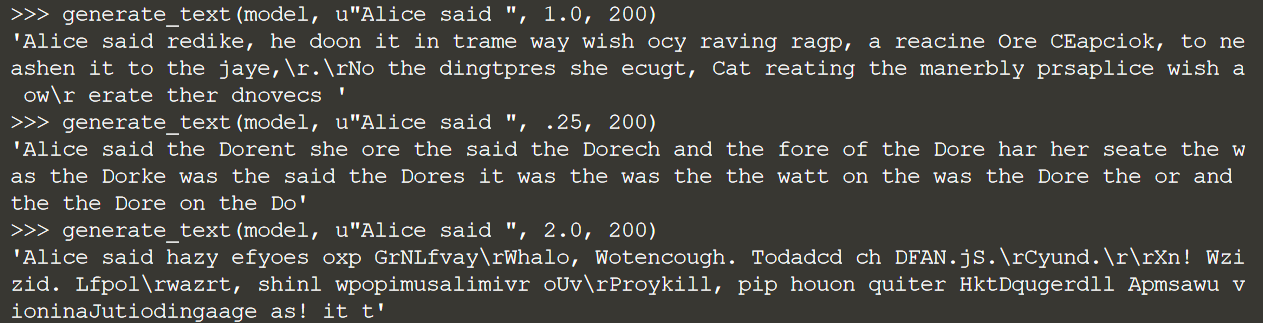
The output will be 3 lines of text generated with different temperatures. Notice the differences in text generation.
Text generation can be one of the most interesting yet challenging tasks in NLP. Most text generation these days is done by text converters like BERT or GPT. Using transformers is an advanced NLP modeling procedure that is better suited for all text tasks.
In conclusion, I would like to recommend you useful webinar dedicated to the Question-Answering task, a highly requested task in the field of NLP today. At the webinar, OTUS experts will talk about what types of question-answer systems exist today, what principles and methods they are based on, and how they are applied in chatbots.