NestJS + GraphQL + Lambda
The goal of this article is to create a GraphQL application built on the NestJS framework. And also load it into a Lambda function using Terraform. I hope this example will save many people a lot of time.
The application will work with a PostgreSQL relational database. For local use, let’s take docker-compose:
version: '3.1'

services:
  db:
    image: 'postgres:14.1'
    restart: unless-stopped
    volumes:
      - ./volumes/postgresql/data:/var/lib/postgresql/data
    environment:
      POSTGRES_PASSWORD: example
      POSTGRES_DB: nest
    ports:
      - 5432:5432
    networks:
      - postgres

networks:
  postgres:
    driver: bridge
Let’s create a new project (for this you need to install Nest CLI):
nest new appLet’s add a module and a user service:
nest generate module user
nest generate service user
Let’s add a user model, which will be both a base model and an object description for GraphQL:
@Entity()
@ObjectType()
export class User {
    @PrimaryGeneratedColumn()
    @Field(type => Int)
    id: number;

    @Column({nullable: false})
    @Field({nullable: false})
    name: string;

    @Column({nullable: true})
    @Field({nullable: true})
    dob: Date;

    @Column({nullable: true})
    @Field({nullable: true})
    address: string;

    @Column({nullable: true})
    @Field({nullable: true})
    description: string;

    @Column({nullable: true})
    @Field({nullable: true})
    imageUrl: string;

    @Column({nullable: true, default: new Date()})
    @Field({nullable: true})
    createdAt: Date;

    @Column({nullable: true, default: new Date()})
    @Field({nullable: true})
    updatedAt: Date;
}
Let’s describe the user’s service so that it can solve standard CRUD tasks, as well as search by username with pagination
@Injectable()
export class UserService {
    constructor(
        @Inject(USER_REPOSITORY)
        private userRepository: Repository<User>
    ) {
    }

    create(data: TUserCreate): Promise<User> {
        const user = this.userRepository.create(data)
        return this.userRepository.save(user)
    }

    findById(id: number): Promise<User> {
        return this.userRepository.findOne(id)
    }

    async findAll(searchText: string = '', take: number = 10, skip: number = 0): Promise<UserSearchResult> {

        const query = searchText ? {
            where: [
                {name: ILike('%'+searchText+'%')}
            ]
        } : {}

        const getQuery = {
            ...query,
            take,
            skip,
            order: {
                name: "ASC",
            }
        }
        const [total, list] = await Promise.all([this.userRepository.count(query), this.userRepository.find(getQuery as FindManyOptions)])
        return {
            total, list
        } as UserSearchResult
    }

    async updateById(id: number, data: TUserUpdate): Promise<User> {
        await this.userRepository.update({id}, data)
        return this.findById(id)
    }

    async deleteById(id: number): Promise<boolean> {
        return !!(await this.userRepository.delete({id}))
    }
}
And now let’s connect them using the resolver class:
@Resolver(of => User)
export class UsersResolver {
    constructor(
        private userService: UserService,
    ) {
    }

    @Mutation(returns => User)
    async createUser(
        @Args('name', {type: () => String}) name: string,
        @Args('address', {type: () => String}) address: string = '',
        @Args('description', {type: () => String}) description: string = '',
        @Args('imageUrl', {type: () => String}) imageUrl: string = '',
        @Args('dob', {type: () => String}) dob: string = null,
    ) {
        return this.userService.create({
            name,
            address,
            description,
            imageUrl,
            dob: dob ? new Date(dob) : null
        } as TUserCreate);
    }

    @Query(returns => User)
    async getUser(@Args('id', {type: () => Int}) id: number) {
        return this.userService.findById(id);
    }

    @Query(returns => UserSearchResult)
    async getAllUsers(
        @Args('searchText', {type: () => String}) searchText: string,
        @Args('take', {type: () => Int}) take: number=10,
        @Args('skip', {type: () => Int}) skip: number=0,
    ) {
        return this.userService.findAll(searchText, take, skip)
    }

    @Mutation(returns => User)
    async updateUser(
        @Args('id', {type: () => Int}) id: number,
        @Args('name', {type: () => String}) name: string,
        @Args('address', {type: () => String}) address: string = '',
        @Args('description', {type: () => String}) description: string = '',
        @Args('imageUrl', {type: () => String}) imageUrl: string = '',
        @Args('dob', {type: () => String}) dob: string = null,
    ) {
        return this.userService.updateById(id, {
            name,
            address,
            description,
            imageUrl,
            dob: dob ? new Date(dob) : null
        } as TUserUpdate);
    }

    @Mutation(returns => Boolean)
    async deleteUser(@Args('id', {type: () => Int}) id: number) {
        return this.userService.deleteById(id);
    }

}
Add GraphQL initialization to the user module. The parameters are standard and this is all very well described in the documentation for GraphQL for NestJS, but there is a very important point.
By default, the GraphQL Playground runs along the path /graphql… We will deploy our application to Lambda via ApiGateway, which should have a stage with some name, which prefixes any path, for example / api. Therefore, you need to move the path for the GraphQL Playground from /graphql v /api/graphql… For this we use the parameter useGlobalPrefix:true… And also when initializing express, add app.setGlobalPrefix('api');
@Module({
    imports: [
        DatabaseModule,
        GraphQLModule.forRootAsync({
            useFactory: () => {
                const schemaModuleOptions: Partial<GqlModuleOptions> = {};

                // If we are in development, we want to generate the schema.graphql
                if (process.env.NODE_ENV !== 'production' || process.env.IS_OFFLINE) {
                    schemaModuleOptions.autoSchemaFile="src/user/user.schema.gql";
                } else {
                    // For production, the file should be generated
                    schemaModuleOptions.typePaths = ['*.gql'];
                }

                return {
                    context: ({req}) => ({req}),
                    useGlobalPrefix:true, // <==
                    playground: true, // Allow playground in production
                    introspection: true, // Allow introspection in production
                    ...schemaModuleOptions,
                };
            }
        } as GqlModuleAsyncOptions),
    ],
    providers: [
        ...userProviders,
        UserService,
        UsersResolver
    ]
})
Let’s start the Playground locally:


To run in Lambda, you need to override the server creation express on the aws-serverless-express
Let’s create app.ts:
import {NestFactory} from '@nestjs/core';
import {ExpressAdapter} from '@nestjs/platform-express';
import {INestApplication} from '@nestjs/common';
import {AppModule} from './app.module';
import * as express from 'express';
import {Express} from 'express';
import {Server} from "http";
import {createServer} from 'aws-serverless-express';

export async function createApp(
    expressApp: Express,
): Promise<INestApplication> {
    const app = await NestFactory.create(
        AppModule,
        new ExpressAdapter(expressApp),
    );
    app.setGlobalPrefix('api');
    return app;
}

export async function bootstrap(): Promise<Server> {
    const expressApp = express();
    const app = await createApp(expressApp);
    await app.init();
    return createServer(expressApp);
}
And also a file with a handler lambda function:
import {Server} from 'http';
import {Context} from 'aws-lambda';
import {proxy, Response} from 'aws-serverless-express';
import {bootstrap} from './app';

let cachedServer: Server;

export async function handler(event: any, context: Context): Promise<Response> {
    if (!cachedServer) {
        cachedServer = await bootstrap();
    }
    return proxy(cachedServer, event, context, 'PROMISE').promise;
}
It remains to deploy it all in AWS. For this we will use Terraform… Create a terraform folder, and in it a file main.tf … Then I throw in the ready-made config with comments for each action:
# Зададим регион по умолчанию
provider "aws" {
  region = "us-east-1"
}

# Деплоить лямбду будем через zip архив. Поэтому необходимо положить наш код в архив
data "archive_file" "app_zip" {
  type        = "zip"
  source_dir  = "../app/dist"
  output_path = "./app.zip"
}

# Создадим API GW
resource "aws_apigatewayv2_api" "app" {
  name          = "api"
  protocol_type = "HTTP"
}

# И добавим в него stage.
resource "aws_apigatewayv2_stage" "app" {
  api_id = aws_apigatewayv2_api.app.id

  name        = "api"
  auto_deploy = true

  # добавим логирования API GW в CloudWatch
  access_log_settings {
    destination_arn = aws_cloudwatch_log_group.api_gw.arn

    format = jsonencode({
      requestId               = "$context.requestId"
      sourceIp                = "$context.identity.sourceIp"
      requestTime             = "$context.requestTime"
      protocol                = "$context.protocol"
      httpMethod              = "$context.httpMethod"
      resourcePath            = "$context.resourcePath"
      routeKey                = "$context.routeKey"
      status                  = "$context.status"
      responseLength          = "$context.responseLength"
      integrationErrorMessage = "$context.integrationErrorMessage"
    }
    )
  }
}

# Создадим интеграцию Lambda в API GW
resource "aws_apigatewayv2_integration" "app" {
  api_id = aws_apigatewayv2_api.app.id

  integration_uri    = aws_lambda_function.app.invoke_arn
  integration_type   = "AWS_PROXY"
  integration_method = "POST"
}
# Добавим Route - любой route должен вызывать нашу лямбду
resource "aws_apigatewayv2_route" "app" {
  api_id = aws_apigatewayv2_api.app.id

  route_key = "ANY /{proxy+}"
  target    = "integrations/${aws_apigatewayv2_integration.app.id}"
}
# Добавим лог группу в Cloud Watch для API GW
resource "aws_cloudwatch_log_group" "api_gw" {
  name = "/aws/api_gw/${aws_apigatewayv2_api.app.name}"
  retention_in_days = 30
}

# Добавим достум API GW вызывать лямбда функцию
resource "aws_lambda_permission" "api_gw" {
  statement_id  = "AllowExecutionFromAPIGateway"
  action        = "lambda:InvokeFunction"
  function_name = aws_lambda_function.app.function_name
  principal     = "apigateway.amazonaws.com"

  source_arn = "${aws_apigatewayv2_api.app.execution_arn}/*/*"
}
# Создадим Security Group для базы данных и настроем ее так, чтоб можно было достучаться до нее из вне
# Внимание это настройка только для демо. для продакшн так делать нельзя.
resource "aws_security_group" "allow_db" {
  name        = "allow_db"
  description = "Allow DB"

  ingress {
    from_port        = 5430
    to_port          = 5440
    protocol         = "tcp"
    cidr_blocks      = ["0.0.0.0/0"]
    ipv6_cidr_blocks = ["::/0"]
  }
  egress {
    from_port        = 0
    to_port          = 0
    protocol         = "-1"
    cidr_blocks      = ["0.0.0.0/0"]
    ipv6_cidr_blocks = ["::/0"]
  }
}
# Создадим рандомный пароль для базы
resource "random_password" "password" {
  length           = 20
  special          = false
  override_special = "_%@"
}
# Создадим инстанс базы
resource "aws_db_instance" "default" {
  allocated_storage      = 20
  db_subnet_group_name   = aws_db_subnet_group.db_subnet_group.name
  engine                 = "postgres"
  identifier             = "dev-db"
  engine_version         = "13"
  instance_class         = "db.t3.micro"
  name                   = "nest"
  username               = "postgres"
  password               = random_password.password.result
  skip_final_snapshot    = true
  publicly_accessible    = true
  vpc_security_group_ids = [aws_security_group.allow_db.id]

}

# Настроим подсеть 'a' для региона us-east-1
resource "aws_default_subnet" "db_subnet_a" {
  availability_zone = "us-east-1a"
  tags = {
    Name = "Default subnet for us-east-1a"
  }
}

# Настроим подсеть 'b' для региона us-east-1
resource "aws_default_subnet" "db_subnet_b" {
  availability_zone = "us-east-1b"

  tags = {
    Name = "Default subnet for us-east-1b"
  }
}

# Объеденим подсети в группу
resource "aws_db_subnet_group" "db_subnet_group" {
  name       = "db_subnet_group"
  subnet_ids = [aws_default_subnet.db_subnet_a.id, aws_default_subnet.db_subnet_b.id]
}

# Создать лямбда функцию, используя архив с кодом
resource "aws_lambda_function" "app" {
  filename         = data.archive_file.app_zip.output_path
  source_code_hash = data.archive_file.app_zip.output_base64sha256
  function_name    = "app"
  handler          = "serverless.handler"
  runtime          = "nodejs14.x"
  memory_size      = 1024
  role             = aws_iam_role.lambda_exec.arn
  timeout          = 30
  # зададим перенные окружения, указав доступ к базе
  environment {
    variables = {
      POSTGRES_HOST     = aws_db_instance.default.address
      POSTGRES_PORT     = aws_db_instance.default.port
      POSTGRES_USER     = aws_db_instance.default.username
      POSTGRES_PASSWORD = random_password.password.result
      POSTGRES_DATABASE = aws_db_instance.default.name
      NODE_ENV          = "production"
    }
  }
}

# Добавим лог группу в CloudWatch для лямбда-функции
resource "aws_cloudwatch_log_group" "app" {
  name = "/aws/lambda/${aws_lambda_function.app.function_name}"
  retention_in_days = 30
}

# Создать роль для лямбды
resource "aws_iam_role" "lambda_exec" {
  name = "serverless_lambda"

  assume_role_policy = jsonencode({
    Version   = "2012-10-17"
    Statement = [
      {
        Action    = "sts:AssumeRole"
        Effect    = "Allow"
        Sid       = ""
        Principal = {
          Service = "lambda.amazonaws.com"
        }
      }
    ]
  })
}

# Присоединим стандартный полиси к роли с доступ к VPC
resource "aws_iam_role_policy_attachment" "lambda_policy" {
  role       = aws_iam_role.lambda_exec.name
  policy_arn = "arn:aws:iam::aws:policy/service-role/AWSLambdaVPCAccessExecutionRole"
}
terraform apply
After that, the necessary resources will be created in your AWS account:
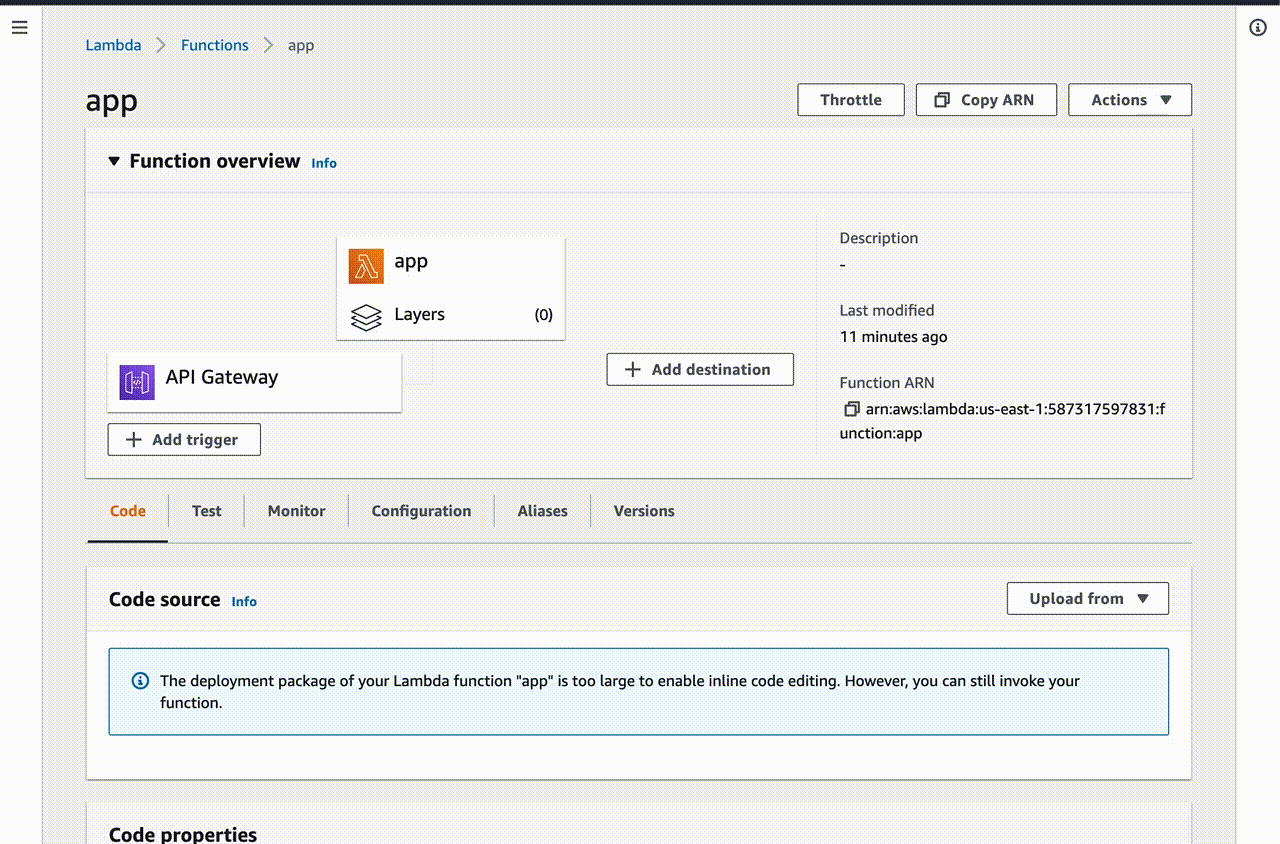
As you can see, Terraform is very convenient for creating and managing resources in the cloud. You can easily change and deploy everything in AWS account, and destroy all resources with one command terraform destroy…
Now let’s run the GraphQL Playground in the lambda:
As a result, we got a lambda function with GraphQL based on the NestJS framework and deployed using Terraform. Using this example, you can implement your projects on similar technologies. The full code can be viewed here