Meet tRPC
Hello world!
In this tutorial, we will develop a simple typesafe fullstack client/server application using tRPC, React And Express.
tRPC – allows you to develop completely type-safe APIs for client-server applications (mono-repository architecture is preferred). This is an intermediary between the server and the client, allowing them to use one router (router) to process HTTP requests. The use of a single router, in turn, makes it possible to automatically infer types (type inference) of incoming and outgoing data (input / output), which is especially important for the client and avoids duplication of types or the use of common (shared) types.
tRPC guide is in preparation – stay tuned 😉
For those who are only interested in the code, here is link to the corresponding repository.
Interesting? Then I ask under cat.
Preparing and setting up a project
The functionality of our application will be as follows:
- an array with user data is stored on the server;
- the server has endpoints for:
- getting all users;
- getting one user by ID;
- creating a new user;
- the client queries all users and renders a list of their names;
- on the client there is a form for requesting one user by ID;
- on the client there is a form for creating a new user.
As you can see, everything is very simple. Let’s implement it.
The mono-repository architecture assumes that the client and server code “live” in the same directory (repository).
Create a root directory:
mkdir trpc-fullstack-app
cd trpc-fullstack-app
Create a directory for the server:
mkdir server
cd servernote: to work with dependencies will be used Yarn.
Initialize the project Node.js:
yarn init -ypInstall the main dependencies:
yarn add express corsSince the client and server will have different origins (will run on different ports), “communication” between them will be blocked CORS. Plastic bag cors allows you to configure this policy.
Install development dependencies:
yarn add -D typescript @types/express @types/corsCreate a file tsconfig.json the following content:
{
  "compilerOptions": {
    "allowJs": false,
    "esModuleInterop": true,
    "forceConsistentCasingInFileNames": true,
    "module": "esnext",
    "moduleResolution": "node",
    // директория сборки
    "outDir": "./dist",
    // директория исходников
    "rootDir": "./src",
    "skipLibCheck": true,
    "strict": true,
    "target": "es2019"
  }
}
Editing the file package.json:
{
  // ...
  // основной файл сервера
  "main": "dist/index.js",
  // модули ES
  "type": "module",
  "scripts": {
    // компиляция TS в JS с наблюдением за изменениями файлов
    "ts:watch": "tsc -w",
    // запуск сервера с перезагрузкой после изменений
    "node:dev": "nodemon",
    // одновременное выполнение команд
    // мы установим concurrently на верхнем уровне
    "start": "concurrently \"yarn ts:watch\" \"yarn node:dev\"",
    // производственная сборка
    "build": "tsc --build && node dist/index.js"
  }
}
Create a directory src and continue to work with her.
Create a file index.ts the following content:
import express from 'express'
import cors from 'cors'

const app = express()

app.use(cors())

// адрес сервера: http://localhost:4000
app.listen(4000, () => {
  console.log('Server running on port 4000')
})
Determine the user type in the file users/types.ts:
export type User = {
  id: string
  name: string
}
Create an array of users in a file users/db.ts:
import type { User } from './types'

export const users: User[] = [
  {
    id: '0',
    name: 'John Doe',
  },
  {
    id: '1',
    name: 'Richard Roe',
  },
]
We return to the root directory and create a client template with Vite:
# client - название проекта/директории
# react-ts - используемый шаблон
yarn create vite client --template react-ts
Vite automatically configures everything you need, our participation in this process is not required 😊
note: the client will start at http://localhost:5173
Being in the root directory, we initialize the Node.js project and install concurrently:
yarn init -yp
yarn add concurrently
We define in package.json command to start server and client simultaneously:
{
  // ...
  "scripts": {
    "dev": "concurrently \"yarn --cwd ./server start\" \"yarn --cwd ./client dev\""
  }
}
This is all that is required to prepare and set up the project. Let’s move on to upgrading the server.
Server
We need 2 more packages:
yarn add @trpc/server zod- @trpc/server – a package for the development of endpoints and routers;
- zod — package for data validation.
Next, work with the directory src.
Create a file trpc.ts with code tRPC initialization:
import { initTRPC } from '@trpc/server'
import type { Context } from './context'

const t = initTRPC.context<Context>().create()

export const router = t.router
export const publicProcedure = t.procedure
We define tRPC context in file context.ts:
import { inferAsyncReturnType } from '@trpc/server'
import * as trpcExpress from '@trpc/server/adapters/express'

const createContext = ({
  req,
  res,
}: trpcExpress.CreateExpressContextOptions) => {
  return {}
}

export type Context = inferAsyncReturnType<typeof createContext>

export default createContext
We define root router/tRPC application router in file router.ts:
import { router } from './trpc.js'
import userRouter from './user/router.js'

const appRouter = router({
  user: userRouter,
})

export default appRouter
To connect tRPC to the server, use request handler or adapter. Editing the file index.ts:
// ...
import * as trpcExpress from '@trpc/server/adapters/express'
import appRouter from './router.js'
import createContext from './context.js'

// ...
app.use(cors())

app.use(
  // суффикс пути
  // получаем http://localhost:4000/trpc
  '/trpc',
  trpcExpress.createExpressMiddleware({
    router: appRouter,
    createContext,
  }),
)

// ...

// обратите внимание: экспортируется не сам роутер, а только его тип
export type AppRouter = typeof appRouter
Finally, we define the user endpoints in the file users/router.ts:
import { z } from 'zod'
import { router, publicProcedure } from '../trpc.js'
import { users } from './db.js'
import type { User } from './types'
import { TRPCError } from '@trpc/server'

const userRouter = router({
  // обработка запроса на получение всех пользователей
  // выполняем запрос (query)
  getUsers: publicProcedure.query(() => {
    // просто возвращаем массив
    return users
  }),
  // обработка запроса на получение одного пользователя по ID
  getUserById: publicProcedure
    // валидация тела запроса
    // ID должен быть строкой
    .input((val: unknown) => {
      if (typeof val === 'string') return val

      throw new TRPCError({
        code: 'BAD_REQUEST',
        message: `Invalid input: ${typeof val}`,
      })
    })
    .query((req) => {
      const { input } = req

      // ищем пользователя
      const user = users.find((u) => u.id === input)

      // если не нашли, выбрасываем исключение
      if (!user) {
        throw new TRPCError({
          code: 'NOT_FOUND',
          message: `User with ID ${input} not found`,
        })
      }

      // если нашли, возвращаем его
      return user
    }),
  // обработка создания нового пользователя
  createUser: publicProcedure
    // тело запроса должно представлять собой объект с полем `name`,
    // значением которого должна быть строка
    .input(z.object({ name: z.string() }))
    // выполняем мутацию
    .mutation((req) => {
      const { input } = req

      // создаем пользователя
      const user: User = {
        id: `${Date.now().toString(36).slice(2)}`,
        name: input.name,
      }

      // добавляем его в массив
      users.push(user)

      // и возвращаем
      return user
    }),
})

export default userRouter
Final directory structure server:
- node_modules
- src
  - user
    - db.ts
    - router.ts
    - types.ts
  - context.ts
  - index.ts
  - router.ts
  - trpc.ts
- package.json
- tsconfig.json
- yarn.lock
Our server is fully prepared to process client requests.
Client
Here we also need 2 more packages.
# client
yarn add @trpc/client @trpc/server
Perhaps we could set @trpc/server at the top level
Next, work with the directory src.
Create a file trpc.ts with tRPC initialization code:
import { createTRPCProxyClient, httpBatchLink } from '@trpc/client'
// здесь могут возникнуть проблемы при использовании синонимов путей (type aliases)
import { AppRouter } from '../../server/src/index'
export const trpc = createTRPCProxyClient<AppRouter>({
links: [
httpBatchLink({
url: 'http://localhost:4000/trpc',
}),
],
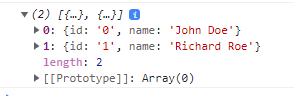
})To get started, let’s just list the user in the developer tools console in the browser. Editing the file App.tsx in the following way:
import { useEffect } from 'react'
import { trpc } from './trpc'

function App() {
  useEffect(() => {
    trpc.user.getUsers.query()
      .then(console.log)
      .catch(console.error)
  }, [])

  return (
    <div></div>
  )
}

export default App
We launch the application. This can be done in 2 ways:
- run command
yarn devfrom the root directory; - run command
yarn startfrom directoryserverand teamyarn devfrom directoryclient.
Result:
Many React developers (including me) like the library React Query, which makes it easy to retrieve, cache, and modify data. Fortunately, tRPC provides an abstraction over React Query. Install 2 more packages:
yarn add @tanstack/react-query @trpc/react-queryEditing the file trpc.ts:
import { createTRPCReact, httpBatchLink } from '@trpc/react-query'
import { AppRouter } from '../../server/src/index'

export const trpc = createTRPCReact<AppRouter>()

export const trpcClient = trpc.createClient({
  links: [
    httpBatchLink({
      url: 'http://localhost:4000/trpc',
    }),
  ],
})
Editing the file main.tsx:
// ...
import App from './App'
import { QueryClient, QueryClientProvider } from '@tanstack/react-query'
import { trpc, trpcClient } from './trpc'

const queryClient = new QueryClient()

ReactDOM.createRoot(document.getElementById('root') as HTMLElement).render(
  <React.StrictMode>
    <trpc.Provider client={trpcClient} queryClient={queryClient}>
      <QueryClientProvider client={queryClient}>
        <App />
      </QueryClientProvider>
    </trpc.Provider>
  </React.StrictMode>,
)
Get users and render their names in App.tsx:
function App {
  const {
    data: usersData,
    isLoading: isUsersLoading,
  } = trpc.user.getUsers.useQuery()

  if (isUsersLoading) return <div>Loading...</div>

  return (
    <div>
      <ul>
        {(usersData ?? []).map((user) => (
          <li key={user.id}>{user.name}</li>
        ))}
      </ul>
    </div>
  )
}
Result:

Add a form to get one user by ID:
function App() {
  // ...

  const [userId, setUserId] = useState('0')
  const {
    data: userData,
    isLoading: isUserLoading,
    error,
  } = trpc.user.getUserById.useQuery(userId, {
    retry: false,
    refetchOnWindowFocus: false,
  })

  if (isUsersLoading || isUserLoading) return <div>Loading...</div>

  const getUserById: React.FormEventHandler = (e) => {
    e.preventDefault()
    const input = (e.target as HTMLFormElement).elements[0] as HTMLInputElement
    const userId = input.value.replace(/\s+/g, '')
    if (userId) {
      // обновление состояния ID пользователя приводит к выполнению нового/повторного запроса
      setUserId(userId)
    }
  }

  return (
    <div>
      {/* ... */}
      <div>
        <form onSubmit={getUserById}>
          <label>
            Get user by ID <input type="text" defaultValue={userId} />
          </label>
          <button>Get</button>
        </form>
        {/* Если пользователь найден */}
        {userData && <div>{userData.name}</div>}
        {/* Если пользователь не найден */}
        {error && <div>{error.message}</div>}
      </div>
    </div>
  )
}
Result:


Finally, we add a form to create a new user:
function App() {
  const {
    data: usersData,
    isLoading: isUsersLoading,
    // метод для ручного повторного выполнения запроса
    refetch,
  } = trpc.user.getUsers.useQuery()

  // ...

  // Состояние для имени пользователя
  const [userName, setUserName] = useState('Some Body')
  // Мутация для создания пользователя
  const createUserMutation = trpc.user.createUser.useMutation({
    // После выполнения мутации необходимо повторно запросить список пользователей
    onSuccess: () => refetch(),
  })

  // ...

  // Обработка отправки формы для создания нового пользователя
  const createUser: React.FormEventHandler = (e) => {
    e.preventDefault()
    const name = userName.trim()
    if (name) {
      createUserMutation.mutate({ name })
      setUserName('')
    }
  }

  return (
    <div>
      {/* ... */}
      <form onSubmit={createUser}>
        <label>
          Create new user{' '}
          <input
            type="text"
            value={userName}
            onChange={(e) => setUserName(e.target.value)}
          />
        </label>
        <button>Create</button>
      </form>
    </div>
  )
}
Result:

This completes the development of our application.
I hope you learned something new and did not waste your time.
happy coding!