Making Windows Server Safer
Following these principles, you will greatly secure your Windows-based servers in both local and public environments.

1. We correctly enter the computer in AD
Do not use users with administrative privileges to enter computers in Active Directory. No one guarantees that Keylogger has not already appeared on the employee’s computer. Having a separate account. An attacker who stole credentials can only add more computers to AD.
1.1. Create a new user
To do this, go to ADUC (Active directory users and Computers). Click on an empty space in the Users and Computers folder and create a user. For simplicity, let’s call it JoinAdmin.
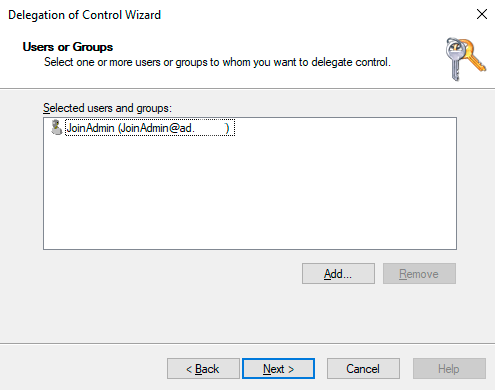
1.2. Delegate authority
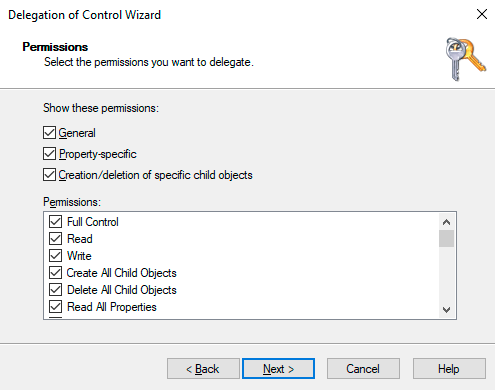
After the user has been created, he needs to be assigned permissions. To do this, right-click on the “Users” folder and select “Delegate Control”. Click “Next” and select our admin.
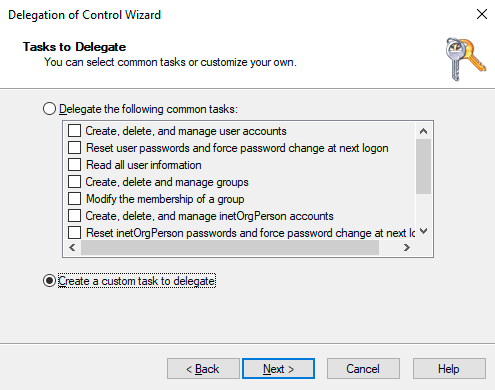
We want the user to perform only one function, so we choose the second option.
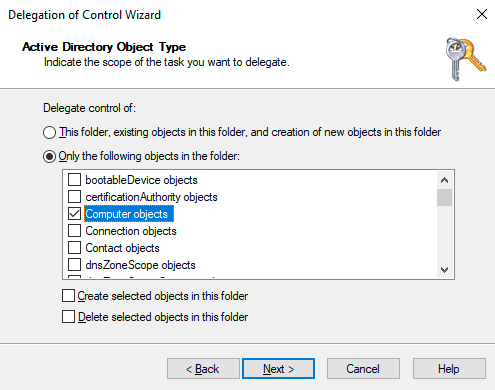
Next, select “Computer objects” and all its subitems.
Use this user and do not worry that someone could steal the password from the administrator.
2. Controlled folder access
Windows Server 2019 introduced a very underrated feature – controlled folder access. It prohibits access to the recording for programs that are not in the white list on the selected folders or sections.
Turning it on will help protect data from ransomware viruses even if your server has been infected. However, this does not protect your data from theft, it can be read.
You can enable the feature in the Windows Security Center or through Powershell:
Set-MpPreference -EnableNetworkProtection EnabledAdd allowed programs:
Allowed programs can be added through the Windows Security Center, and through Powershell you need to enter the full path to the executable files, separated by commas.
Set-MpPreference -ControlledFolderAccessAllowedApplications "C:FolderFile.exe"

Добавлять новые файлы в тот же самый список будет легче с помощью скрипта.

$ApplicationToAdd = "C:Fodlerfile.exe"

$ExistingApplicationList = (Get-MpPreference).ControlledFolderAccessAllowedApplications

$FullList = $ApplicationToAdd + $ExistingApplicationList

Set-MpPreference -ControlledFolderAccessAllowedApplications $FullList
Add protected folders:
Folders are added in exactly the same way as programs. For example, with this command we add the entire C: drive:
Set-MpPreference -ControlledFolderAccessProtectedFolders "C:"3. SYSWOW64 and SMB
All 32 bit programs run on 64 bit through the compatibility layer – SYSWOW64. Disabling this component makes incompatible all 32 bit software, including viruses.
By themselves, 32-bit applications are more vulnerable, 64-bit programs cannot be attacked by buffer overflows, and through them it is much more difficult to execute code that is not provided for by these programs. If only embedded components or only 64 bit programs work on the server, be sure to remove this component.
Do you remember Wannacry who walked through SMB1? The first version SMB is still a standard component of Windows Server and is installed by default in each edition. Be sure to remove this component if it is still installed on your server.
This command remove both SMB1 and SYSWOW64:
Remove-WindowsFeature WoW64-Support, FS-SMB14. Disable ping
By default, a Windows-based computer responds to ICMP only on the local network. Disabling ICMP slightly increases the security of your server. In part, this is due to the fact that on the kulhacker forums and other script kiddie there are manuals on how to look for goals that can be brute force.
In order to show that you will win if you disable ICMP, two servers were created. RDP was opened on both of them, however one of the servers did not respond to ICMP.
ICMP is disabled:
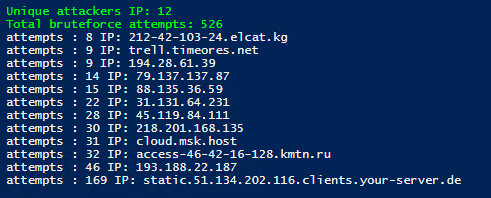
ICMP enabled:
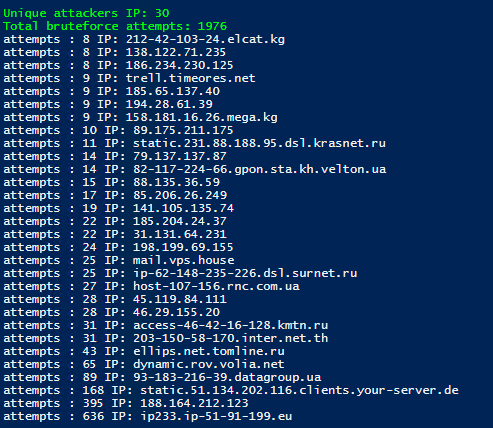
As can be seen from the screenshot, this did not stop everyone, but many. To collect data about how much they want to hack you, you can use this script:
function Get-Bruteforce {

    $Last = 4
    $Attempts = 10

    #Getting date -one hour (default)
    $DateTime = [DateTime]::Now.AddHours(-$Last)

    $BruteEvents = Get-EventLog -LogName 'Security' -InstanceId 4625 -After $DateTime -ErrorAction SilentlyContinue | Select-Object @{n='IpAddress';e={$_.ReplacementStrings[-2]} }
    $TopPunks = $BruteEvents | Group-Object -property IpAddress | Sort-Object Count

    #Get bruteforsers that tried to login greated or equal than 4 times (default)
    $GetPunks = $TopPunks | where {$_.Count -ge $attempts} | Select -property Name

    Write-host Unique attackers IP: $GetPunks.Length -ForegroundColor Green
    Write-Host Total bruteforce attempts: $BruteEvents.Length -ForegroundColor Green

    #Output-punks
    foreach ($i in $TopPunks | where {$_.Count -ge $attempts}) {

    $PunkRdns = (Resolve-DnsName $i.Name -ErrorVariable ProcessError -ErrorAction SilentlyContinue).NameHost

    if ($ShowRDNS) {
        if ($PunkRdns) {
            Write-Host "attempts": $i.count IP: $PunkRdns
        }
        else {
            Write-Host "attempts": $i.count IP: $i.name
        }
    }
    else {

        Write-Host "attempts": $i.count IP: $i.name

    }

    }

}
Get-Bruteforce
You can still monitor your server, for example, by checking the availability of a specific port:
Test-NetConnection 192.168.0.1 -Port 33895. Not all names are equally good
Using another script, pulling out the most popular usernames that were attacked.
If you are installing Remote Desktop Services, we strongly recommend that you avoid these names. In combination with a weak password, you can guarantee a quick hacking account.
For your convenience, the list of “bad” names has been rewritten into a table:
| Hacking attempts | Account name |
|---|---|
| 40 | IRINA |
| 41 | Home |
| 42 | SKLAD |
| 42 | sqlserver |
| 42 | Sys |
| 42 | KASSA2 |
| 43 | ADMIN1 |
| 43 | PC |
| 45 | A GUEST |
| 46 | Host |
| 46 | Audit |
| 49 | USER3 |
| 54 | TEST1 |
| 55 | BUH2 |
| 66 | USER |
| 66 | MANAGER |
| 75 | ADM |
| 77 | .NET.v.4.5 |
| 80 | BUH1 |
| 86 | BACKUP |
| 89 | Buh |
| 90 | ADMIN |
| 100 | 1 |
| 116 | SERVER |
| 122 | User2 |
| 128 | À نى È ي È ًٌٍ À ٍ Î ً |
| 147 | TEST |
| 219 | USER1 |
| 308 | USER |
| 330 | Admin |
| 9299 | ADMINISTRATOR |
| 13972 | ADMINISTRATOR |
You can get the same list on your server with this script:
function Get-Badname {

    $Last = 24
    $Attempts = 40


    $DateTime = [DateTime]::Now.AddHours(-$Last)

    $BruteEvents = Get-EventLog -LogName 'Security' -InstanceId 4625 -After $DateTime -ErrorAction SilentlyContinue | Select-Object @{n='IpAddress';e={$_.ReplacementStrings[5]} }
    $TopPunks = $BruteEvents | Group-Object -property IpAddress | Sort-Object Count


    $GetPunks = $TopPunks | where {$_.Count -ge $attempts} | Select -property Name

    Write-host Unique attackers IP: $GetPunks.Length -ForegroundColor Green
    Write-Host Total bruteforce attempts: $BruteEvents.Length -ForegroundColor Green

    #Output
    foreach ($i in $TopPunks | where {$_.Count -ge $attempts}) {

        Write-Host "Attempts": $i.count Username: $i.name

    }

}
Get-Badname
6. Obvious things
Well, we end the article with the obvious things:
- Create a gateway – To manage a large infrastructure, it is best to secure yourself with a single entry point. In more detail.
- Install updates. In particular, on battle servers.
- Disable services that you do not use – this is an extra area to attack.
- Use Server Core, it has the least attack area and the least number of reboots when installing updates
- Remote Desktop Server for multiple users is a bad idea. Adhere to the principle of one person or service – one server.
- Make backups and be sure to test them. A backup that has not been tested is not a backup.
We hope the first five points were useful and interesting for you.