Implementing machine learning on an iOS device using Core ML, Swift and Neural Engine

Introduction
Core ML is a machine learning library released by Apple at WWDC 2017.
It allows iOS developers to add real-time personalized experiences to their apps using advanced local machine learning models using the Neural Engine.
A11 Bionic Chip Review

A11 Bionic Chip Filling
Number of transistors: 4.3 billion
Number of cores: 6 ARM cores (64 bits) – 2 high frequency (2.4 GHz) – 4 low power
Number of GPUs: 3
Neural Engine – 600 base operations per second
On September 12, 2017, Apple unveiled the A11 Bionic chip with Neural Engine to the world. This neural network hardware can perform up to 600 basic operations per second (BOPS) and is used for FaceID. Animoji and other machine learning tasks. Developers can use the Neural Engine using the Core ML API.
Core ML optimizes on-device performance by using CPU, GPU, and Neural Engine resources, minimizing memory and power consumption.
Running the model locally on the user’s device eliminates the need for a network connection, which helps maintain the privacy of user data and improves the responsiveness of your application.
Core ML is the basis for frameworks and functionality of this domain. Core ML supports Vision for image analysis, Natural Language for word processing, Speech for sound-to-text, and Sound Analysis for identifying sounds in audio.

Core ML API
We can easily automate the task of building machine learning models, which includes training and testing the model using the Playground, and integrating the resulting model file into our iOS project.
Newbie tip: Allocate separate labels for classification tasks.

Core ML general block diagram
Okay. What are we going to create?
In this tutorial, I will show you how to build an image classifier model using Core ML, which can classify orange and Strawberry images, and add this model to our iOS application.
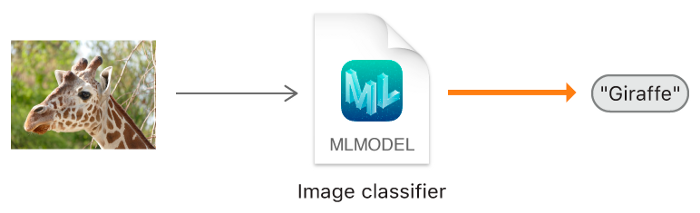
Image classifier model.
Newbie tip: Image classification refers to supervised learning problems in which we use labeled data (in our case, the label is the name of the image).

Required minimum:
- Knowledge of Swift language
- IOS Development Basics
- Understanding Object Oriented Programming Concepts
Application programs:
- X-code 10 or later
- iOS SDK 11.0+
- macOS 10.13+
Data collection

When collecting data for image classification, follow Apple’s guidelines.
- Use a minimum of 10 images per category – the more the better.
- Avoid grossly imbalanced datasets by preparing approximately equal numbers of images per category.
- Make your model more robust by enabling the Create ML UI’s Augmentation options: Crop, Rotate, Blur, Expose, Noise, and Flip.
- Don’t shy away from redundancy for your training kits: shoot many images from different angles, with different backgrounds and in different lighting conditions. Simulate real-life shooting conditions, including noise and motion blur.
- Take pictures of sample objects in your hands to simulate real users trying to classify objects in their hands.
- Exclude other objects from the field of view, especially those that you want to classify differently.
After you have collected your Data Set, divide it into Train and Test sets and place them in the appropriate folders.
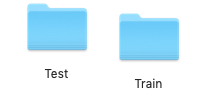
IMPORTANT NOTE: Make sure you put the images in the appropriate folders inside the test folder. Because the folder name serves as a label for our images.

In our case, we have two folders, each of which contains the corresponding images.
Model creation


Do not panic! Apple has made this much easier by automating the milestones.
With Core ML, you can use an already trained model to classify input data, or create your own. The Vision framework already works with Core ML to apply classification models to images and preprocess those images, and to make machine learning tasks simpler and more robust.
Just follow these steps.
STEP 1: Open your X-code.
STEP 2: Create a clean Swift Playground.
STEP 3: Remove the default generated code, add the following program and run playground…
   import CreateMLUI //Импортируем нужный модуль

   let builder = MLImageClassifierBuilder()
//Создаем инстанс MLImageClassifierBuilder

   builder.showInLiveView()
//Показывает интерфейс редактора Xcode Model builder
Description:
Here we open the interface of the default model builder provided by Xcode.
STEP 4: Drag the training sample folder to the training area.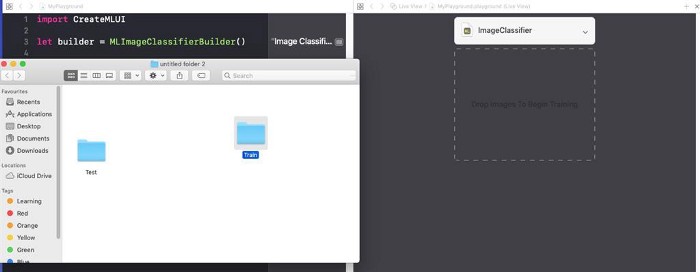
Place the training sample folder in the training area indicated by the dotted lines.
Newbie tip : We can also provide an arbitrary name for our model by clicking the down arrow in the training area.
Step 5: Xcode will automatically process the image and start the learning process. By default, it takes 10 iterations to train a model, depending on the characteristics of your Mac and the size of the dataset. You can watch the training progress in the Playground terminal window.

I’m waiting while the model is being trained.
STEP 6: After finishing training, you can test your model by dragging and dropping the Test folder into the testing area. Xcode will automatically test your model and display the result.
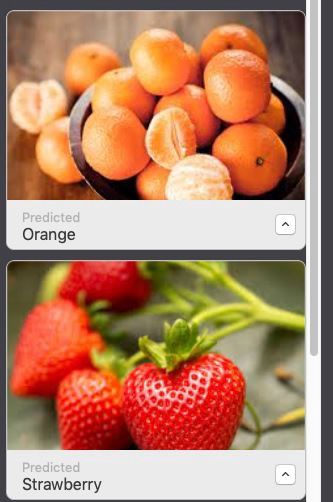
As you can see, our model has accurately classified the images.
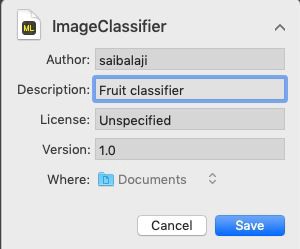
STEP 7: Save your model.

Integration into the iOS application:
STEP 1: Open your X-code.
STEP 2: Create a Single Page iOS app.
STEP 3: Open the project navigator.
STEP 4: Drag the trained model to the project navigator.
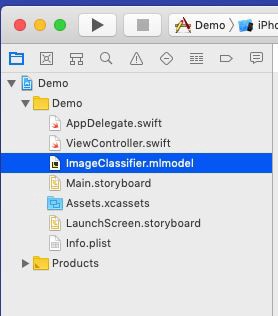
Place your model in the project navigator.
STEP 5: Discover Main.storyboard and create a simple interface like below, add IBOutlets and IBActions for the respective views.

Add UIImageView, UIButtons and UILabels.
STEP 6: Open the file ViewController.swift and add the following code as an extension.
  extension ViewController: UINavigationControllerDelegate, UIImagePickerControllerDelegate {


       func getimage() {

           let imagePicker = UIImagePickerController()
//Создайте объект UIImagePickerController()

           imagePicker.delegate = self //Установите контекст делегата

           imagePicker.sourceType = .photoLibrary  //Выбирете библиотеку фотографий пользователя в качестве источника

           imagePicker.allowsEditing = true  //Разрешите пользователю обрезать изображение

           present(imagePicker, animated: true)  //Всплывающее окно UIPickerView

       }

       func imagePickerController(_ picker: UIImagePickerController, didFinishPickingMediaWithInfo С: [UIImagePickerController.InfoKey: Any]) {

           let fimage = info[.editedImage] as!UIImage
//Получает выбранное пользователем изображение с ключом .editedImage из словаря info

           //Приведение типа изображения к UIImage

           fruitImageView.image = fimage
//Установите выбранное изображение в UIImageView

           dismiss(animated: true, completion: nil)  //Закрывает окно выбора изображений, когда пользователь выбрал изображение

       }

       func imagePickerControllerDidCancel(_ picker: UIImagePickerController) {

           dismiss(animated: true, completion: nil)
//Если пользователь не хочет выбирать изображение, закрывает представление средства выбора изображений

       }

   }
Description: Here we create an extension for our ViewController class and implement the UINavigationControllerDelegate and UIImagePickerControllerDelegate to display the UIImagePickerView when the user clicks the PickImage UIButton. Make sure you set the delegate context.

Steps related to accessing the Core ML model in an iOS application

STEP 1: Make sure you have imported the following libraries.
import CoreML
 import Vision
STEP 2: Create an instance of our Core ML model class.
let modelobj = ImageClassifier()STEP 3: To force Core ML to do the classification, we must first form a request of type VNCoreMLRequest (VN stands for Vision)
var myrequest: VNCoreMLRequest?
//Создает экземпляр VNCoreMLRequest

myrequest = VNCoreMLRequest(model: fruitmodel, completionHandler: { (request, error) in
//Инстанцируется посредством передачи объекта модели

               //Этот обработчик вызывается, когда запрос был выполнен Core ML

               self.handleResult(request: request, error: error)
//Вызов пользовательской функции

                                                     })
STEP 4: Make sure you crop the image so that it is compatible with the Core ML model.
myrequest!.imageCropAndScaleOption = .centerCrop
STEP 5: Place the above code in a custom function that returns a request object.
 func mlrequest() - > VNCoreMLRequest {
        var myrequest: VNCoreMLRequest ?
            let modelobj = ImageClassifier()
        do {
            let fruitmodel =
                try VNCoreMLModel(
                    for: modelobj.model)

           myrequest = VNCoreMLRequest(model: fruitmodel, completionHandler: {
                (request, error) in self.handleResult(request: request, error: error)

           })

       } catch {
           print("Unable to create a request")

       }

       myrequest!.imageCropAndScaleOption = .centerCrop
        return myrequest!
    }
STEP 6: We now need to convert our UIImage to CIImage (CI: CoreImage) so that it can be used as input to our Core ML model. This can be easily done by instantiating CIImage by passing UIImage in the constructor.
guard  let ciImage = CIImage(image: image)  else {
       return
    }
STEP 7: Now we can process our VNCoreMLRequestby creating a request handler and passing ciImage…
let handler = VNImageRequestHandler(ciImage: ciImage)STEP 8: The request can be fulfilled with a method call perform() and passing as a parameter VNCoreMLRequest…
DispatchQueue.global(qos: .userInitiated).async {
       let handler = VNImageRequestHandler(ciImage: ciImage)
       do {
           try handler.perform([self.mlrequest()])
       } catch {
           print("Failed to get the description")
       }
} Description: DispatchQueue is an object that manages the execution of tasks sequentially (or concurrently) on the main (or background) thread of your application.
STEP 10: Place the above code in a custom function as shown below.
func excecuteRequest(image: UIImage) {

            guard
            let ciImage = CIImage(image: image)
            else {
                return
            }
            DispatchQueue.global(qos: .userInitiated).async {
                let handler = VNImageRequestHandler(ciImage: ciImage)
                do {
                    try handler.perform([self.mlrequest()])
                } catch {
                    print("Failed to get the description")
                }
            }
STEP 11: Create a custom function named handleResult()which takes an object VNRequest and the error object as parameters. This function will be called upon completion VNCoreMLRequest…
func handleResult(request: VNRequest, error: Error ? ) {

       if let classificationresult = request.results as ? [VNClassificationObservation] {// Приведение типа запроса к массиву VNClassificationObservation

           DispatchQueue.main.async {
               self.fruitnamelbl.text = classificationresult.first!.identifier//Обновление UILabel идентификатором первого элемента в массиве путем доступа к тексту prperty
                print(classificationresult.first!.identifier)
            }
        }
        else {
            print("Unable to get the results")
        }
} Note:
DispatchQueue.main.asyncis used to update UIKit objects (in our case, UILabel) using the UI Thread or Main Thread, since all classification tasks are performed on the background thread.

Listing ViewController.Swift
import UIKit
    import CoreML
    import Vision
    class ViewController: UIViewController {
        var name: String = ""
        @IBOutlet weak
        var fruitnamelbl: UILabel!@IBOutlet weak
        var fruitImageView: UIImageView!override func viewDidLoad() {
            super.viewDidLoad()
            // Выполняйте любую дополнительную настройку после загрузки представления.
        }
        @IBAction func classifybtnclicked(_ sender: Any) {
            excecuteRequest(image: fruitImageView.image!)
        }
        @IBAction func piclimage(_ sender: Any) {
            getimage()
        }
        func mlrequest() - > VNCoreMLRequest {
            var myrequest: VNCoreMLRequest ?
                let modelobj = ImageClassifier()
           do {
                let fruitmodel =
                    try VNCoreMLModel(
                        for: modelobj.model)
                myrequest = VNCoreMLRequest(model: fruitmodel, completionHandler: {
                    (request, error) in self.handleResult(request: request, error: error)
                })
            } catch {
                print("Unable to create a request")
            }
            myrequest!.imageCropAndScaleOption = .centerCrop
            return myrequest!
        }
        func excecuteRequest(image: UIImage) {
            guard
            let ciImage = CIImage(image: image)
            else {
                return
            }
            DispatchQueue.global(qos: .userInitiated).async {
                let handler = VNImageRequestHandler(ciImage: ciImage)
                do {
                    try handler.perform([self.mlrequest()])
                } catch {
                    print("Failed to get the description")
                }
            }
        }
        func handleResult(request: VNRequest, error: Error ? ) {
            if let classificationresult = request.results as ? [VNClassificationObservation] {
                DispatchQueue.main.async {
                    self.fruitnamelbl.text = classificationresult.first!.identifier
                    print(classificationresult.first!.identifier)
                }
            }
            else {
                print("Unable to get the results")
            }
        }
    }
    extension ViewController: UINavigationControllerDelegate, UIImagePickerControllerDelegate {
        func getimage() {
            let imagePicker = UIImagePickerController()
            imagePicker.delegate = self
            imagePicker.sourceType = .photoLibrary
            imagePicker.allowsEditing = true
            present(imagePicker, animated: true)
        }
        func imagePickerController(_ picker: UIImagePickerController, didFinishPickingMediaWithInfo info: [UIImagePickerController.InfoKey: Any]) {
            let fimage = info[.editedImage] as!UIImage
            fruitImageView.image = fimage
            dismiss(animated: true, completion: nil)
        }
        func imagePickerControllerDidCancel(_ picker: UIImagePickerController) {
            dismiss(animated: true, completion: nil)
        }
    }
All is ready!

Now start your Simulator and test your application.
Note: Make sure you have a photo of oranges and strawberries in your Simulator’s photo library.

Click the Pick Image button

Select any image
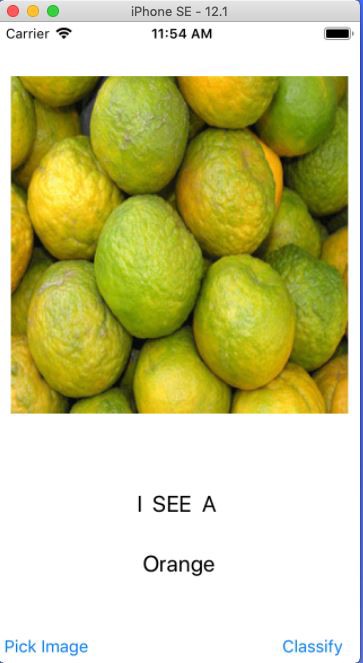
Click the Classify button
Choose another picture and click Classify
Hooray:
You’ve created your first iOS application using Core ML.
Yet:
- Neomorphism with SwiftUI. Part 1
- Neomorphism with SwiftUI. Part 2: What can be done with accessibility?
- Making a multi-threaded Kotlin Multiplatform application