Implementing a simple HTML5 server control panel with IPMI support
For remote access to physical servers, hosting clients use software tools that work only with an operating system and special software.
If the system is not installed or there are some problems with its configuration (for example, when trying to change firewall rules), access can be lost. In such situations, specialized controllers come to the rescue, allowing you to manage servers without an OS, as if you were sitting at a physical console. We tell you how it works in our HOSTKEY.
Problems of Traditional Solutions
The usual method of organizing remote access to rented servers is considered to be management based on IPMI* – launching the KVM Java plugin.
* IPMI – Intelligent Platform Management Interface (industry standard).
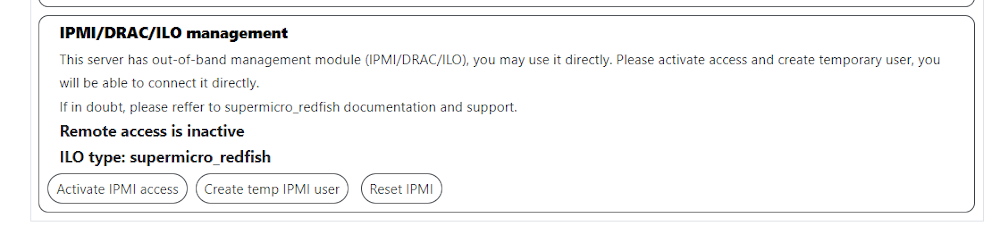
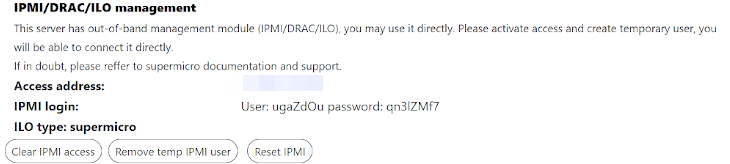
To access the console, our customers had to perform many actions: activate the connection, wait for the system to forward the gray address, create a temporary account, follow the link with the IP address, log in to the web interface and use the IPMI module integrated into the server.
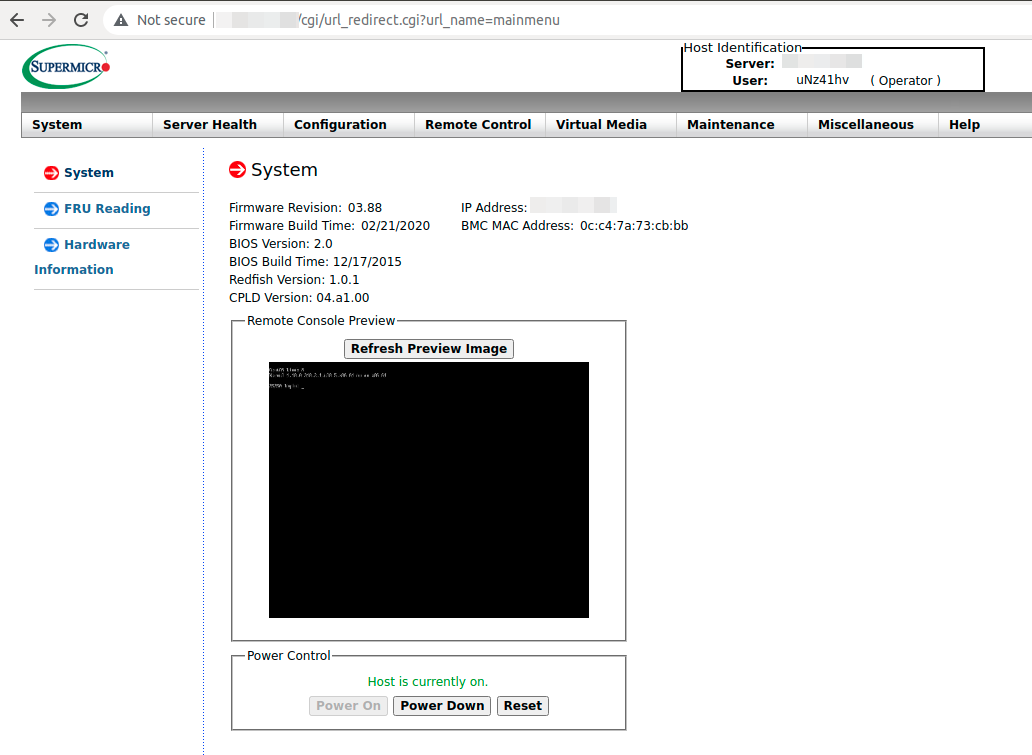
Java software was required to be installed on the client device, which often led to an increased load on the support service: not all users were able to launch the downloaded console, there were problems with software versions, running on Mac, etc.
These shortcomings stimulated us to develop a more convenient and easy-to-use mechanism for controlling equipment. The idea is quite obvious: so that the client does not have to install and configure software, everything needs to be done on the hoster’s side in a secure virtual environment.
We have created HOSTKEY INVAPI – a service panel that allows you to perform any actions to manage equipment: from ordering servers to reinstalling the OS. The panel is implemented as a single-page web application, and all its functions are also available through the API. User actions and API requests can be tracked in the browser through the developer console (called by Ctrl + Shift + I). This allows you to analyze all calls to debug the integration. We will tell you more about the concept of Invapi and the process of its creation in a separate article.
INVAPI internal device
To save users from unnecessary body movements, we implemented a direct call to the HTML5 web console from a personal account without a local Java installation. For the practical implementation of the idea, Docker was used, and the assembly was based on the solution NoJava-IPMI-KVM-Server and ipmi-kvm-docker. The panel supports Supermicro motherboards up to and including the 10X generation, as the eleventh generation is already equipped with the Supermicro iKVM/IPMI HTML5 viewer.
To access the console, the user just needs to press the button:

It is also possible to activate the console by requesting directly to the API:
curl -s "https://invapi.hostkey.com/eq.php" -X POST \
--data "action=novnc" \
--data "token=SESSION_TOKEN" \
--data "id=SERVER_ID" \
--data "pin=PIN_CODE"
Answer example:
{
"result":"OK",
"scope":"http://rcnl1.hostkey.com:32800/vnc.html?host=IP ХОСТА&port=32800&autoconnect=true&password=YVhMxxhiuTpe3mH6y3ry",
"context":{"action":"novnc","id":"25250","location":"NL"},
"debug":"debug",
"key":"71ccb18b1fa499458526acc15fb6a40b"
}
It remains to wait for the console to load – and you can work, although the internal structure of the process of gaining access looks more complicated. For example, consider calling the HTML5 console for a server with IPMI.
The general scheme for calling the HTML5 web console from the client’s personal account:
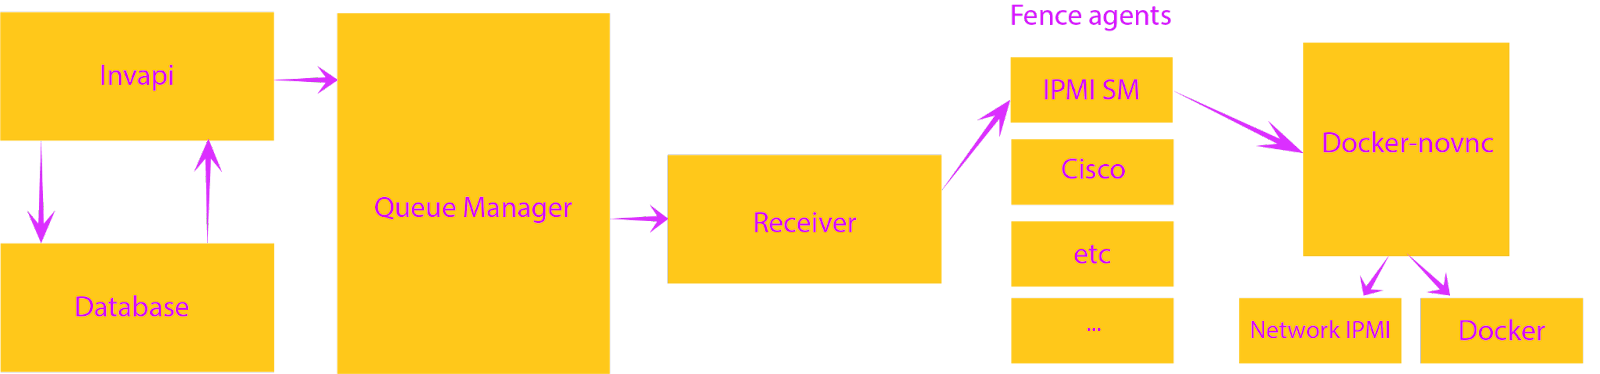
When requested through INVAPI, a command is given in the API to open a console for a specific server through a message broker cluster (RabbitMQ). To call the console, it is enough to send the server IP address and its location to the message broker (our servers are located in the Netherlands, the USA and Russia).
RabbitMQ passes the server data and the task to open the console to an auxiliary receiver service created by our specialists. The receiver takes the data, transforms all the necessary information, separates the tasks (for example, Cisco, IPMI, etc.) and sends them to agents.
Fence agents correspond to the types of hardware used in our infrastructure. They access a server running Docker-novnc that has access to the private IPMI network. The agent sends a GET request to the server with Docker-novnc, which contains the IP address and server ID, the session token, and a link to close the session.
Request structure:
http://rcnl1.hostkey.com:ПОРТ/api/v1/server/IP_СЕРВЕРА/skey/КЛЮЧ_ЗАПРОСА/ID_СЕРВЕРА/closeurl/ССЫЛКА_НА_ЗАКРЫТИЕContainer content:
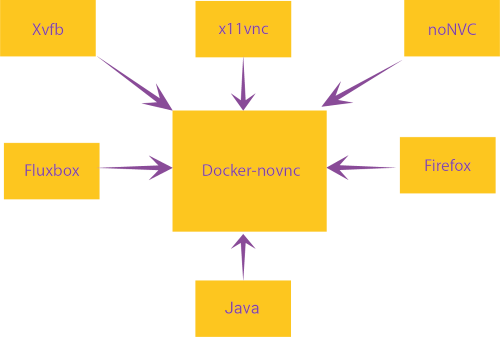
Xvfb – X11 in the virtual framebuffer;
x11vnc – VNC server that cleans up the specified X11 server;
noNVC – HTML5 VNC viewer
Fluxbox – window manager;
Firefox is a browser for viewing IPMI consoles;
Java plugin – Java is required to access most IPMI KVM consoles.
NoJava-IPMI-KVM-Server is a Python-based server that allows you to provide sciapp/nojava-ipmi-kvm centrally through a browser. The solution does not require Java or nojava-ipmi-kvm to be installed on local devices.
We have added a link to automatically log out of the session for the convenience of the user and to ensure the safety of the equipment: if there is no activity for a certain time, the console will be closed automatically. This call starts a service that runs a Docker-novnc container containing the external IP address to open the console. A complete description of the assembly and installation process of the NoJava-IPMI-KVM container can be found on GitHub.
Configuration file example (~/.nojava-ipmi-kvmrc.yaml):
templates:
  kvm-openjdk-7u51:
    skip_login: False
    login_user: ADMIN
    login_endpoint: rpc/WEBSES/create.asp
    allow_insecure_ssl: False
    user_login_attribute_name: WEBVAR_USERNAME
    password_login_attribute_name: WEBVAR_PASSWORD
    send_post_data_as_json: False
    session_cookie_key: SessionCookie
    download_endpoint: Java/jviewer.jnlp
    java_version: 7u51
    format_jnlp: False
Running a Docker container:
usr/bin/nojava-ipmi-kvm -i 10.77.21.239 -u ADMIN -p PASSWD mykvmhost
[INFO] Check if 'http://10.77.21.239/' is reachable...
[INFO] The url 'http://10.77.21.239/' is reachable.
[INFO] Starting the Docker container...
[INFO] Waiting for the Docker container to be up and ready...
[INFO] Docker container is up and running.
[INFO] Url to view kvm console: http://IP_SERV:ID_SERV/vnc.html?host=IP_SERV&port=32769&autoconnect=true&password=PASSWD
http://IP_SERV:ID_SERV/vnc.html?host=IP_SERV&port=ID_SERV&autoconnect=true&password=PASSWD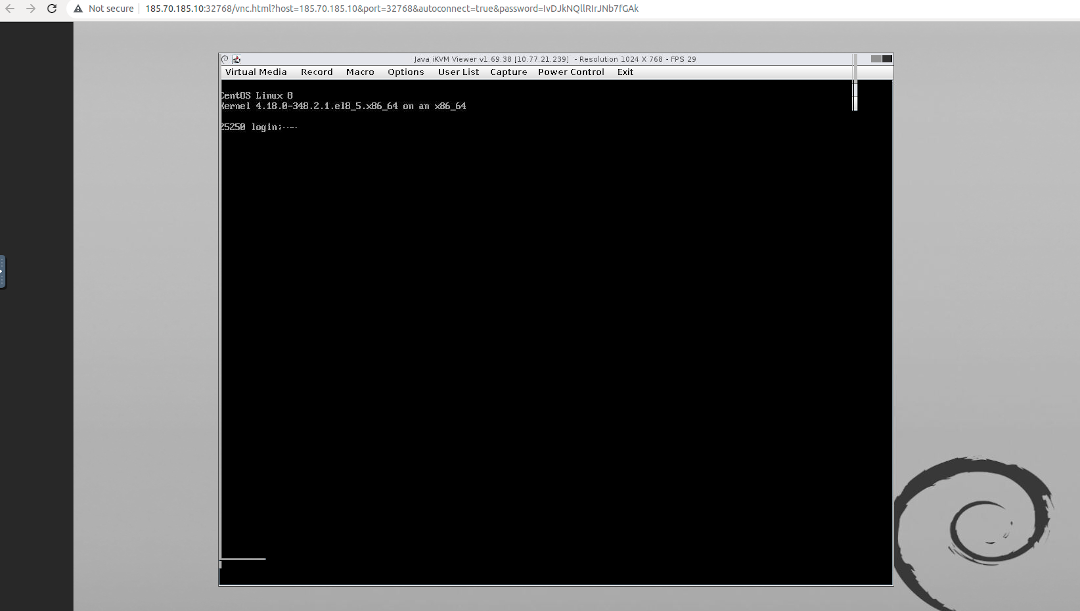
Script to start the service:
#/bin/python3
# EASY-Install-Entry_Script: 'nojava-ipmi-kvm==0.9.0', 'console_scripts', 'nojava-ipmi-kvm'
__requires__ = 'nojava-ipmi-kvm==0.9.0'
import re
import sys
from pkg_resources import load_entry_point

if __name__ == ' __main__ ':
    sys.argv[0] = re.sub(r'(-script\.pyw?|\.exe)?$', '', sys.argv[0])
    sys.exit(
        load_entry_point('nojava-ipmi-kvm==0.9.0', 'console_scripts', 'nojava-ipmi-kvm')()
    )
Results
The implementation of the new solution has greatly simplified the process of managing Supermicro equipment for end users, as well as reducing the burden on our support team. For servers with VNC access, we implemented an HTML5 console using Apache Guacamole, which also made it easier to manage third-party hardware.
___________________________
By the way, in our server control panel HOSTKEY in addition to the described options expansion of functionality is planned. If you are interested in additional functions and features of the panel or our API, write in the comments.