How to remove extraneous noise from photo documents using PyTorch
When automating work with documentation, sometimes you have to deal with scans of poor quality. Especially depressing is the situation in which a photo from the phone is provided instead of a scanned document.
In the field of document processing, there are a number of tasks that are solved using machine learning. A sample list can be found in this article. In this guide, I offer a solution to the problem of various noises on a photo of a document that can occur when the quality of the shooting is poor or the quality of the document itself is poor.
To combat noise in the photo, I will use an autoencoder based on a convolutional network.
I will work in the Google Colab cloud service.
First, I download a dataset with photographs of documents in English using the kaggle.com API, which is a popular platform for Data Science competitions. In order to use the site API, you need to get the file kaggle.json from your personal account, following instructions.
!pip install -q kaggle
from google.colab import files

files.upload()
!mkdir ~/.kaggle
!cp kaggle.json ~/.kaggle/
!chmod 600 ~/.kaggle/kaggle.json

!kaggle datasets download -d uurdeep/cleaning-dirty-documents-unzipped
Unzip the downloaded archive with data. Two folders should appear. One contains noisy images (train), into another clean image (train_cleaned).
!unzip -q cleaning-dirty-documents-unzipped.zipI import the necessary libraries. To create and train the model, I will use the PyTorch library.
import os
import cv2
import torch
import numpy as np
import torchvision
import torch.nn as nn
import torch.optim as optim
import torch.nn.functional as F


from google.colab.patches import cv2_imshow
from tqdm import tqdm
from torchsummary import summary
from torch.utils.data import Dataset, DataLoader
from torchvision.transforms import transforms
from torchvision.utils import save_image
from sklearn.model_selection import train_test_split
Let’s see what the data is:
import matplotlib.pyplot as plt
import matplotlib.image as mpimg

img = os.listdir('/content/train')[0]
fig, ax = plt.subplots(1,2, figsize=(20, 10))
img_noisy = mpimg.imread(f'/content/train/{img}')
img_clean = mpimg.imread(f'/content/train_cleaned/{img}')

ax[0].imshow(img_noisy, cmap='gray')
ax[0].axis('off')
ax[0].set_title('Noisy', fontsize = 20)

ax[1].imshow(img_clean, cmap='gray')
ax[1].axis('off')
ax[1].set_title('Clean', fontsize = 20);
I will form a sample to train the model and to check its quality:
train_imgs, test_imgs = train_test_split(os.listdir('/content/train'), test_size=0.33, random_state=123)Select the device on which the model will be trained:
device="cuda:0" if torch.cuda.is_available() else 'cpu'
print(device)
For the convenience of working with data, I will create an auxiliary class based on torch.utils.data.Dataset. I will override methods __len__ and __getitem__ for our data.
This class will take as input the path to the folder with noisy images, the list with images itself and, if necessary, the path to clean files and the class object torchvision.transforms.transformsA containing a list of transforms over images. When accessed by index, this class will return a tuple from a noisy image in the format torch.Tensor and its name in the directory. If a clean image directory is specified, another image without noise will be returned.
class NoisyCleanDataset(Dataset):
    def __init__(self, noisy_path, images, clean_path=None, transforms=None):
        self.noisy_path = noisy_path
        self.clean_path = clean_path
        self.images = images
        self.transforms = transforms

    def __len__(self):
        return (len(self.images))

    def __getitem__(self, i):
        noisy_image = cv2.imread(f"{self.noisy_path}/{self.images[i]}")
        noisy_image = cv2.cvtColor(noisy_image, cv2.COLOR_BGR2GRAY)

        if self.transforms:
            noisy_image = self.transforms(noisy_image)

        if self.clean_path is not None:
            clean_image = cv2.imread(f"{self.clean_path}/{self.images[i]}")
            clean_image = cv2.cvtColor(clean_image, cv2.COLOR_BGR2GRAY)
            clean_image = self.transforms(clean_image)
            return (noisy_image, clean_image, self.images[i])
        else:
            return (noisy_image, self.images[i])
I will define transformations for the image in a variable transform. The transformation will resize the image to 400 by 400 pixels and return it as torch.Tensor.
transform = transforms.Compose([
    transforms.ToPILImage(),
    transforms.Resize((400, 400)),
    transforms.ToTensor(),
])
I will create a model. It will consist of two blocks. The first block (encoder) reduces the dimension of the image, extracting the necessary features from it. The second block (decoder) tries to restore the images using the extracted features.
class Autoencoder(nn.Module):
    def __init__(self):
        super(Autoencoder, self).__init__()

        self.encoder = nn.Sequential(
            nn.Conv2d(1, 128, kernel_size=5, padding=2),
            nn.ReLU(),
            nn.MaxPool2d(kernel_size=2),
            nn.Conv2d(128, 128, kernel_size=3, padding=1),
            nn.ReLU()
        )

        self.decoder = nn.Sequential(
            nn.Conv2d(128, 1, kernel_size=3, padding=1),
            nn.Sigmoid()
        )

    def forward(self, x):
        encoded = self.encoder(x)
        decoded = nn.functional.interpolate(encoded, scale_factor=2)
        decoded = self.decoder(decoded)
        return decoded
I will create a class in which we implement training and model prediction. I will also add the ability to display information about the model, save and load model weights.
class MyModel():
    def __init__(self, Dataset, Model, transforms):
        self.Dataset = Dataset
        self.model = Model().to(device)
        self.transform = transforms

    def load_weights(self, path):
        if device == 'cpu':
            self.model.load_state_dict(torch.load(path, map_location=torch.device('cpu')))
        else:
            self.model.load_state_dict(torch.load(path))

    def save_weights(self, path):
        torch.save(self.model.state_dict(), path)

    def show_info(self):
        print(summary(self.model, (1, 400, 400)))

    def fit(self, n_epochs, noisy_path, clean_path, train_imgs, test_imgs):

        train_data = self.Dataset(noisy_path, train_imgs, clean_path, self.transform)
        val_data = self.Dataset(noisy_path, test_imgs, clean_path, self.transform)

        trainloader = DataLoader(train_data, batch_size=4, shuffle=True)
        valloader = DataLoader(val_data, batch_size=4, shuffle=False)
        criterion = nn.MSELoss()
        optimizer = optim.Adam(self.model.parameters(), lr=0.001)
        scheduler = torch.optim.lr_scheduler.ReduceLROnPlateau(
                optimizer,
                mode="min",
                patience=5,
                factor=0.5,
                verbose=True
            )

        self.model.train()
        self.train_loss = []
        self.val_loss = []
        running_loss = 0.0

        for epoch in range(n_epochs):
            self.model.train()
            for i, data in enumerate(trainloader):
                noisy_img = data[0]
                clean_img = data[1]
                noisy_img = noisy_img.to(device)
                clean_img = clean_img.to(device)
                optimizer.zero_grad()
                outputs = self.model(noisy_img)
                loss = criterion(outputs, clean_img)
                loss.backward()
                optimizer.step()
                running_loss += loss.item()
                if i % 10 == 0:
                    print(f'Epoch {epoch+1} batch {i}: Loss {loss.item()/4}')
            self.train_loss.append(running_loss/len(trainloader.dataset))
            print('Validation ...')
            self.model.eval()
            running_loss = 0.0
            with torch.no_grad():
                for i, data in tqdm(enumerate(valloader), total=int(len(val_data)/valloader.batch_size)):
                    noisy_img = data[0]
                    clean_img = data[1]
                    noisy_img = noisy_img.to(device)
                    clean_img = clean_img.to(device)
                    outputs = self.model(noisy_img)
                    loss = criterion(outputs, clean_img)
                    running_loss += loss.item()
                current_val_loss = running_loss/len(valloader.dataset)
                self.val_loss.append(current_val_loss)
                print(f"Val Loss: {current_val_loss:.5f}")

    def predict(self, img):
        os.makedirs('outputs', exist_ok=True)
        self.model.eval()
        if type(img) == str:
            if os.path.isfile(img):
                filename = os.path.basename(img)
                img = cv2.imread(img)
                img  = cv2.cvtColor(img, cv2.COLOR_BGR2GRAY)
                img = self.transform(img).to(device)
                img = self.model(img)
                img = img.detach().cpu().permute(1,2,0).numpy()
                cv2.imwrite(f'outputs/{filename}', img*255)
            else:
                images = os.listdir(img)
                predictDataset = self.Dataset(img, images, transforms=self.transform)
                predictDataloader = DataLoader(predictDataset, batch_size=4, shuffle=False)
                with torch.no_grad():
                    for i, data in tqdm(enumerate(predictDataloader), total=int(len(predictDataset)/predictDataloader.batch_size)):
                        noisy_img = data[0]
                        noisy_img = noisy_img.to(device)
                        outputs = self.model(noisy_img)
                        for im, image_name in zip(outputs, data[1]):
                            im = im.detach().cpu().permute(1,2,0).numpy()
                            cv2.imwrite(f'outputs/{image_name}', im*255)
        if type(img) == np.ndarray:
            if img.shape[2] == 3:
                img  = cv2.cvtColor(img, cv2.COLOR_BGR2GRAY)
            img = self.transform(img).to(device)
            img = self.model(img)
            img = img.detach().cpu().permute(1,2,0).numpy()
            cv2.imwrite('outputs/cleaned_img.jpg', img*255)
When creating a class, you will need to specify a link to an auxiliary class for working with data, a link to the model, and to a variable containing a list of transformations.
The main method is fit, which is responsible for training the model. It takes as input the number of epochs for training, links to folders with noisy and clean images, as well as a list of images for training or validation. Further, based on our auxiliary class for working with data, two variables are created, which are fed into another auxiliary class torch.utils.data.DataLoaderwhich is responsible for distributed data processing.
As a loss function, I take the root mean square error. And as an optimizer, the algorithm Adam. I will also set the gradient step controller from torch.optim.lr_scheduler. This controller will decrease the gradient step if the loss function exponent stops decreasing.
After each 10th iteration, a message will be displayed with information about the epoch, batch number, and the value of the loss function. Validation will be performed after each epoch. The function values will be written to variables, so that later you can see the learning process on the graph.
Method predict allows you to use the finished model for testing on images. This method can accept either a link to an image directory, or a link to a single image, or an image in array format. Images processed by the model will be saved to the folder outputs.
I initialize my class:
AutoEncoder = MyModel(NoisyCleanDataset, Autoencoder, transform)Let’s look at the structure of the model:
AutoEncoder.show_info()
----------------------------------------------------------------
        Layer (type)               Output Shape         Param #
================================================================
            Conv2d-1        [-1, 128, 400, 400]           3,328
              ReLU-2        [-1, 128, 400, 400]               0
         MaxPool2d-3        [-1, 128, 200, 200]               0
            Conv2d-4        [-1, 128, 200, 200]         147,584
              ReLU-5        [-1, 128, 200, 200]               0
            Conv2d-6          [-1, 1, 400, 400]           1,153
           Sigmoid-7          [-1, 1, 400, 400]               0
================================================================
Total params: 152,065
Trainable params: 152,065
Non-trainable params: 0
----------------------------------------------------------------
Input size (MB): 0.61
Forward/backward pass size (MB): 432.13
Params size (MB): 0.58
Estimated Total Size (MB): 433.32
I will start training the model on 40 epochs:
AutoEncoder.fit(40,
        '/content/train',
        '/content/train_cleaned',
        train_imgs,
        test_imgs)
Save the weights of the trained model:
AutoEncoder.save_weights('model1.pth')
#AutoEncoder.load_weights('model1.pth')
I visualize the learning process:
f, ax = plt.subplots(figsize=(10, 10))
ax.plot(AutoEncoder.train_loss, color="red", label="train")
ax.plot(AutoEncoder.val_loss, color="green", label="val")
ax.set_xlabel('Epoch')
ax.set_ylabel('Loss')
ax.legend();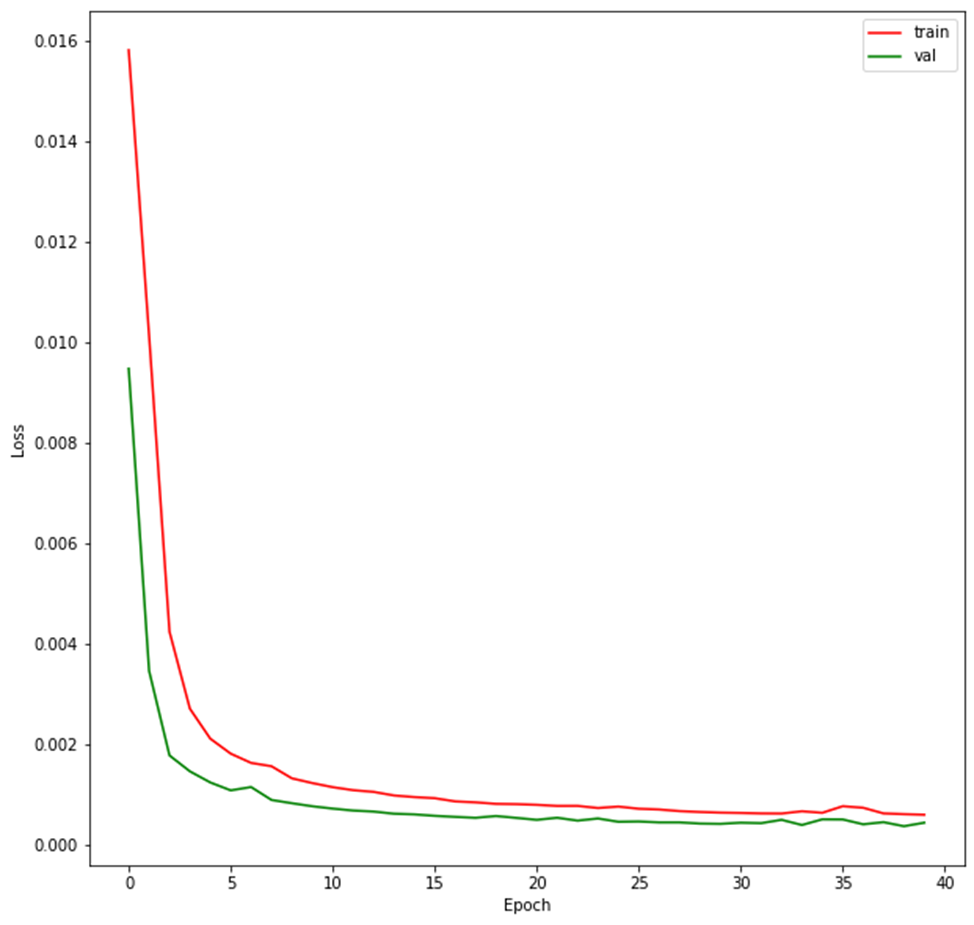
On the graph, the red line shows the process of changing the loss function during training. Green color indicates the value of the loss function on the delayed data for validation. As you can see, both indicators decrease synchronously, which indicates a successful learning process.
Apply the model to the images in the test folder:
AutoEncoder.predict('/content/train')I will write a small function that will render the original image, noisy and restored by the model:
import matplotlib.pyplot as plt
import matplotlib.image as mpimg

def show_pair_img(img):
    fig, ax = plt.subplots(1,3, figsize=(21, 7))
    img_noisy = cv2.resize(mpimg.imread(f'/content/train/{img}'), (400, 400))
    img_clean = cv2.resize(mpimg.imread(f'/content/train_cleaned/{img}'), (400, 400))
    img_cleaned = mpimg.imread(f'/content/outputs/{img}')

    ax[0].imshow(img_clean, cmap='gray')
    ax[0].axis('off')
    ax[0].set_title('Clean', fontsize = 20)

    ax[1].imshow(img_noisy, cmap='gray')
    ax[1].axis('off')
    ax[1].set_title('Noisy', fontsize = 20);

    ax[2].imshow(img_cleaned, cmap='gray')
    ax[2].axis('off')
    ax[2].set_title('Cleaned', fontsize = 20);
for i in range(3):
show_pair_img(test_imgs[i])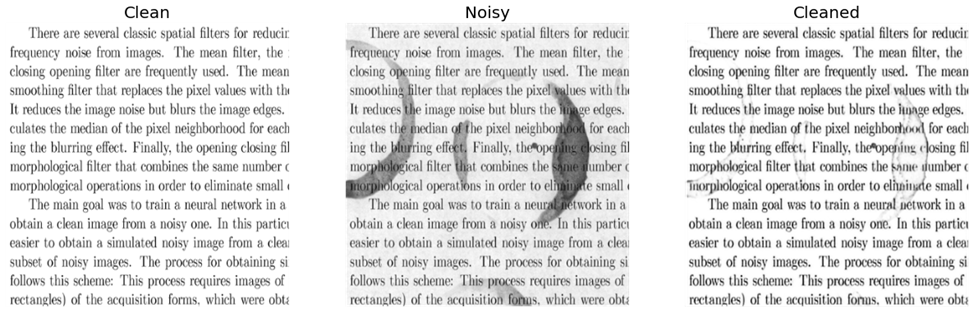
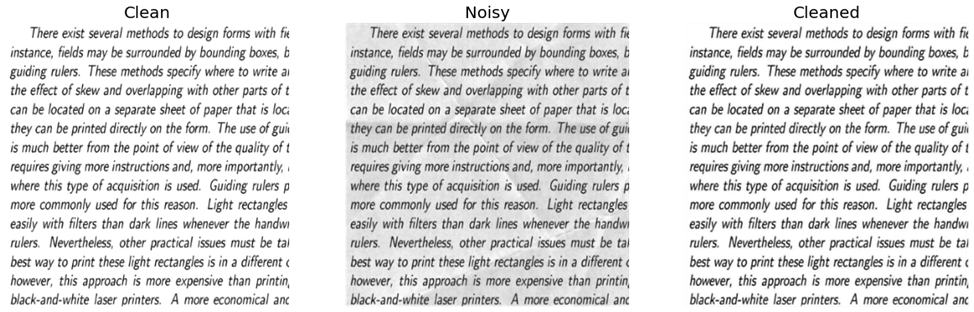
On the left is the original image, in the center is the same image, but with background noise. On the right is the image that was restored from the noisy one. The restored image looks much better than its noisy copy.
Thus, we managed to partially remove background noise from the image using a convolutional neural network. There are other architectures that can accept images as input and return images as output. For example, generative-adversarial models (GAN).
The limitations of our model include the fact that it was trained on artificially noisy data with a certain background pattern. The text was in English. Because of this, we can assume a deterioration in the quality of the model for images with text in other languages. Also, in reality, the symbols may have a different shape. For example, letters on a crumpled sheet will look at an angle in the photo than in our dataset, where all the letters have the correct shape. Removing these restrictions is a more complex task, requiring a more complex architecture. In addition, it is necessary to collect a representative set of real data, which should contain a good quality image and a bad copy of it.
The full code can be found link.