How to make your Python code fast and asynchronous with Sanic
On the eve of the start of the course “Python Developer. Professional“prepared a traditional translation of a useful article.
Hello everyone, in this article I will talk about creating simple asynchronous projects using the Sanic framework.
Introduction
Sanic Is a very similar to Flask open source web server and a Python web framework with more than 10K starswhich is developing rapidly. It allows the syntax async/awaitwhich was added to Python 3.5helping make your code non-blocking and fast.
Sanic has a very good documentationwritten by community members for the community itself.
The goal of the project is to provide an easy way to run a high-performance HTTP server that is easy to build, extend, and eventually scale up.
Requirements
Before we get started, let’s install a few packages and make sure we have everything we need to create the project.
Note: The source code is on my github… Each step is reflected in a separate commit.
Presets
Python3.6 +
pipenv (or any other package installer)
PostgreSQL (for databases, you can also take MySQL or SQLite)
Packages
secure Is a lightweight package that adds security headers and cookie attributes for Python web frameworks.
environs – Python library for parsing environment variables. It allows you to keep the configuration separate from the code, in accordance with the application methodology twelve factors.
sanic-envconfig Is an extension that helps you bring command line and environment variables into your Sanic configuration.
databases Is a Python package that allows you to build queries using a powerful expression language SQLAlchemy Core and provides support for PostgreSQL, MySQL and SQLite.
Let’s create an empty directory and initialize empty Pipfile…
pipenv -- python python3.6Install all required packages using the below commands pipenv…
pipenv install sanic secure environs sanic-envconfigFor the database:
pipenv install databases[postgresql]To choose postgresql, mysql, sqlite…
Structure
Now let’s create some files and folders where we will write the code.
├── .env
├── Pipfile
├── Pipfile.lock
├── setup.py
└── project
    ├── __init__.py
    ├── __main__.py
    ├── main.py
    ├── middlewares.py
    ├── routes.py
    ├── settings.py
    └── tables.py
We will use the file setup.pyto make a folder project available as a package in our code.
from setuptools import setup

setup(
    name="project",
)
Installation …
pipenv install -e .In file .env we will store global variables like database connection string.
_main_.py created so that our package project could be executed from the command line.
pipenv run python -m projectInitialization
Let’s make the first call in the file main.py
from project.main import init

init()
This is the beginning of our application. Now we need to create a function init in file main.py…
from sanic import Sanic

app = Sanic(__name__)

def init():
    app.run(host="0.0.0.0", port=8000, debug=True)
By simply creating app from the class Sanic, we can run it by specifying host, port and optional keyword argument debug…
Launching …
pipenv run python -m project
If the Sanic application runs successfully, the output will look like this. If in the browser you open http://0.0.0.0:8000, you will see:
Error: Requested URL / not found
We haven’t created any routes yet, so everything is fine. We will deal with this further.
Customization
Now we can modify the environment and settings. We need to add some variables to the file .env, read them and pass them to the Sanic application configuration file.
File .env
DEBUG=True
HOST=0.0.0.0
POST=8000
Configuration…
from sanic import Sanic
from environs import Env
from project.settings import Settings
app = Sanic(__name__)
def init():
    env = Env()
    env.read_env()

    app.config.from_object(Settings)
    app.run(
        host=app.config.HOST,
        port=app.config.PORT,
        debug=app.config.DEBUG,
        auto_reload=app.config.DEBUG,
    )
File settings.py
from sanic_envconfig import EnvConfig


class Settings(EnvConfig):
    DEBUG: bool = True
    HOST: str="0.0.0.0"
    PORT: int = 8000
Note that I have added an optional argument auto_reloadwhich enables or disables automatic reboot.
Database
Now is the time to set up the database.
One note about the database before we move on.
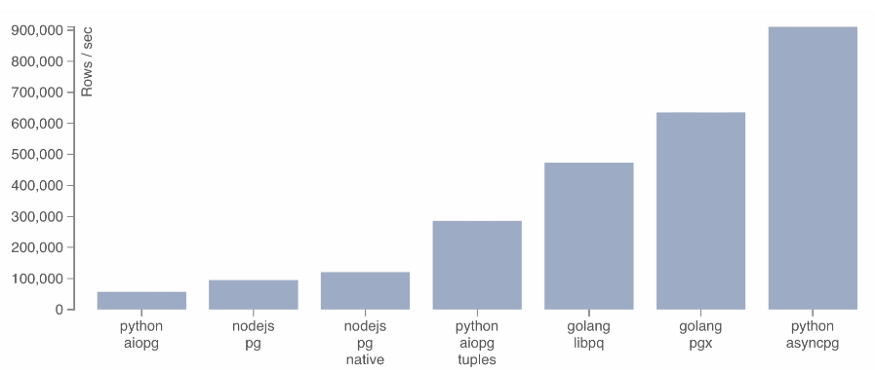
Package databases uses asyncpg, which is an asynchronous library interface for working with PostgreSQL. Works fast enough. You can see the results below.
We will use two listeners Sanic, for which we will indicate the operations of connecting and disconnecting from the database. Here are the listeners we’ll be using:
afterserverstart
afterserverstop
File main.py
from sanic import Sanic
from databases import Database
from environs import Env
from project.settings import Settings
app = Sanic(__name__)
def setup_database():
    app.db = Database(app.config.DB_URL)

    @app.listener('after_server_start')
    async def connect_to_db(*args, **kwargs):
        await app.db.connect()

    @app.listener('after_server_stop')
    async def disconnect_from_db(*args, **kwargs):
        await app.db.disconnect()
def init():
    env = Env()
    env.read_env()

    app.config.from_object(Settings)
    setup_database()
    app.run(
        host=app.config.HOST,
        port=app.config.PORT,
        debug=app.config.DEBUG,
        auto_reload=app.config.DEBUG,
    )
And one more thing. We need to indicate DB_URL in project settings and environment.
File .env
DEBUG=True
HOST=0.0.0.0
POST=8000
DB_URL=postgresql://postgres:postgres@localhost/postgres
And the file settings.py:
from sanic_envconfig import EnvConfig


class Settings(EnvConfig):
    DEBUG: bool = True
    HOST: str="0.0.0.0"
    PORT: int = 8000
    DB_URL: str=""
Make sure that DB_URL correct and your database is running. You can now access the database with app.db… More details can be found in the next section.
Tables
We now have a connection to our database and can try making some SQL queries.
Let’s declare the table in a file tables.py using SQLAlchemy.
import sqlalchemy


metadata = sqlalchemy.MetaData()

books = sqlalchemy.Table(
    'books',
    metadata,
    sqlalchemy.Column('id', sqlalchemy.Integer, primary_key=True),
    sqlalchemy.Column('title', sqlalchemy.String(length=100)),
    sqlalchemy.Column('author', sqlalchemy.String(length=60)),
)
For now I will assume that you have already done the database migration with the table books in it. For creating database migrations, I recommend using Alembic Is a lightweight and simple tool that can be used in conjunction with the SQLAlchemy Database Toolkit for Python.
Now we can use any requests SQLAlchemy… Below are some examples.
# Executing many
query = books.insert()
values = [
    {"title": "No Highway", "author": "Nevil Shute"},
    {"title": "The Daffodil", "author": "SkyH. E. Bates"},
]
await app.db.execute_many(query, values)

# Fetching multiple rows
query = books.select()
rows = await app.db.fetch_all(query)

# Fetch single row
query = books.select()
row = await app.db.fetch_one(query)
Routes
Now we need to set up the routes. Let’s go to routes.py and add a new route for books.
from sanic.response import json
from project.tables import books

def setup_routes(app):
    @app.route("/books")
    async def book_list(request):
        query = books.select()
        rows = await request.app.db.fetch_all(query)
        return json({
            'books': [{row['title']: row['author']} for row in rows]
        })
Of course, for everything to work, we need to init summon setup_routes…
from project.routes import setup_routes
app = Sanic(__name__)
def init():
    ...
    app.config.from_object(Settings)
    setup_database()
    setup_routes(app)
    ...
Making a request …
$ curl localhost:8000/books
{"books":[{"No Highway":"Nevil Shute"},{"The Daffodil":"SkyH. E. Bates"}]}
Middleware
Can we check the response titles and see if we can add or fix anything there?
$ curl -I localhost:8000
Connection: keep-alive
Keep-Alive: 5
Content-Length: 32
Content-Type: text/plain; charset=utf-8
As you can see, we have a lot to improve on security issues. There are a few missing headers like X-XSS-Protection, Strict-Transport-Security, etc. So let’s deal with them with additional software and packages secure…
File middlewares.py
from secure import SecureHeaders

secure_headers = SecureHeaders()

def setup_middlewares(app):
    @app.middleware('response')
    async def set_secure_headers(request, response):
        secure_headers.sanic(response)
Customization middleware in file main.py:
from project.middlewares import setup_middlewares
app = Sanic(__name__)
def init():
    ...
    app.config.from_object(Settings)
    setup_database()
    setup_routes(app)
    setup_middlewares(app)
    ...
And here’s the result:
$ curl -I localhost:8000/books
Connection: keep-alive
Keep-Alive: 5
Strict-Transport-Security: max-age=63072000; includeSubdomains
X-Frame-Options: SAMEORIGIN
X-XSS-Protection: 1; mode=block
X-Content-Type-Options: nosniff
Referrer-Policy: no-referrer, strict-origin-when-cross-origin
Pragma: no-cache
Expires: 0
Cache-control: no-cache, no-store, must-revalidate, max-age=0
Content-Length: 32
Content-Type: text/plain; charset=utf-8
As I promised in the beginning, for everyone section this article has a separate repository on github. Hope this little tutorial helps you get started with Sanic. There are many more unexplored features in the Sanic framework, you can get acquainted with them in documentation…
More details about the course. You can view the open lesson entry “Extending Python to C: Making Python Crawl Faster” here.