Four Quick Tricks for Unity3D Development
More flexibility, less code – more productive development.

For a long time Unity3D – my favorite game development tool, which I have been using for over 8 years – both for professional products and for personal projects, and when teaching programming and game design… Moreover, I wrote in Unity on almost all the game jams in which I participated, which made it possible to create the base of the game in just a few hours.
As you probably know game jam Is a game developer competition where participants make a game from scratch in a short period of time. Game jam usually lasts from 24 to 72 hours, but there are also longer ones – for example, GitHub Game Offwhich lasts all November.
After participating in various game jams, including my group’s self-made C ++ engine (unfortunately it is only in Portuguese), I made a list of rules for rapid prototyping, which soon became my main principle of software development: less code, faster work.
The basic idea – to write less code (or, in other words, keep a smaller codebase) – does two things:
Error protection: the smaller the code size, the less likely it is to make a mistake.
Save time: Every code change requires updates and tests, which takes time.
And for Unity, there is a third reason: every change in the code triggers a Unity update, which regularly takes some time.
In this article, I’ll show you a few techniques that make it easy to implement this principle in Unity3D and thus speed up prototyping and game creation in general.
For reference: Unity 3D Technologies paid me nothing (yet).
1. Serialization of classes and structures
Serialization is the process of automatically converting data structures or object states to a different format. In the case of Unity, this simplifies data storage and reconstruction.
Class and structure can be marked as serializable – by specifying [Serializable] above the name. Below is an example from Unity documentation:
[Serializable]
public struct PlayerStats
{
   public int movementSpeed;
   public int hitPoints;
   public bool hasHealthPotion;
}
The main advantage of this approach is that it allows direct access to the corresponding properties via inspector, which is especially convenient when using lists and arrays…
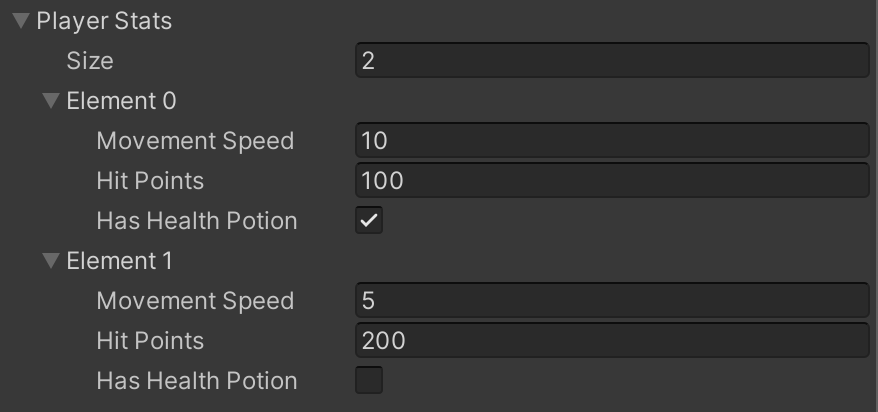
Your project will likely have duplicate structures: for example, tasks, subjects or even dialogues – they can be implemented as serialized classes or structures, which will allow you to easily change their list of values in inspector…
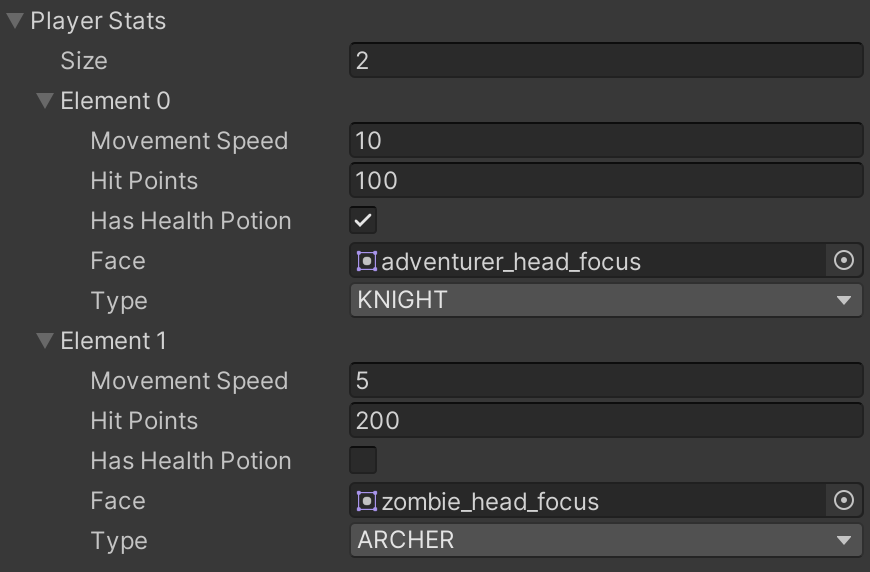
The same can be done for transfers (their use improves type safety) and more complex structures – for example, sprites… Both cases are shown in the image and in the code below:
public enum PlayerType
{
    ARCHER, KNIGHT
}

[Serializable]
public struct PlayerStats
{
    public int movementSpeed;
    public int hitPoints;
    public bool hasHealthPotion;
    public Sprite face;
    public PlayerType type;
}
If you use enumeration in a serialized structure, then as a nice addition you get it identifiers in the Unity inspector in a nice and convenient drop-down list – and you no longer need to remember strings…
2. Use RequireComponent whenever possible
Scenarios with component dependencies are common. For example, a player controller script is likely to depend on the player’s Rigidbody and colliders. The safest way to ensure that all dependencies on a game object are present at runtime is to mark it the RequireComponent attribute…
This attribute has three main functions:
Ensure that the game object has the necessary components.
Block the removal of required components.
Automatically add the required components to a game object when a script is attached to it.
Sample code using RequireComponent is shown below:
[RequireComponent(typeof(Rigidbody))]
public class PlayerScript : MonoBehaviour
{
    Rigidbody rigidbody;

    void Awake()
    {
        rigidbody = GetComponent<Rigidbody>();
    }
}
This functionality greatly improves the security of your code and reduces the likelihood of the unexpected. null pointer exceptions when trying to access invalid or non-existent components. Components can be directly attached in the editor window or retrieved using the methods Awake or Startas shown in the example code above.
In terms of prototyping, this approach speeds up the preparation of objects. Moreover, in classes and structures there can be multiple attributes RequireComponent immediately. It is enough to specify them in the script and then just add it to game object – and all components will be attached.
And given that these components will never be invalid under normal circumstances, the script does not need to check for null, which means less code to write.

3. Interface buttons for multiple events
This is perhaps the simplest and most effective method of the considered: use the same Unity UI button for several events at the same time. Many newcomers to Unity use buttons to either do a single task, or worse, call a specific method in a script that handles the logic of the button.
This in itself is not bad, but in both cases there is a strong dependence on changes in the codebase – which for sure will be.
Your best bet is to list all of the button’s effects right in its list of OnClick events: there can be as many events as you want and are easier to access and modify.
With this approach one can for example use the onClick of one button to display Unity panels, play sound, and start animation. Specifically, for these tasks, additional code is not required: display the panel – (setActive (true)), play the sound – (play ()) and call Animator – (setTrigger ()). Examples of calling these methods are below.
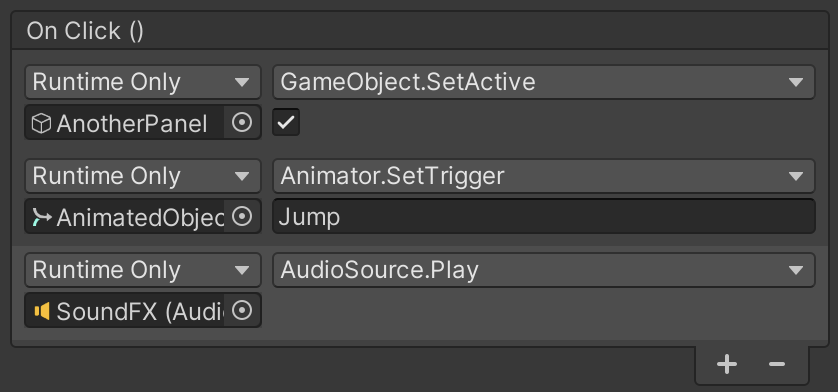
Quite often this approach is used for programming menu navigation. Each menu activates the next and deactivates itself. When you return or close the menu, each of them deactivates itself again and activates the previous one. The best part is that you don’t need a single line of code. I repeat: less code means fewer errors, faster work.
4. Extensive use of Unity events
Unity has a special class named UnityEventwhich behaves like method OnClick Unity interface buttons… Variable UnityEventthat the script has access to gives the same interface as the OnClick method:

Such a variable is used in much the same way, except that to execute the list of events, the variable UnityEvent it must be called through a script. The code snippet below shows how to add a variable UnityEvent into a script and how a simple call function is written Invoke:
using UnityEngine;
using UnityEngine.Events;
public class CallEventsScript : MonoBehaviour
{
   public UnityEvent eventsToBeCalled;
   public void CallEvents()
   {
      eventsToBeCalled.Invoke();
   }
}
Method CallEvents calls the event list for a variable UnityEvent… This is a public method, so other scripts can access it, including timeline signals and animation events… For these two cases, you don’t need to write code to access the method – everything is done by simple drag and drop.

UnityEvent can also be used to create very flexible scripts, for example to call a list of events in methods such as Awake, Start, OnEnable, OnDisable and so on. For example, you could write a script that executes a list of events in a method StartThis allows you to quickly create functions without having to write code.
Practical example – trigger boxas I call it: this game object from colliderthat performs one or more actions when colliding with others game objects… It can be easily implemented using UnityEvent:
[RequireComponent(typeof(Collider))]
public class TriggerBoxScript : MonoBehaviour
{
    public UnityEvent eventsToBeCalledOnCollision;
    public List<string> objectsTagToActivate;

    private void OnCollisionEnter(Collision other)
    {
        if (OtherHasWantedTag(other.gameObject))
        {
            InvokeEvents();
        }
    }

    private void OnTriggerEnter(Collider other)
    {
        if (OtherHasWantedTag(other.gameObject))
        {
            InvokeEvents();
        }
    }

    private bool OtherHasWantedTag(GameObject other)
    {
        var found = objectsTagToActivate.Find(other.CompareTag);
        return found != null;
    }

    private void InvokeEvents()
    {
        eventsToBeCalledOnCollision.Invoke();
    }
}
The example above works for triggers, and for colliders without trigger (the method is called and through OnTriggerEnter, and through OnCollisionEnter). However, only game objectsthat have a collider.
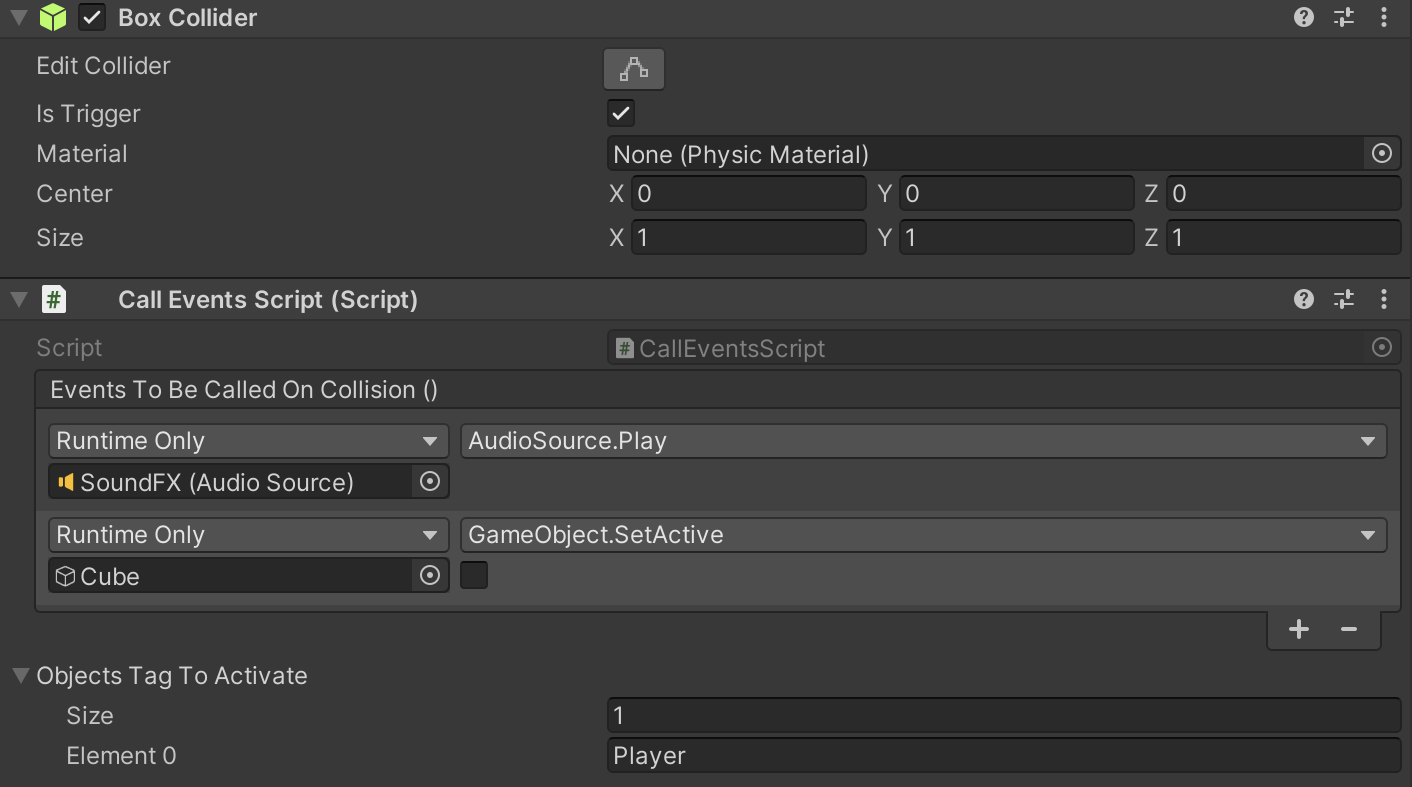
The example above shows game object with trigger boxusing this approach. In this example, whenever game object “Player” collides with object – trigger box, the latter plays sound and deactivates. The possibilities of such a structure are almost endless: activating enemies, changing background music, spawn points, save points, etc.
Conclusion
In short, the two main benefits of using these approaches are less code and more capabilities for the Unity inspector. More flexibility means more room for action.
In case of events (OnClick and UnityEvent) the developer does not need to worry about setting object dependencies (object methods can be called directly from lists) and checking their validity (only valid existing objects can be bound in the list).
Of course, there are times when these approaches are best not used: they will complicate the job. For example, if the same series of tasks needs to be performed on different items, it would be wise to pass it to a specific method and call it, rather than listing all tasks for each item. This applies directly to interface buttons Unity, for which it might be convenient to assign specific methods in such situations.
In any case, the flexibility of the described approaches will certainly outweigh their disadvantages – and, of course, they are easy to ignore or eliminate. Moreover, these techniques allow you to quickly prototype and test an idea, and only then start writing more stable and efficient code.
Thank you for attention 🙂
![Coast, brown sand. Albert Edelfelt (1935) [USEUM] Coast, brown sand. Albert Edelfelt (1935) [USEUM]](https://habrastorage.org/getpro/habr/upload_files/242/d66/470/242d664703dd898ef9c3156c4a58ae7a.png)
About the translator
The article was translated by Alconost.
Alconost deals with localization of games, applications and sites in 70 languages. Native native translators, linguistic testing, cloud platform with API, continuous localization, 24/7 project managers, any string resource formats.
We also do promotional and training videos – for sites that sell, image, advertising, training, teasers, explainers, trailers for Google Play and the App Store.


