Everything about OpenShift Egress. Part 2

IP address manipulation won’t help here. The only solution in this case will be the organization of additional interfaces on the cluster nodes, which will be in the required VLANs, and the organization of access to additional interfaces from the projects we need within the cluster. And a project called Multus CNI…
Multus CNI
As you know, by default, POD in Kubernetes has one interface through which all interaction with it takes place. Multus allows you to create multiple interfaces in POD in addition to the default one. In fact, Multus is itself a CNI-Plugin, which in turn controls the call of other CNI-Plugin’s. For this Multus is called the CNI meta Plugin. What Multus does is well illustrated in the picture from the article Demystifing Multus:
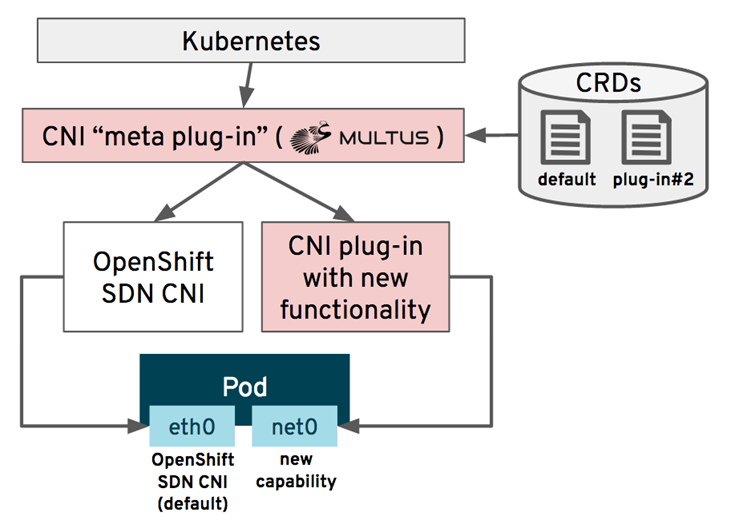
Of course, the number of additional interfaces can be more than one.
Configuring Multus CNI in OpenShift
So, let’s try to solve the problem of access to a dedicated VLAN at our booth. By default, all cluster nodes are assigned one interface located in the OpenShift VLAN (IP: 192.168.111 / 24). We want to organize access from the multes-test project to the resources of the 192.168.112 / 24 network located in VLAN Restricted. VLAN Restricted and VLAN OpenShift are not routed to each other.

First, add an interface from VLAN Restricted to a number of nodes (in our case, these are Node1 and Node2), and put a label on these nodes node-role.kubernetes.io/multus-node=‘yes’. Resources from the Restricted VLAN will be available from nodes with a multus-node label. Let’s create our multus-test project:
[ocp@shift-is01 macvlan]$ oc new-project multus-test
Multus CNI support has been present in OpenShift for a long time, there is no need to add it separately. Multus configuration management is done via CR in CRD networks.operator.openshift.io… You need to edit this resource by adding CNI Plugin configuration for the new interface:
oc edit networks.operator.openshift.io cluster
spec:
  additionalNetworks:
    - name : net1
      namespace: multus-test
      type: Raw
      rawCNIConfig: |-
        { "cniVersion": "0.3.1",
          "type": "ipvlan",
          "mode": "l2",
          "master": "ens224",
          "ipam": {
            "type": "static"
           }
        }
This moment requires decoding. What have we defined with this configuration?
- For POD, an interface named “net1” will be added in the multus-test project
- The configuration of this interface will be determined through the CNI Plugin “ipvlan”;
- CNI Plugin ipvlan is configured in L2 Mode;
- The physical interface of the ens224 node is used as the main interface for net1;
- Finally, the IPAM static plugin will be used to manage IP addressing.
Choosing CNI Plugin
For our additional interface, you need to select the used CNI Plugin. A list of possible CNI Plugin can be found on the website www.cni.dev… In our example, we use ipvlan plugin… In fact, this is the simplest bridge that allows containers to communicate through the host’s external network interface. In this case, all outgoing connections use their own IP address, but will have the MAC address of the external network interface. Picture from the site hicu.be illustrates well how the ipvlan plugin works:

In productive environments, they tend to choose macvlan pluginwhich differs from ipvlan in that outgoing connections have unique MAC addresses. But in this case, it is often necessary to prepare the network infrastructure so that the network equipment allows the transmission of packets with different MAC addresses from one port.
Selecting IPAM Plugin
In addition to organizing the network interface, we need to define the rules for issuing an IP address for the new interface. This is also handled by the CNI Plugin, which implements the IP Address Management (or IPAM) functions. The list of possible IPAM-plugins can also be found on the website www.cni.dev… In this example, we used the simplest static IPAM plugin that assigns a fixed address to our POD.
If there are many such PODs, static IPAM will become inconvenient. A good choice here would be to either use the dhcp plugin (it assigns POD IP addresses via a request to an external DHCP server), or use whereabouts plugin…
Support for these IPAM Plugin is also available by default in OpenShift, you do not need to install them separately.
Restricted VLAN access
After defining our Multus configuration, a resource called Network Attachment Definition should appear in the cluster, which reflects the current Multus configuration:
Network Attachment Definition
[ocp@shift-is01 macvlan]$ oc get network-attachment-definitions --all-namespaces
NAMESPACE     NAME   AGE
multus-test   net1   3m4s

[ocp@shift-is01 macvlan]$ oc get network-attachment-definitions.k8s.cni.cncf.io -n multus-test net1 -o yaml
apiVersion: k8s.cni.cncf.io/v1
kind: NetworkAttachmentDefinition
metadata:
  creationTimestamp: "2020-11-02T16:44:46Z"
  generation: 1
  managedFields:
  - apiVersion: k8s.cni.cncf.io/v1
    fieldsType: FieldsV1
    fieldsV1:
      f:metadata:
        f:ownerReferences:
          .: {}
          k:{"uid":"01a4f46a-fc3c-495f-b196-b39352421e2a"}:
            .: {}
            f:apiVersion: {}
            f:blockOwnerDeletion: {}
            f:controller: {}
            f:kind: {}
            f:name: {}
            f:uid: {}
      f:spec:
        .: {}
        f:config: {}
    manager: cluster-network-operator
    operation: Update
    time: "2020-11-02T16:44:46Z"
  name: net1
  namespace: multus-test
  ownerReferences:
  - apiVersion: operator.openshift.io/v1
    blockOwnerDeletion: true
    controller: true
    kind: Network
    name: cluster
    uid: 01a4f46a-fc3c-495f-b196-b39352421e2a
  resourceVersion: "25898949"
  selfLink: /apis/k8s.cni.cncf.io/v1/namespaces/multus-test/network-attachment-definitions/net1
  uid: 7a7d718b-82c5-46fe-8f72-8fd4299508ec
spec:
  config: |-
    { "cniVersion": "0.3.1",
      "type": "ipvlan",
      "mode": "l2",
      "master": "ens224",
      "ipam": {
        "type": "static"
       }
    }
Let’s create a test POD with an additional interface that will have access to our restricted VLAN:
pod-ipvlan-static.yaml
[ocp@shift-is01 ipvlan]$ cat ./pod-ipvlan-static.yaml
apiVersion: v1
kind: Pod
metadata:
  namespace: multus-test
  name: test-multus-pod
  labels:
    app: test-multus-pod
  annotations:
    k8s.v1.cni.cncf.io/networks: '[
      {
        "name": "net1",
        "ips": ["192.168.112.250/24"]
      }
]'
spec:
  nodeSelector:
    node-role.kubernetes.io/multus-node: yes
  containers:
  - name: test-multus-pod
    image: centos/tools
    command: ["/bin/bash", "-c", "sleep 9000000"]
Let’s go to the created POD to view its network configuration and check the availability of addresses in the restricted VLAN (on the 192.168.112.0/24 network):
ocp@shift-is01 ipvlan]$ oc rsh test-multus-pod
sh-4.2# ip a
1: lo: <LOOPBACK,UP,LOWER_UP> mtu 65536 qdisc noqueue state UNKNOWN group default qlen 1000
    link/loopback 00:00:00:00:00:00 brd 00:00:00:00:00:00
    inet 127.0.0.1/8 scope host lo
       valid_lft forever preferred_lft forever
    inet6 ::1/128 scope host
       valid_lft forever preferred_lft forever
3: eth0@if2142: <BROADCAST,MULTICAST,UP,LOWER_UP> mtu 1450 qdisc noqueue state UP group default
    link/ether 0a:58:0a:fe:04:a0 brd ff:ff:ff:ff:ff:ff link-netnsid 0
    inet 10.254.4.160/24 brd 10.254.4.255 scope global eth0
       valid_lft forever preferred_lft forever
    inet6 fe80::bc4b:abff:fe0b:91f8/64 scope link
       valid_lft forever preferred_lft forever
4: net1@if826: <BROADCAST,MULTICAST,UP,LOWER_UP> mtu 1500 qdisc noqueue state UNKNOWN group default
    link/ether 00:50:56:96:f3:02 brd ff:ff:ff:ff:ff:ff
    inet 192.168.112.250/24 brd 192.168.112.255 scope global net1
       valid_lft forever preferred_lft forever
    inet6 fe80::50:5600:196:f302/64 scope link
       valid_lft forever preferred_lft forever

sh-4.2# ping 192.168.112.1 -c 3
PING 192.168.112.1 (192.168.112.1) 56(84) bytes of data.
64 bytes from 192.168.112.1: icmp_seq=1 ttl=64 time=0.179 ms
64 bytes from 192.168.112.1: icmp_seq=2 ttl=64 time=0.230 ms
64 bytes from 192.168.112.1: icmp_seq=3 ttl=64 time=0.223 ms

--- 192.168.112.1 ping statistics ---
3 packets transmitted, 3 received, 0% packet loss, time 2041ms
rtt min/avg/max/mdev = 0.179/0.210/0.230/0.028 ms
As you can see from the output of the “ip a” command, POD received an additional net1 @ if826 network interface and the IP address that we specified in its manifest. Since the additional interface works through an ethernet adapter in the restricted VLAN, from this POD we got access to the network segment we need.
Author: Sergey Artemov, Head of DevOps Solutions Department, Jet Infosystems
Join our Telegram channel @DevSecOps Talks!