Enhancing Microservice Security with Istio
[*]Hello! My name is Ilya, I work as a DevOps engineer in the development team. We actively use the microservice approach, and, due to the specifics of our work, the security of interservice interaction is important to us. In this article I want to describe how Istio works and show how to use some of its security features using an example. I hope this will be useful for solving your problems. Enjoy reading!

Why do I need a service network
Service mesh, in this case, Istio is a binding for everything that is required to manage and configure interservice interaction: routing, authentication, authorization, tracing, access control and much more. And although there are many open libraries to implement these functions directly in the service code, with Istio you can get the same thing without adding anything to the service itself.
Components
Article written for istio 1.6
Istio is logically divided into a data plane and a control plane.
The data plane is a collection of proxy servers (Envoy) added to the pod’s in the form of sidecars. These proxies provide and control all network communication between microservices and are configured from the control plane.
The management plane (istiod) provides service discovery, configuration, and certificate management. It converts Istio objects into Envoy-friendly configurations and distributes them in the data plane.

Istio service mesh components
You can add envoy to the application pod either manually or by setting up automatic addition using the Mutating Admission webhook, which Istio adds during its installation. To do this, put the istio-injection = enabled label on the necessary namespace.
In addition to the proxy sidecar with envoy, Istio will add a special init container to the pod, which will redirect the combat traffic to the container with envoy. But how is this achieved? In this case, there is no magic, and this is implemented by installing additional iptables rules in the network namespace pod.
Let’s see in practice how a sidecar captures incoming and outgoing traffic from a container. To do this, take a look at the network space of some pod’s with Istio sidecar added in more detail.
Deploying Kubernetes locally is easy with minikube:
curl -Lo minikube https://storage.googleapis.com/minikube/releases/latest/minikube-linux-amd64 && chmod +x minikube
sudo mkdir -p /usr/local/bin/
sudo install minikube /usr/local/bin/

minikube start --driver= // --driver=none запустит все докер контейнеры прямо на локальной машине.
brew install minikube
minikube start --driver=
Istio with demo profile can be installed by document from the official website:
curl -L https://istio.io/downloadIstio | sh -
cd istio-1.6.3
export PATH=$PWD/bin:$PATH
istioctl install --set profile=demo
For examples of interservice interactions, I will use two microservices: productpage and details. They both come in standard Istio delivery to demonstrate its capabilities.
kubectl label namespace default istio-injection=enabled
kubectl apply -f samples/bookinfo/platform/kube/bookinfo.yaml
Let’s see the list of productpage application containers:
kubectl -n default get pods productpage-v1-7df7cb7f86-ntwzz -o jsonpath="{.spec['containers','initContainers'][*].name}"
productpage
istio-proxy
istio-init
In addition to the productpage itself, sidecar istio-proxy (the same envoy) and init container istio-init work in the pod.
You can look at the pod’s iptables-rules configured in space using the nsenter utility. To do this, we need to find out the pid of the container process:
docker inspect k8s_productpage --format '{{ .State.Pid }}'
16286
Now we can see the iptables rules installed in this container.

It can be seen that almost all incoming and outgoing traffic is now intercepted and redirected to the ports on which envoy is already waiting for it.
Enable mutual traffic encryption
Policy and MeshPolicy objects were removed from istio 1.6. Instead, they suggest using the PeerAuthentication object.
Istio allows you to encrypt all traffic between containers, and the applications themselves will not even know that they communicate via tls. This is done by Istio himself out of the box with just one manifesto, since client certificates are already mounted in sidecar proxies.
The algorithm is as follows:
- Envoy proxies on the client side and on the server side authenticate each other before sending requests;
- If the check is successful, the client proxy encrypts the traffic and sends it to the server proxy;
- The proxy server side decrypts the traffic and locally redirects it to the actual destination service.
You can enable mTLS at different levels:
- At the level of the entire network;
- At the namespace level;
- At the specific pod’s level.
Operating modes:
- PERMISSIVE: both encrypted and plain text traffic are allowed;
- STRICT: only TLS allowed;
- DISABLE: only plain text is allowed.
Let’s look at the details service from the pod’s productpage using curl without TLS enabled and see what comes to details using tcpdump:
Request:

Dump traffic:
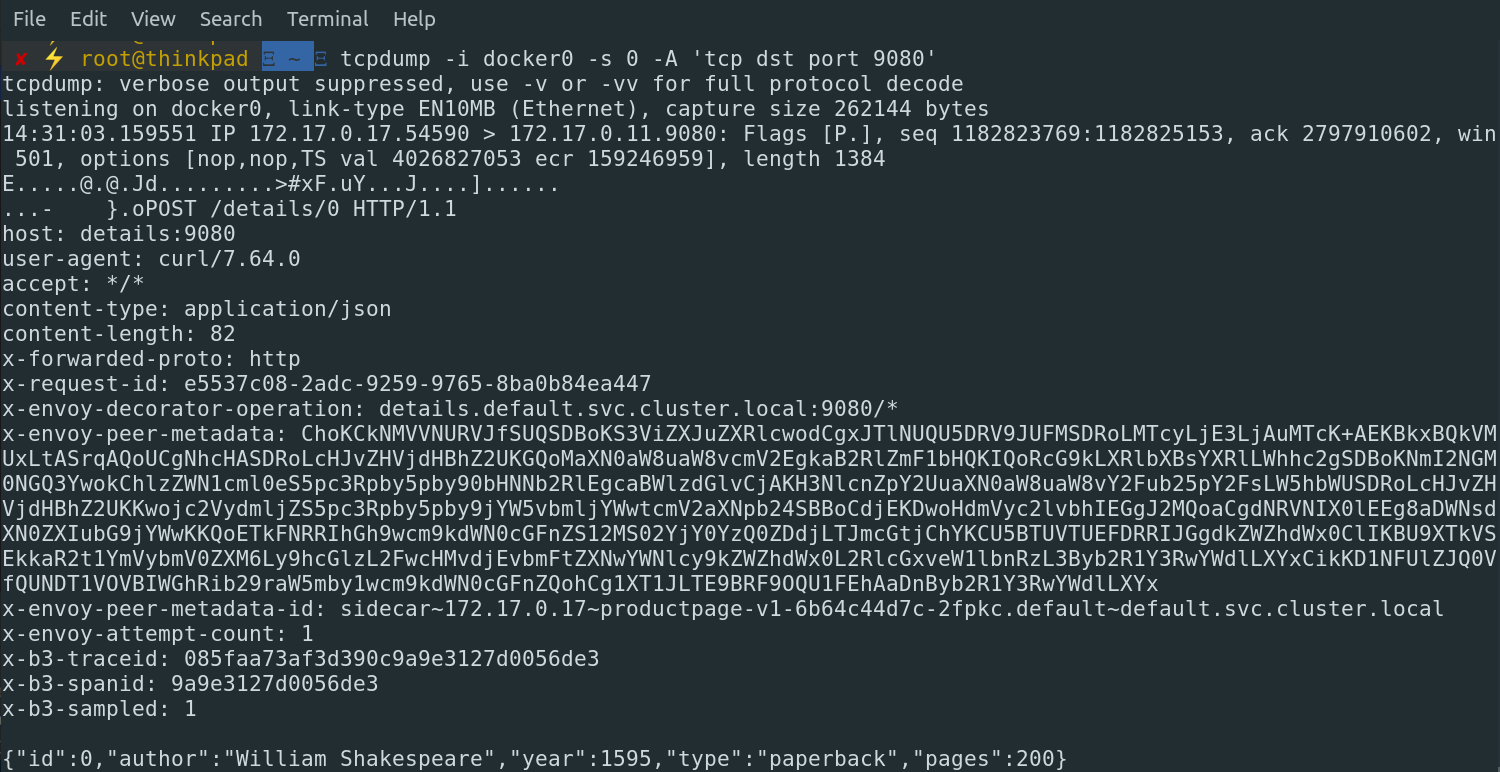
All body and headings are perfectly readable in plain text.
Turn on tls. To do this, create an object of type PeerAuthentication in the namespace with our pod’s.
apiVersion: security.istio.io/v1beta1
kind: PeerAuthentication
metadata:
  name: default
  namespace: default
spec:
  mtls:
    mode: STRICT
Run the query from the product page to details again and see what you can get:
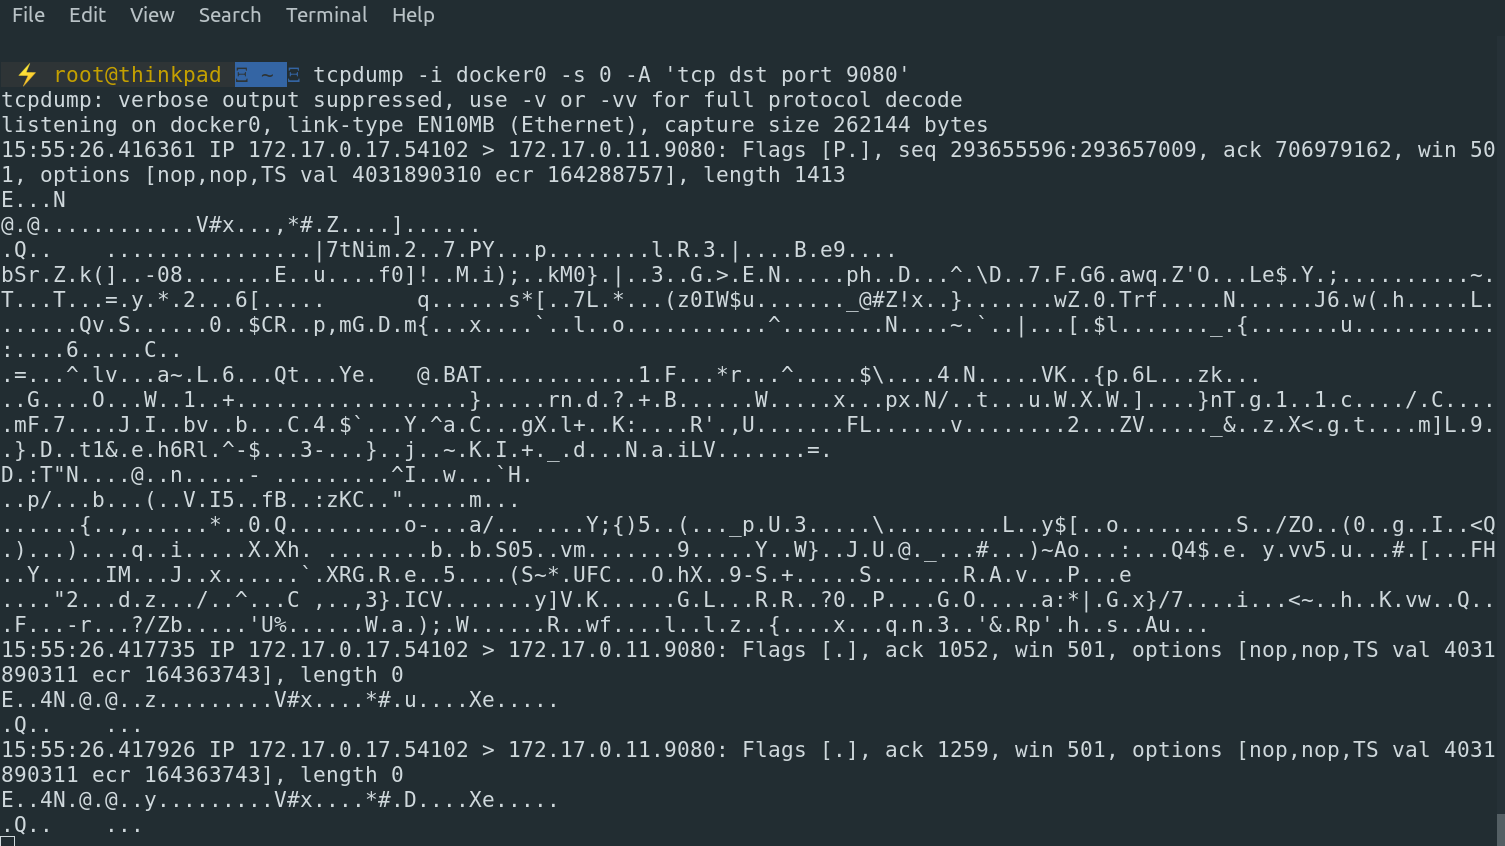
Traffic is encrypted
Login
ClusterRbacConfig, ServiceRole, and ServiceRoleBinding objects were removed along with the introduction of a new authorization policy. Instead, it is proposed to use the AuthorizationPolicy object.
Using authorization policies, Istio can configure one application to access another. Moreover, unlike pure Kubernetes network policies, this works at the L7 level. For example, for http traffic, you can finely control the methods and paths of the request.
As we saw in the previous example, by default access is open to all pods of the entire cluster.
Now we will ban all activities in the default namespace using this yaml file:
apiVersion: security.istio.io/v1beta1
kind: AuthorizationPolicy
metadata:
  name: deny-all
  namespace: default
spec:
  {}
And try to get to the details service:
curl details:9080
RBAC: access denied
Great, now our request fails.
Now, let’s configure access so that only a GET request passes and only along the / details path, and all other requests are rejected. There are several options for this:
- You can configure that requests with specific headers pass;
- By the service account of the application;
- By outgoing ip-address;
- By outgoing namespace;
- According to claims in the JWT token.
The easiest to maintain is to configure access to the service account of the application, since no pre-configuration is required for this, since the bookinfo demo application already comes with service account created and mounted.
To use authorization policies based on service accounts, you must enable TLS mutual authentication.
Set up a new access policy:
apiVersion: "security.istio.io/v1beta1"
kind: "AuthorizationPolicy"
metadata:
  name: "details-viewer"
  namespace: default
spec:
  selector:
    matchLabels:
      app: details
  rules:
  - from:
    - source:
        principals: ["cluster.local/ns/default/sa/bookinfo-productpage"]
    to:
    - operation:
        methods: ["GET"]
        paths: ["/details/*"]
And try to reach out again:
root@productpage-v1-6b64c44d7c-2fpkc:/# curl details:9080/details/0
{"id":0,"author":"William Shakespeare","year":1595,"type":"paperback","pages":200,"publisher":"PublisherA","language":"English","ISBN-10":"1234567890","ISBN-13":"123-1234567890"}
Everything is working. Let’s try other methods and ways:
root@productpage-v1-6b64c44d7c-2fpkc:/# curl -XPOST details:9080/details/0
RBAC: access denied
root@productpage-v1-6b64c44d7c-2fpkc:/#
root@productpage-v1-6b64c44d7c-2fpkc:/# curl -XGET details:9080/ping
RBAC: access denied
Conclusion
In conclusion, I note that the opportunities considered are only a fraction of what Istio can do. Out of the box, we received and configured interservice traffic encryption and authorization, however, at the cost of adding additional components and, therefore, additional resource consumption.
Thanks to all!