DIY Pineapple Nano Part 1. Platform Assembly
The Pineapple Nano is a hacking device from the Hak5 team for attacking wireless networks. Buying it is not so easy, so I decided to assemble it myself. And this article will be just about how I went through fire and water to recreate an exact copy (well, almost) of this device. Go!
Device description
WiFi Pineapple is a software and hardware system developed by Hak5 for testing wireless networks for vulnerabilities. The whole essence of the device is to lower the threshold for entering network testing. This device has an intuitive web-based interface and a wide range of tools for exploration, tracking, tracking and reporting.
First of all, to create a prototype of such a device, it was necessary to study what hardware and software solution Pineapple adopted, its characteristics, capabilities and hardware platform. After a little googling, I found documentation FCC (US Federal Communications Commission) certification of this device, including photos, with detailed specifications.
Photo
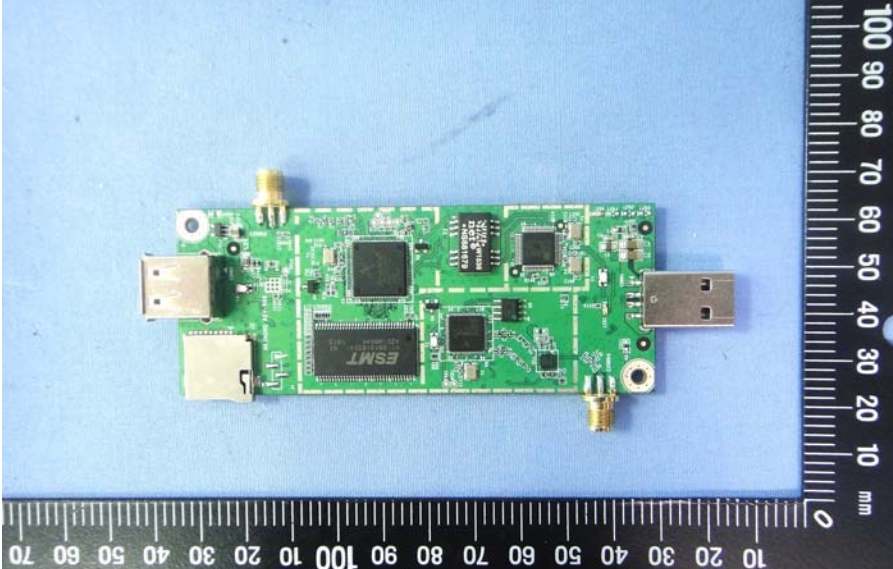

Judging by the photo and documentation, Pineapple Nano is built on a fairly popular Atheros9331 processor, which is used in many network devices (Tp-Link routers, Black Swift mini computer (link, etc.). On board the board we also have:
-
Atheros9271 wireless adapter;
-
USB to Ethernet adapter Asix AX88179;
-
RAM 64mb;
-
Flash 16mb;
-
microSD card slot.
A short search for the internal structure of the device yielded results in the form of a dmesg report, with the help of which the necessary information was obtained:
[    6.410000] hub 1-1:1.0: USB hub found
[    6.430000] hub 1-1:1.0: 4 ports detected
[   12.230000] usb 1-1.2: new high-speed USB device number 4 using ehci-platform
[   14.150000] usb 1-1.1: ath9k_htc: Firmware ath9k_htc/htc_9271-1.4.0.fw requested
which tells us that the developers of the device went the easy way and made the connection of the wireless adapter and SD card via a USB hub. Well, we’ll do the same.
In addition, we made sure that the wireless adapter based on the Atheros9271 chip is used:
[ 14.150000] usb 1-1.1: ath9k_htc: Firmware ath9k_htc/htc_9271-1.4.0.fw requestedPlatform selection
The most suitable and affordable router built on the Atheros9331 chipset at the time of the platform search was the well-known Tp-Link TL-MR3020. It has a USB connector on board, which allows you to connect a USB hub to it, the board has a divorced Uart-ttl connector for connecting to the device terminal, and an important point – it has a small size.
To connect to the router terminal, a USB-Uart adapter built on the CH340 chip was purchased. You will have to connect to the terminal more than once … The pinout of the router connector is shown in the photo below, maybe it will be useful to someone.
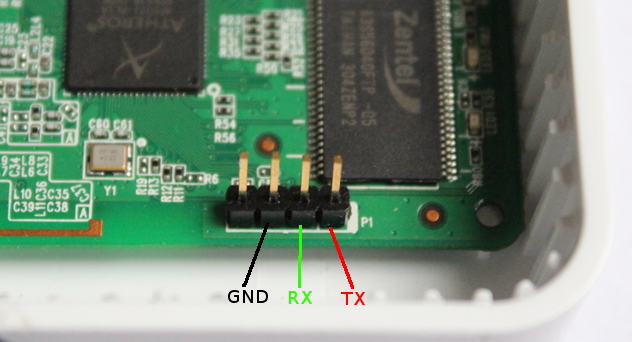
The main disadvantages that did not allow the full use of this router in your project were scanty Flash and RAM memory (4 Mb and 32 Mb, respectively), although only 16 Mb is required for the Pineapple firmware.
Increasing RAM to the maximum possible 64 Mb of memory turned out to be quite simple: on the openwrt.org website, in the description section of this router, there is a list of RAM memory chips that can be installed instead of the factory one. In this case, the bootloader itself determines the size of the memory during startup, and there is no need to make programmatic changes. The required chip has been found in disassembly in the line of RAM from an old PC, and with the help of a blow dryer, it was simply replaced instead of the factory one.
With Flash memory, everything is much more complicated – replacing a chip with another one also means changing the bootloader that can work with increased memory. The same site presents chips that can be installed (up to 16 Mb inclusive). I chose a chip from the Chinese manufacturer WinBond W25Q128 – 16 Mb. I flashed it with a cheap programmer from China on the CH341 chip.
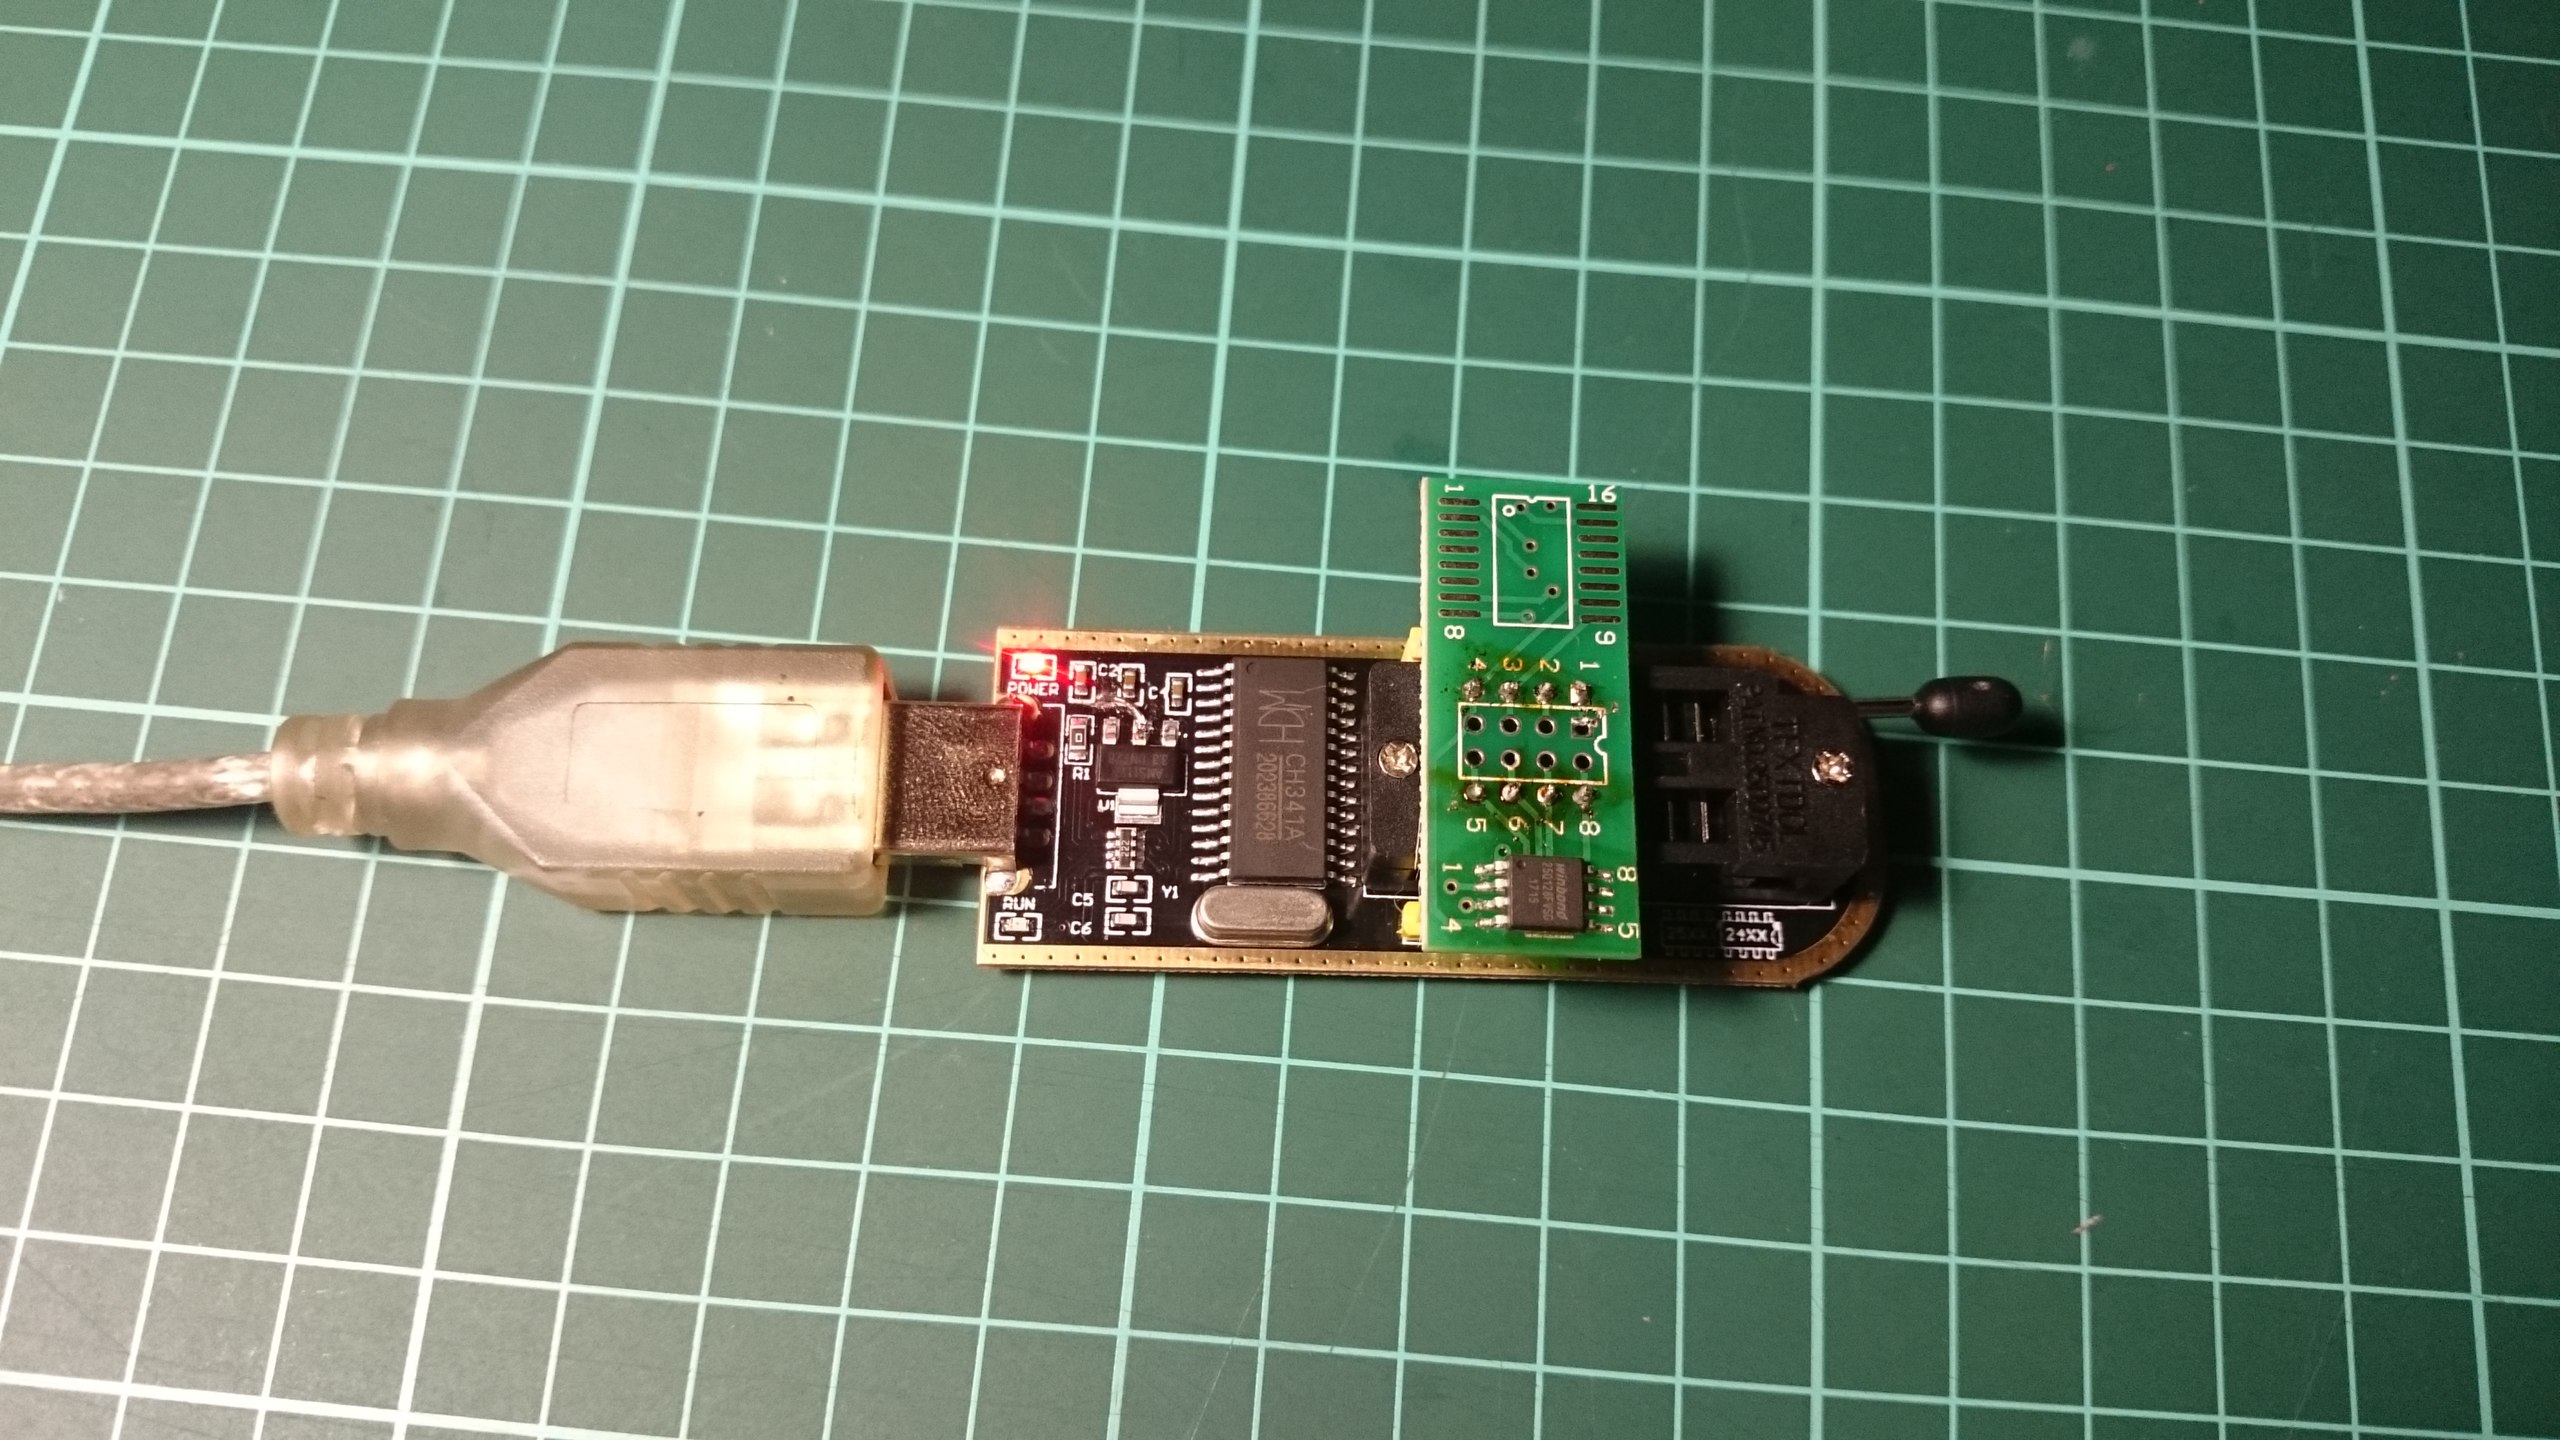
I blew off the memory chip with a soldering gun without any problems, and decided not to solder the memory chip to the board, but brought it to the dip-panel to easily connect and disconnect the memory for flashing it.

Then I bought a wireless WiFi adapter based on the Atheros9271 chipset – Tp-Link TL-WN722N. The usb hub took the simplest and cheapest one, and a 1 Gb usb flash card was also used for tests.

The bootloader from pepe2k was used as an alternative bootloader. In short, this is an upgraded bootloader version of U-Boot 1.1.4. Unlike the factory bootloader, it supports 16 Mb memory chips and allows you to update the firmware, U-Boot and ART (Atheros Radio Test) images directly from a web browser without the need to access the serial console and start the TFTP server.
Device assembly
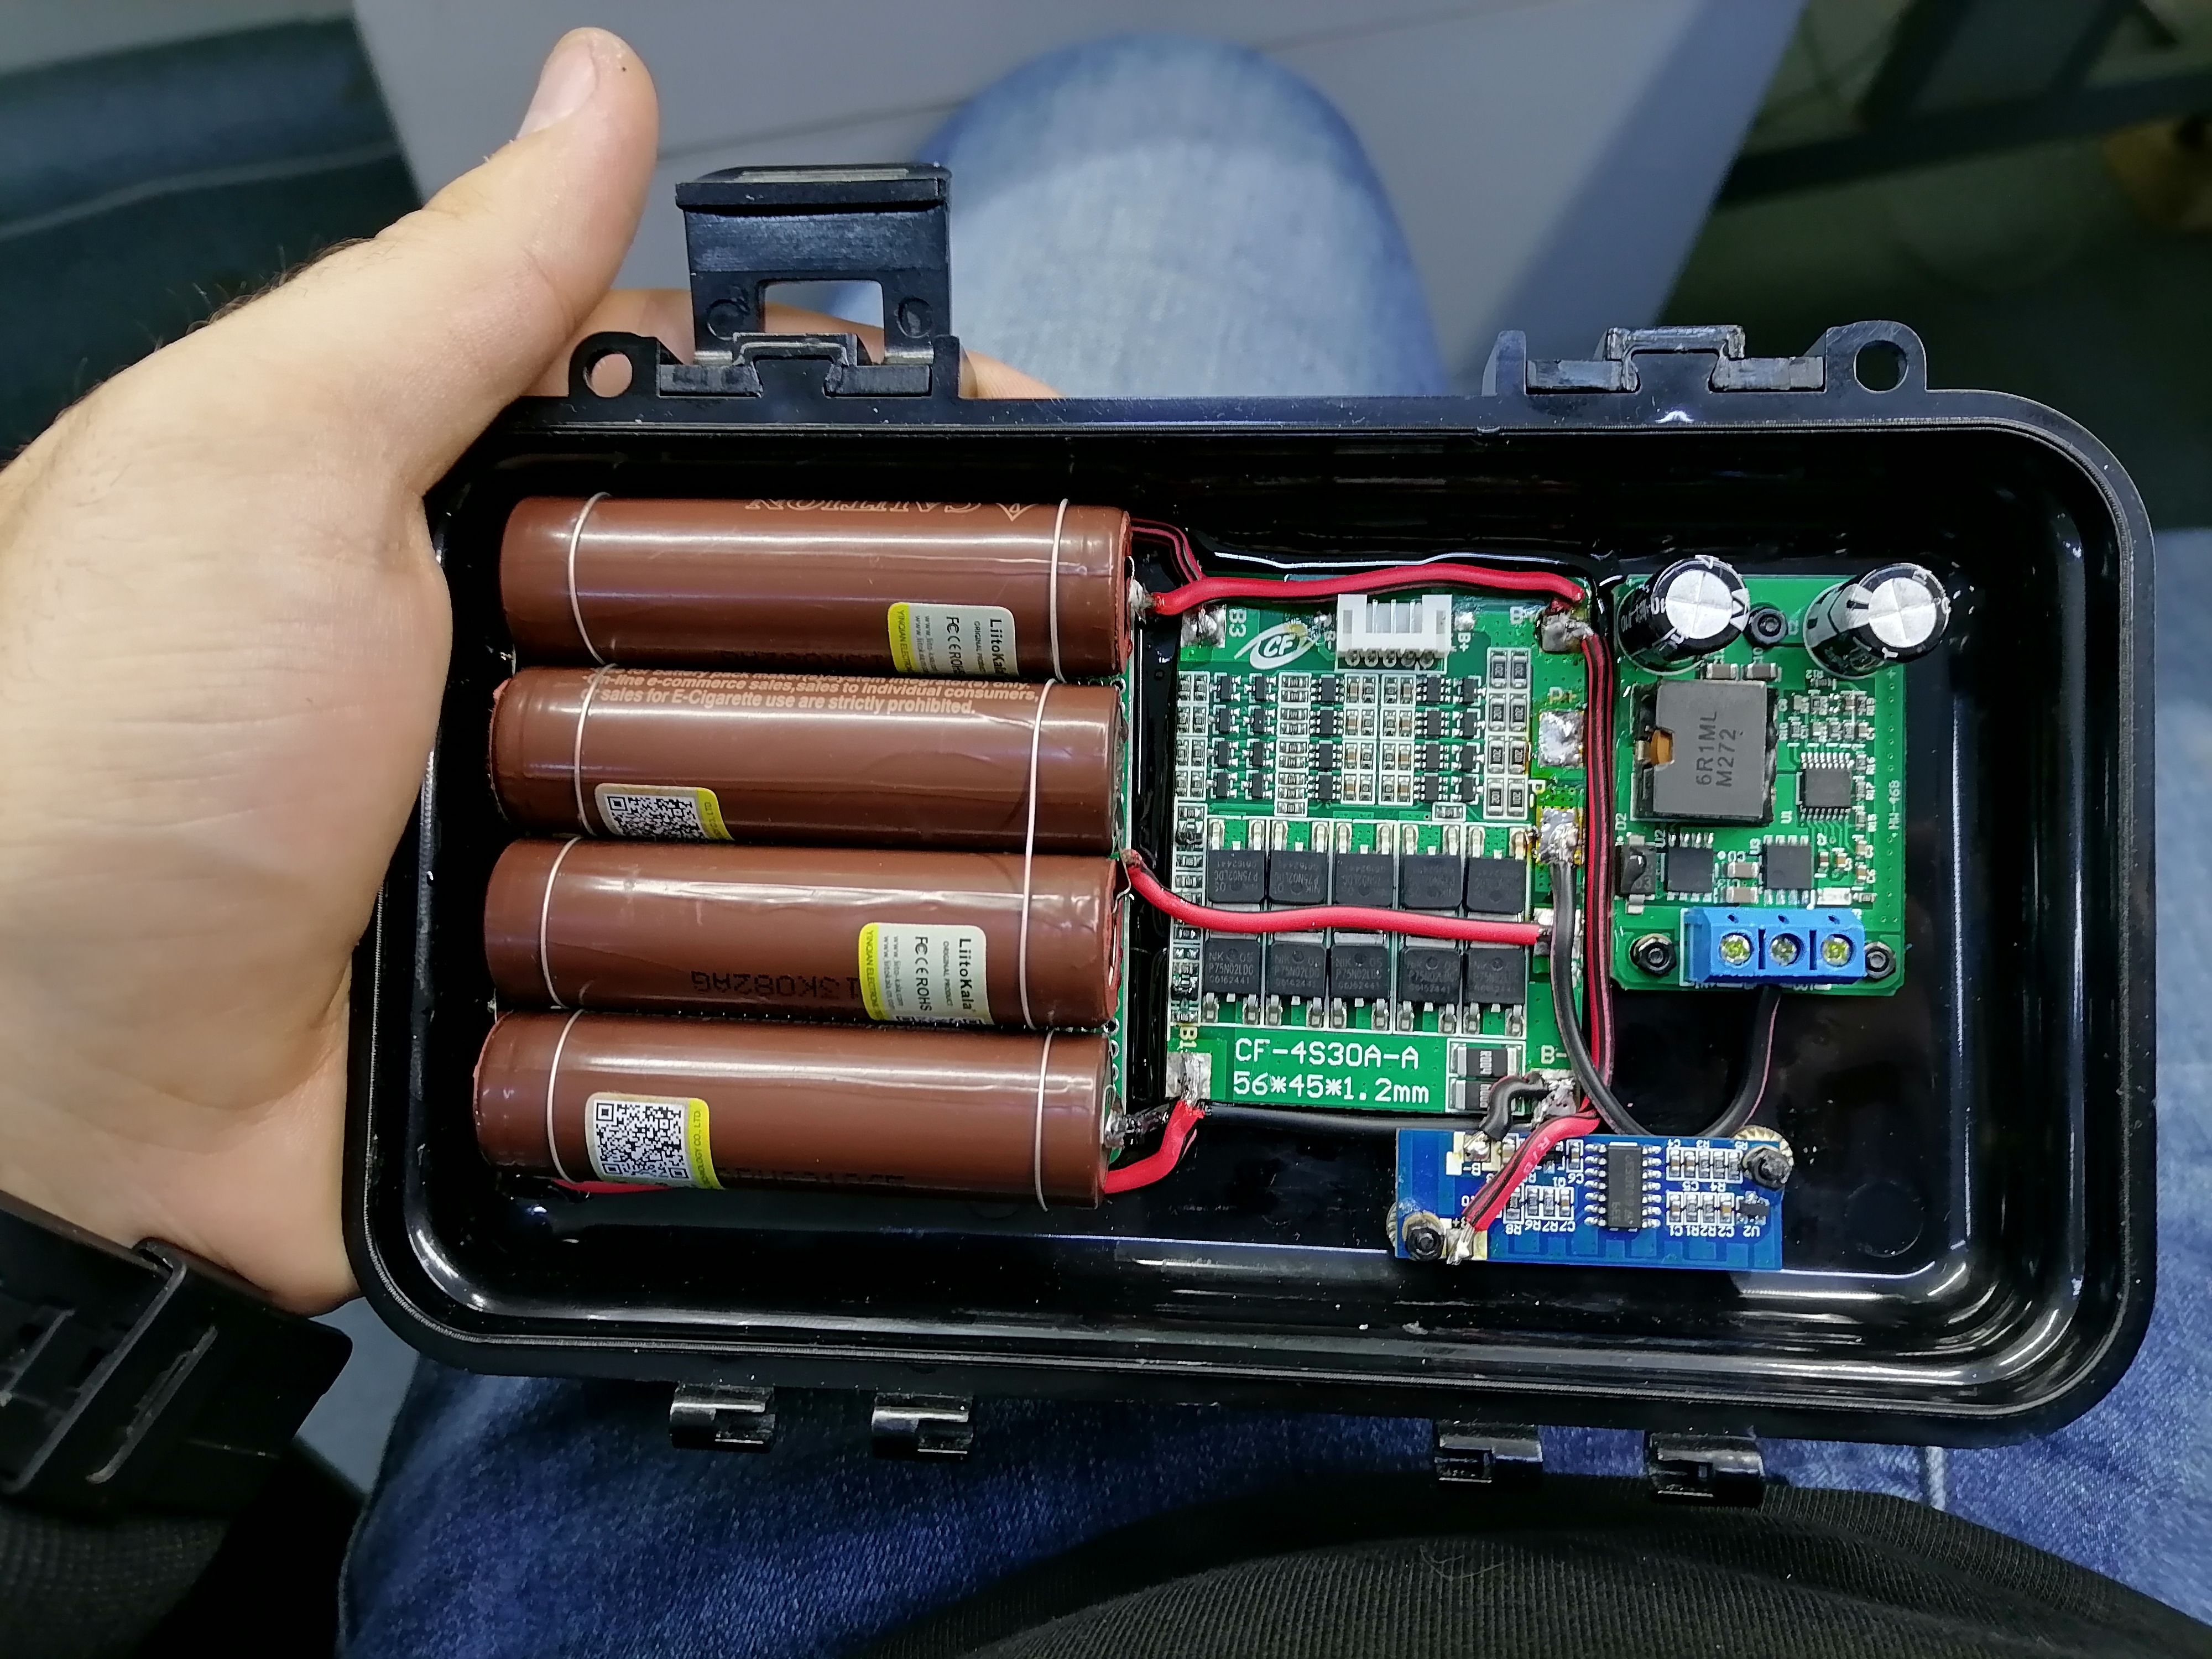
The first drawback of the Pineapple Nano, in my opinion, is the lack of its own power supply. Therefore, in my device, I decided to place a battery assembly in addition to the router and auxiliary devices in the case.
Were purchased 4 batteries size 18650 with a capacity of 2300 mAh each. For the correct operation of the battery assembly, I installed a protection board, a balancer and an LED indicator of the charge level of the battery assembly. To power the router and all auxiliary devices, I installed a voltage converter up to 5 volts, bought, like most of all components, in China.
The case was also purchased in the open spaces of Ali, according to the seller, it is waterproof. Having gutted the router, the wireless adapter, and putting everything together, we got the following picture:

In the photo you can see the battery, voltage converter, USB hub, router itself, wireless adapter, BMS board, USB-Uart adapter, charge level indicator and flash card.
Then the only thing left is to switch it all. But there was one more thing that did not suit me – this is the “native” antenna on the router. We want to leave the ability to connect highly directional antennas, so I just soldered a U.fl type connector instead of the standard antenna – so that it would be easy to connect an external antenna (naturally, the native antenna was disabled by dismantling the container).

Welded to all the batteries by spot welding on the plate, put them together. I soldered the BMS board, connected a 5 volt voltage converter to the output – we will need them to power the router and all other peripherals. The location of the components of the power part began to look like this:
And the most basic part with the router is like this:
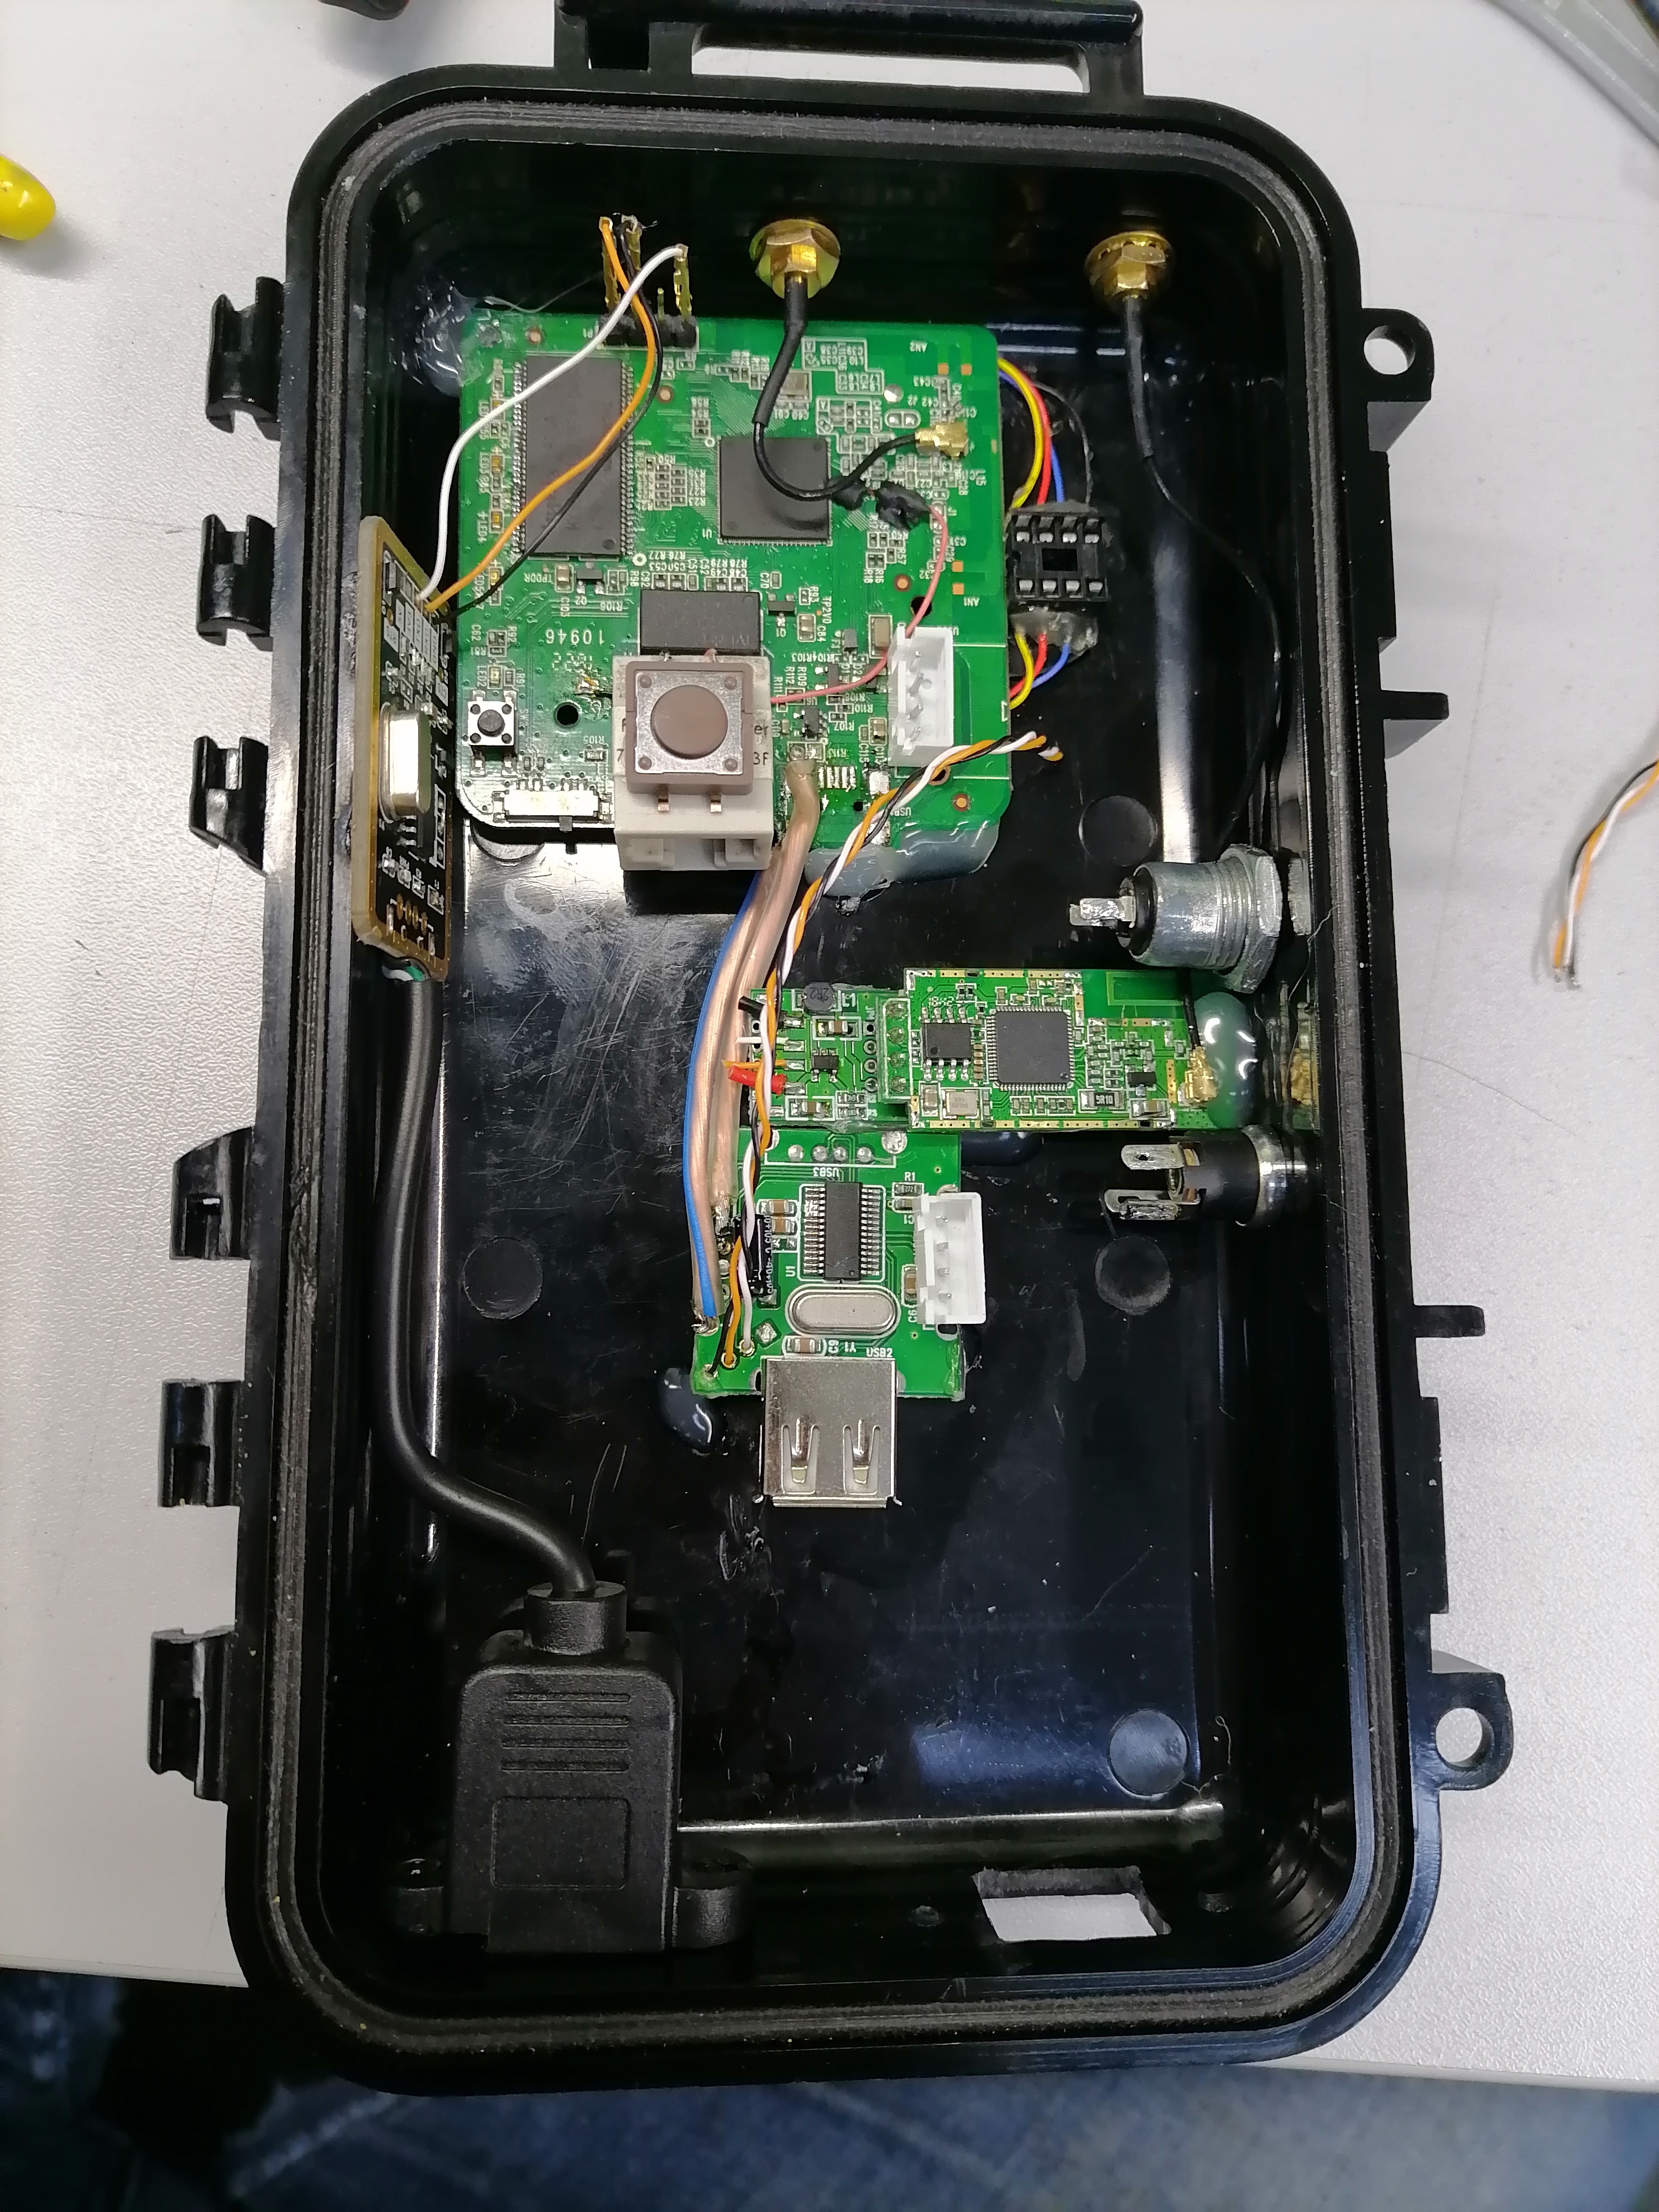
In the photo you can see the output USB-B connector for connecting to the device terminal (it is defined on the computer as a virtual Com-port).
The second drawback of the original Pineapple is the lack of a connector for connecting to wired networks (the device emulates a network card when connected with a USB cable). Well, what if we want to study the security of not only wireless technologies, but will we also pay attention to the good old ones? To do this, a panel RJ45 connector will later be placed on the right bottom of the case – now the device can be discreetly connected to the network and left there.
I decided to make an original power button – it is done by turning the key.
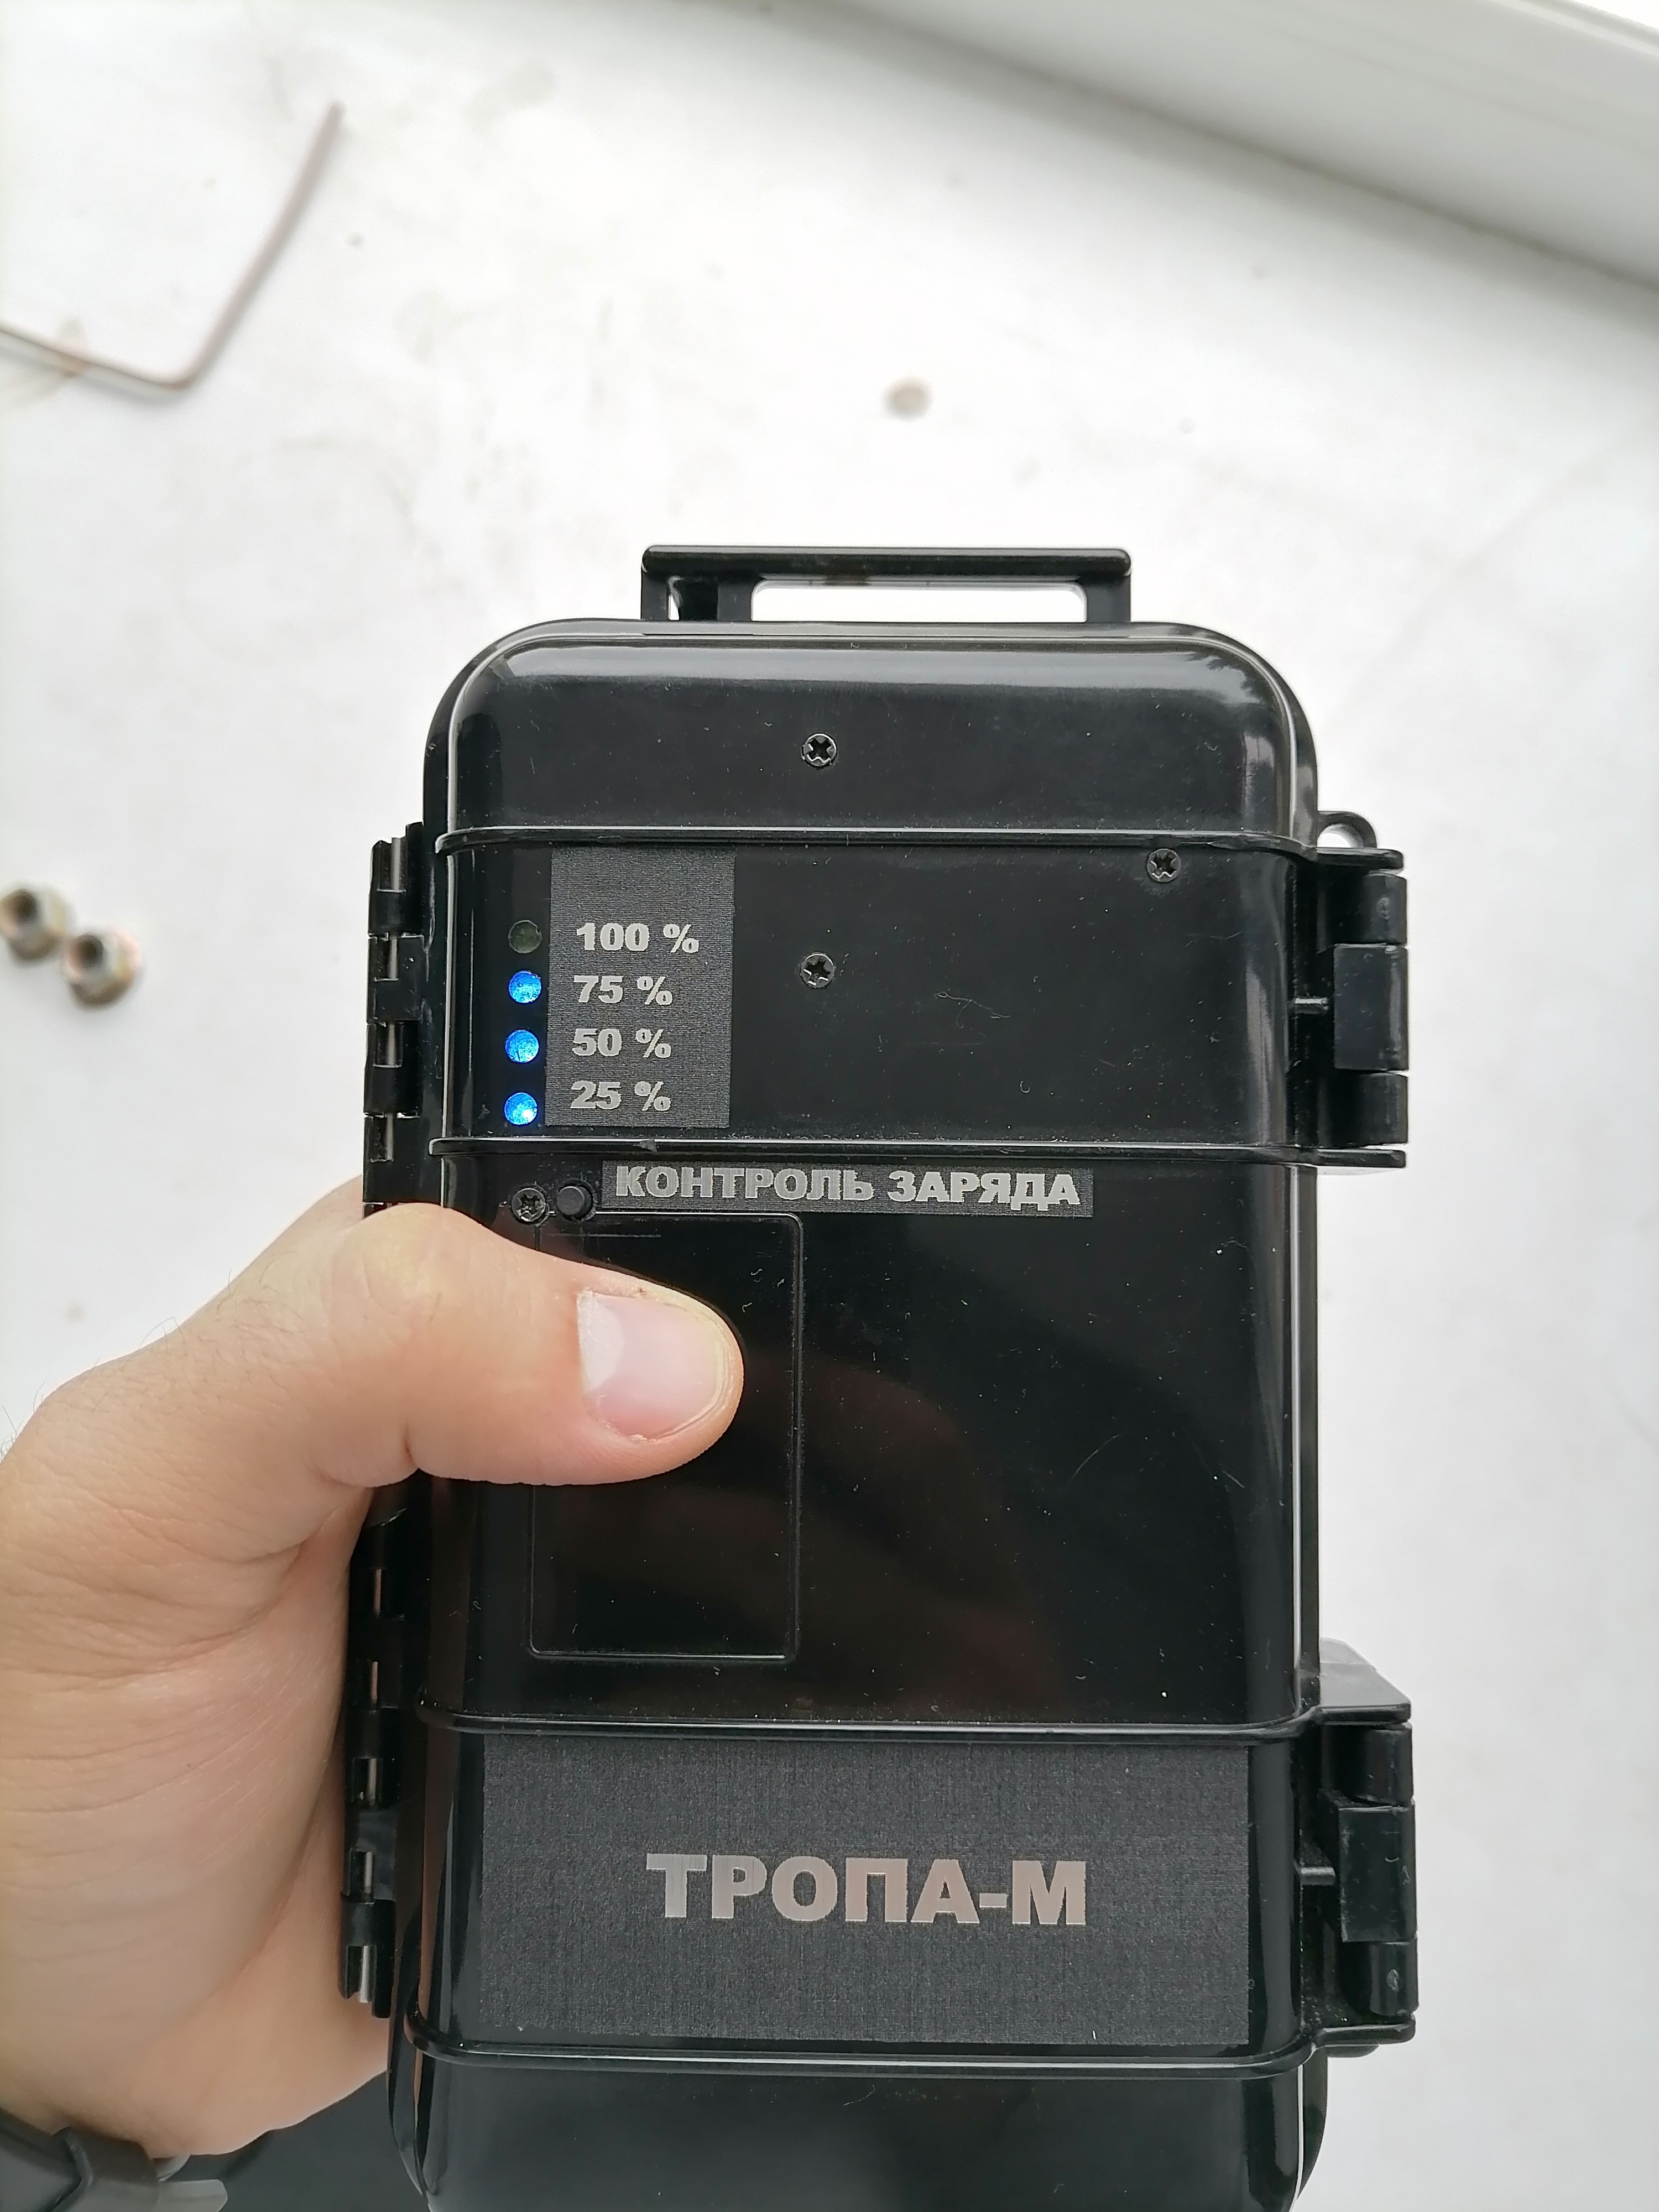
The code for this product was given “Tropa-M”. Why? Don’t ask, I don’t know. But I decided to attend to the marking on the case, for which I burned out the inscriptions I needed on the film with a laser, which were soon pasted on the case.
Well, at the very end I’ll tell you about the configuration of my “product”:

-
charger for 16.8 V (4 banks of 4.2 V);
-
– Usb-B cable (for connecting to the device terminal);
-
Antennas 2 pcs;
-
Usb-Ethernet adapter with a driver for it on the disk;
-
Ethernet cable;
-
Start key;
-
Belt.
What belt for what? For concealed wear, of course!

At this point, the platform assembly stage is considered complete. Everything hardware corresponds to the original as much as possible, all the shortcomings are taken into account and changed in their own way. It remains the case for small things – to stick the firmware into the device, but this will be a separate article.

![ISO-TP Protocol Overview [ISO 15765-2]](https://prog.world/wp-content/uploads/2024/03/bdcaa72cd161c422111eab28a176c1b4.JPG)