Dive into autotesting on iOS. Part 1. How to work with the accessibilityidentifier of objects

Hello everyone!
My name is Boris. I am an AQA iOS-engineer at Vivid Money.
This is an introductory article in a series of articles on iOS automation, in which I want to talk about the benefits of ui tests on a project, their effective use and writing.
This article will be useful for novice iOS automators or developers who decide to learn XCUITest and cover their project with ui tests.
Within the framework of this article, we will analyze the following stages:
What are ui tests and how they are useful.
Installation and configuration of the environment.
Finding ui-elements in the project and giving them an accessibilityidentifier.
What are UI tests?
When we hear the word ‘testing’, we usually think of testing an application against test cases. But what if you can not go through the regression test cases yourself, but entrust this routine matter to the machine?
This is where ui tests come in. They reduce the time for regression and can provide up-to-date information about the application without your participation!
The goal of these tests is to verify that the application’s interface behaves according to the specification: the buttons have the required state, the expected text is displayed, and the navigation in the application proceeds as we expect.
The code you write mimics the user’s actions with the application, making the application behave as if you yourself are performing these actions on your phone. And in the course of these actions, we can check the conditions of interest to us.
What is the use of UI tests?
Writing code for autotests takes a lot of time, and keeping them up to date is even more, BUT in the long term, this will reduce the time to check the application during regression testing.
Writing UI tests has many benefits, especially as your application grows and becomes more difficult to maintain.
What are the advantages:
Tests run faster than manual QA runs;
Tests can be run every night and get a report on the quality of the application by the time it goes to work in the morning;
The tests are not subject to the human factor and will not miss even the most subtle detail;
They protect your tester’s nerves during regression – he does not have to pass test cases 100,500 times;
Reduces the time required for regression testing.
Everything looks cool, of course, but really there are no downsides, you ask? They are also very significant:
The user interface may change and your tests may be out of date;
Team members must be able to write ui tests;
Tests require maintenance;
Quite fragile compared to unit tests (if the position of the button changes, the ui test may fail);
It also takes a long time compared to unit tests (unit tests take less than a second, ui tests will only run the application in 5 seconds).
Despite these shortcomings, I believe that if you have a large project, ui tests have a right to exist.
Setting up the environment:
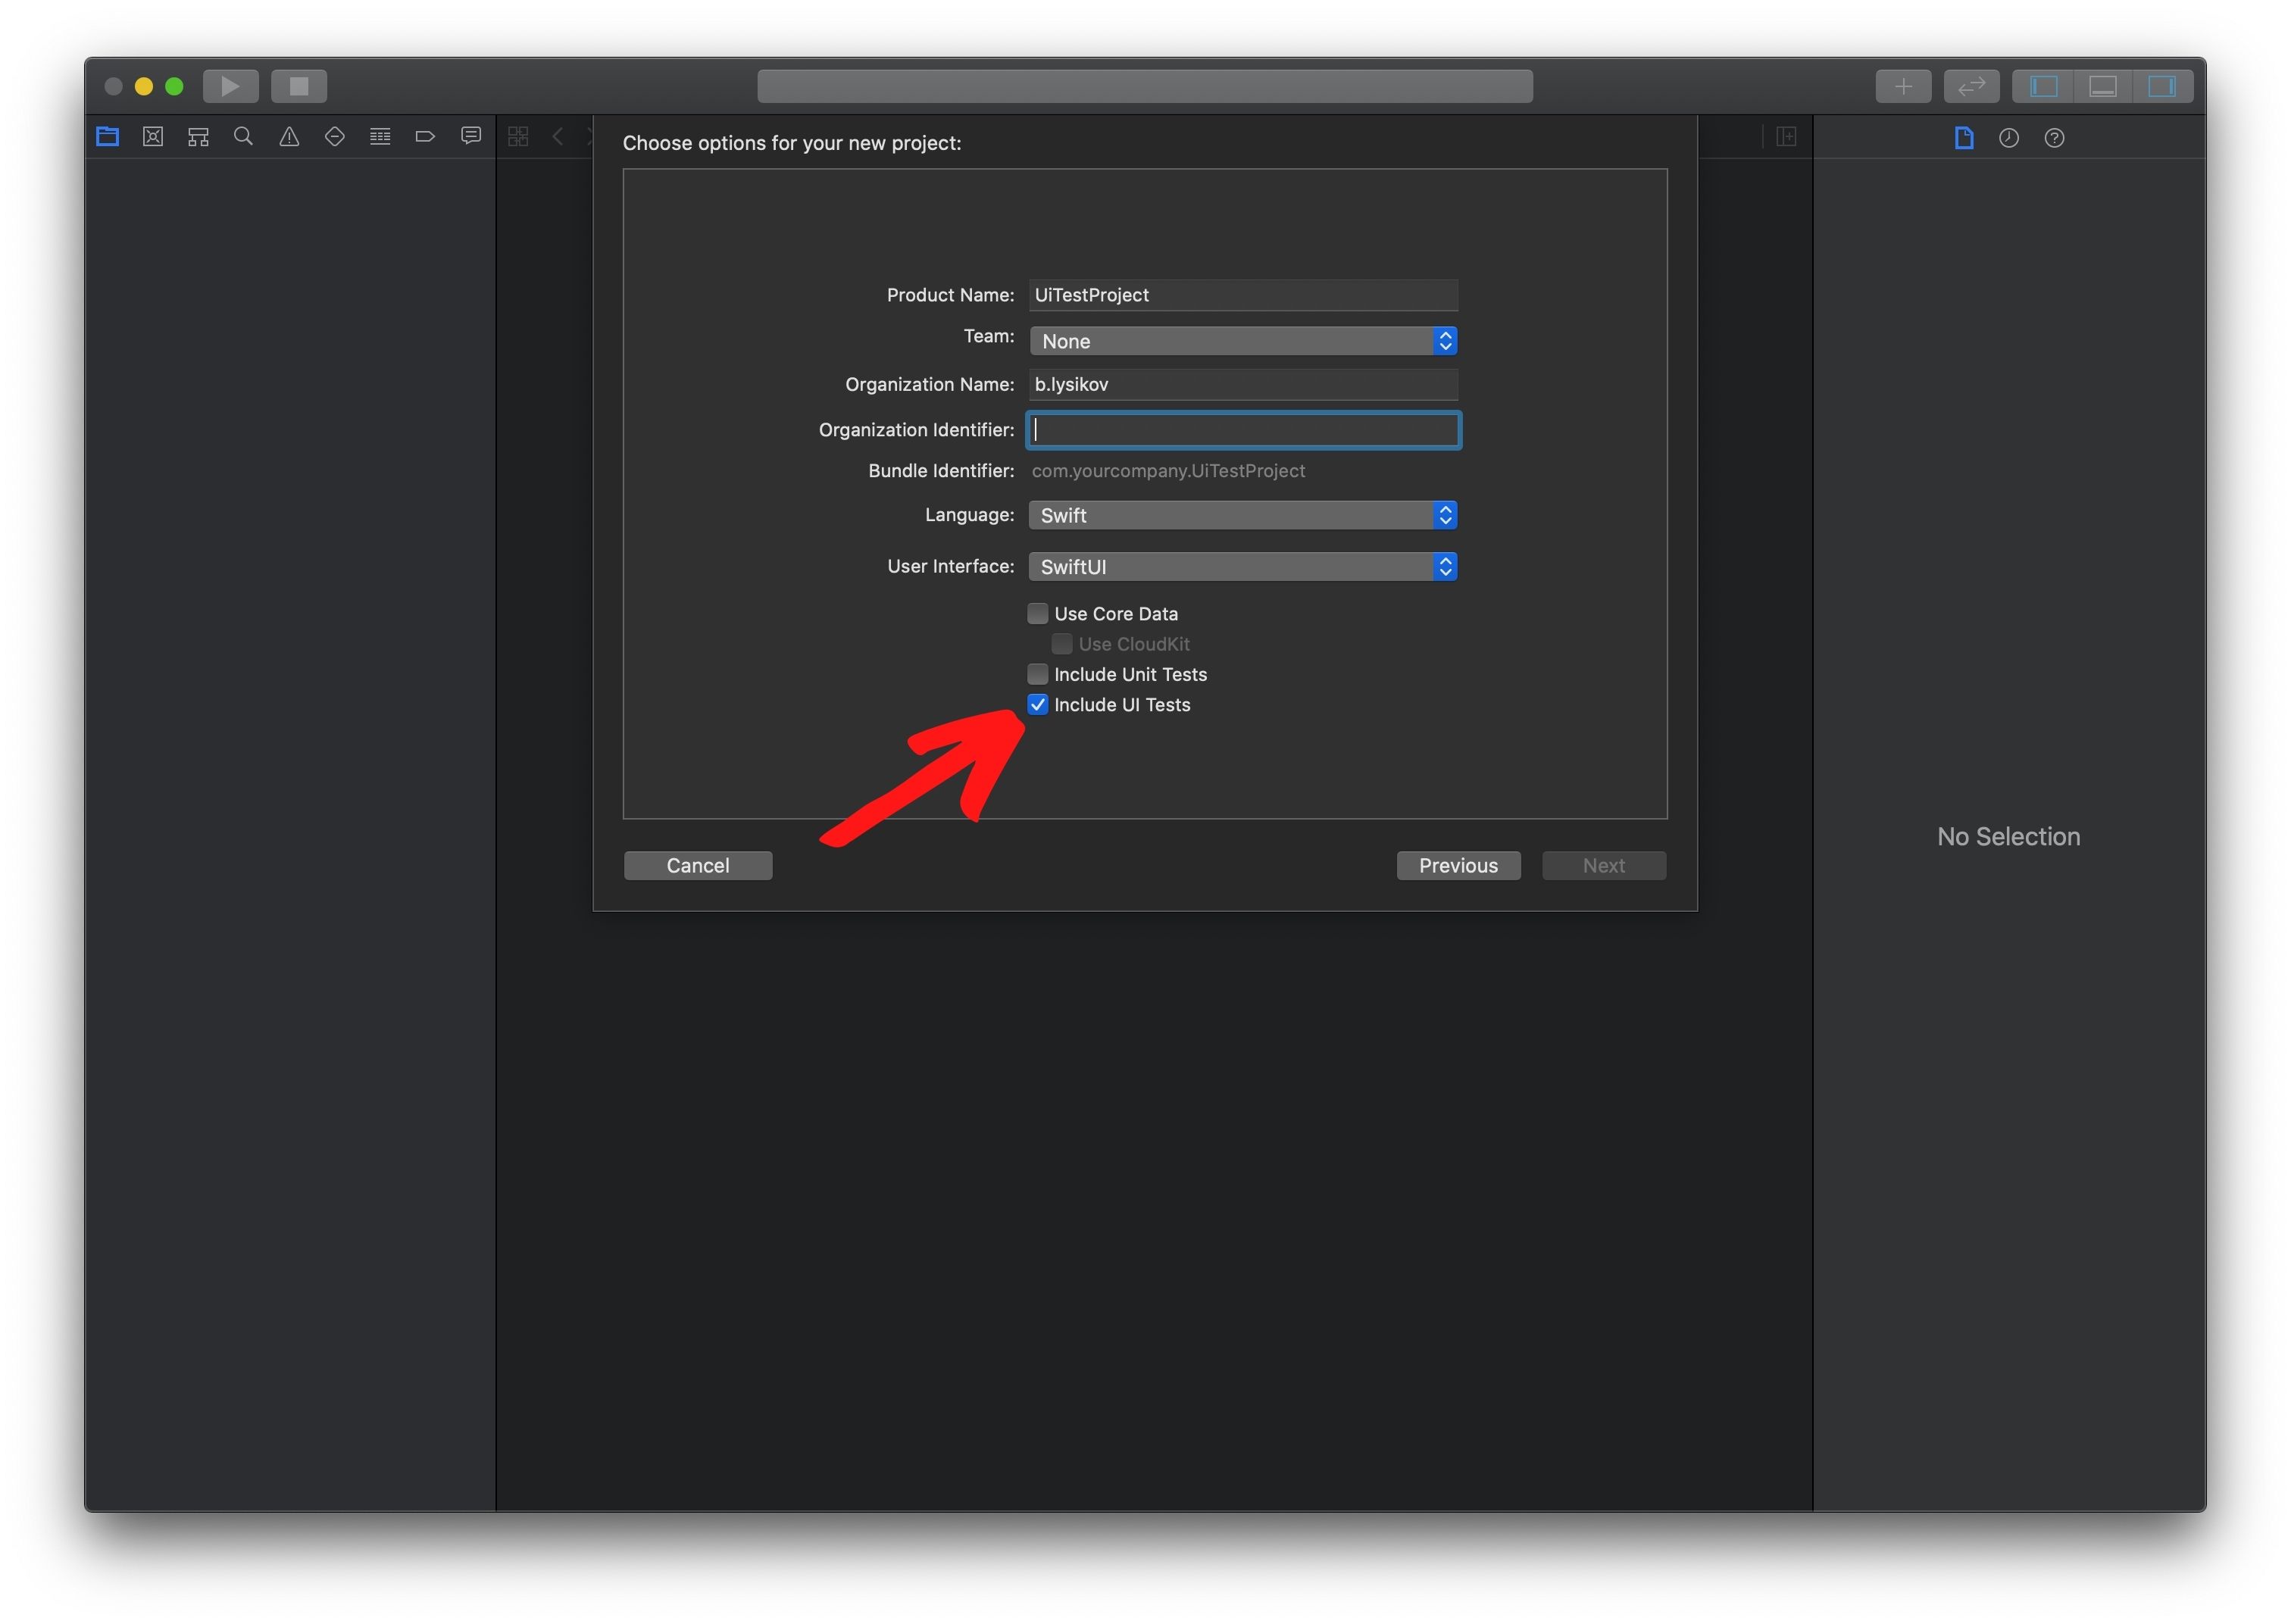
In order to be able to write ui tests, we need to do the following. If you are creating a new project, you just need to enable the target with UI tests at the time of project creation.
If you already have a project, then to add a target with ui tests you will need:
Click on File> New> Target.
Select UI Testing Bundle.
Click on Next and enter a name.
Click Finish.
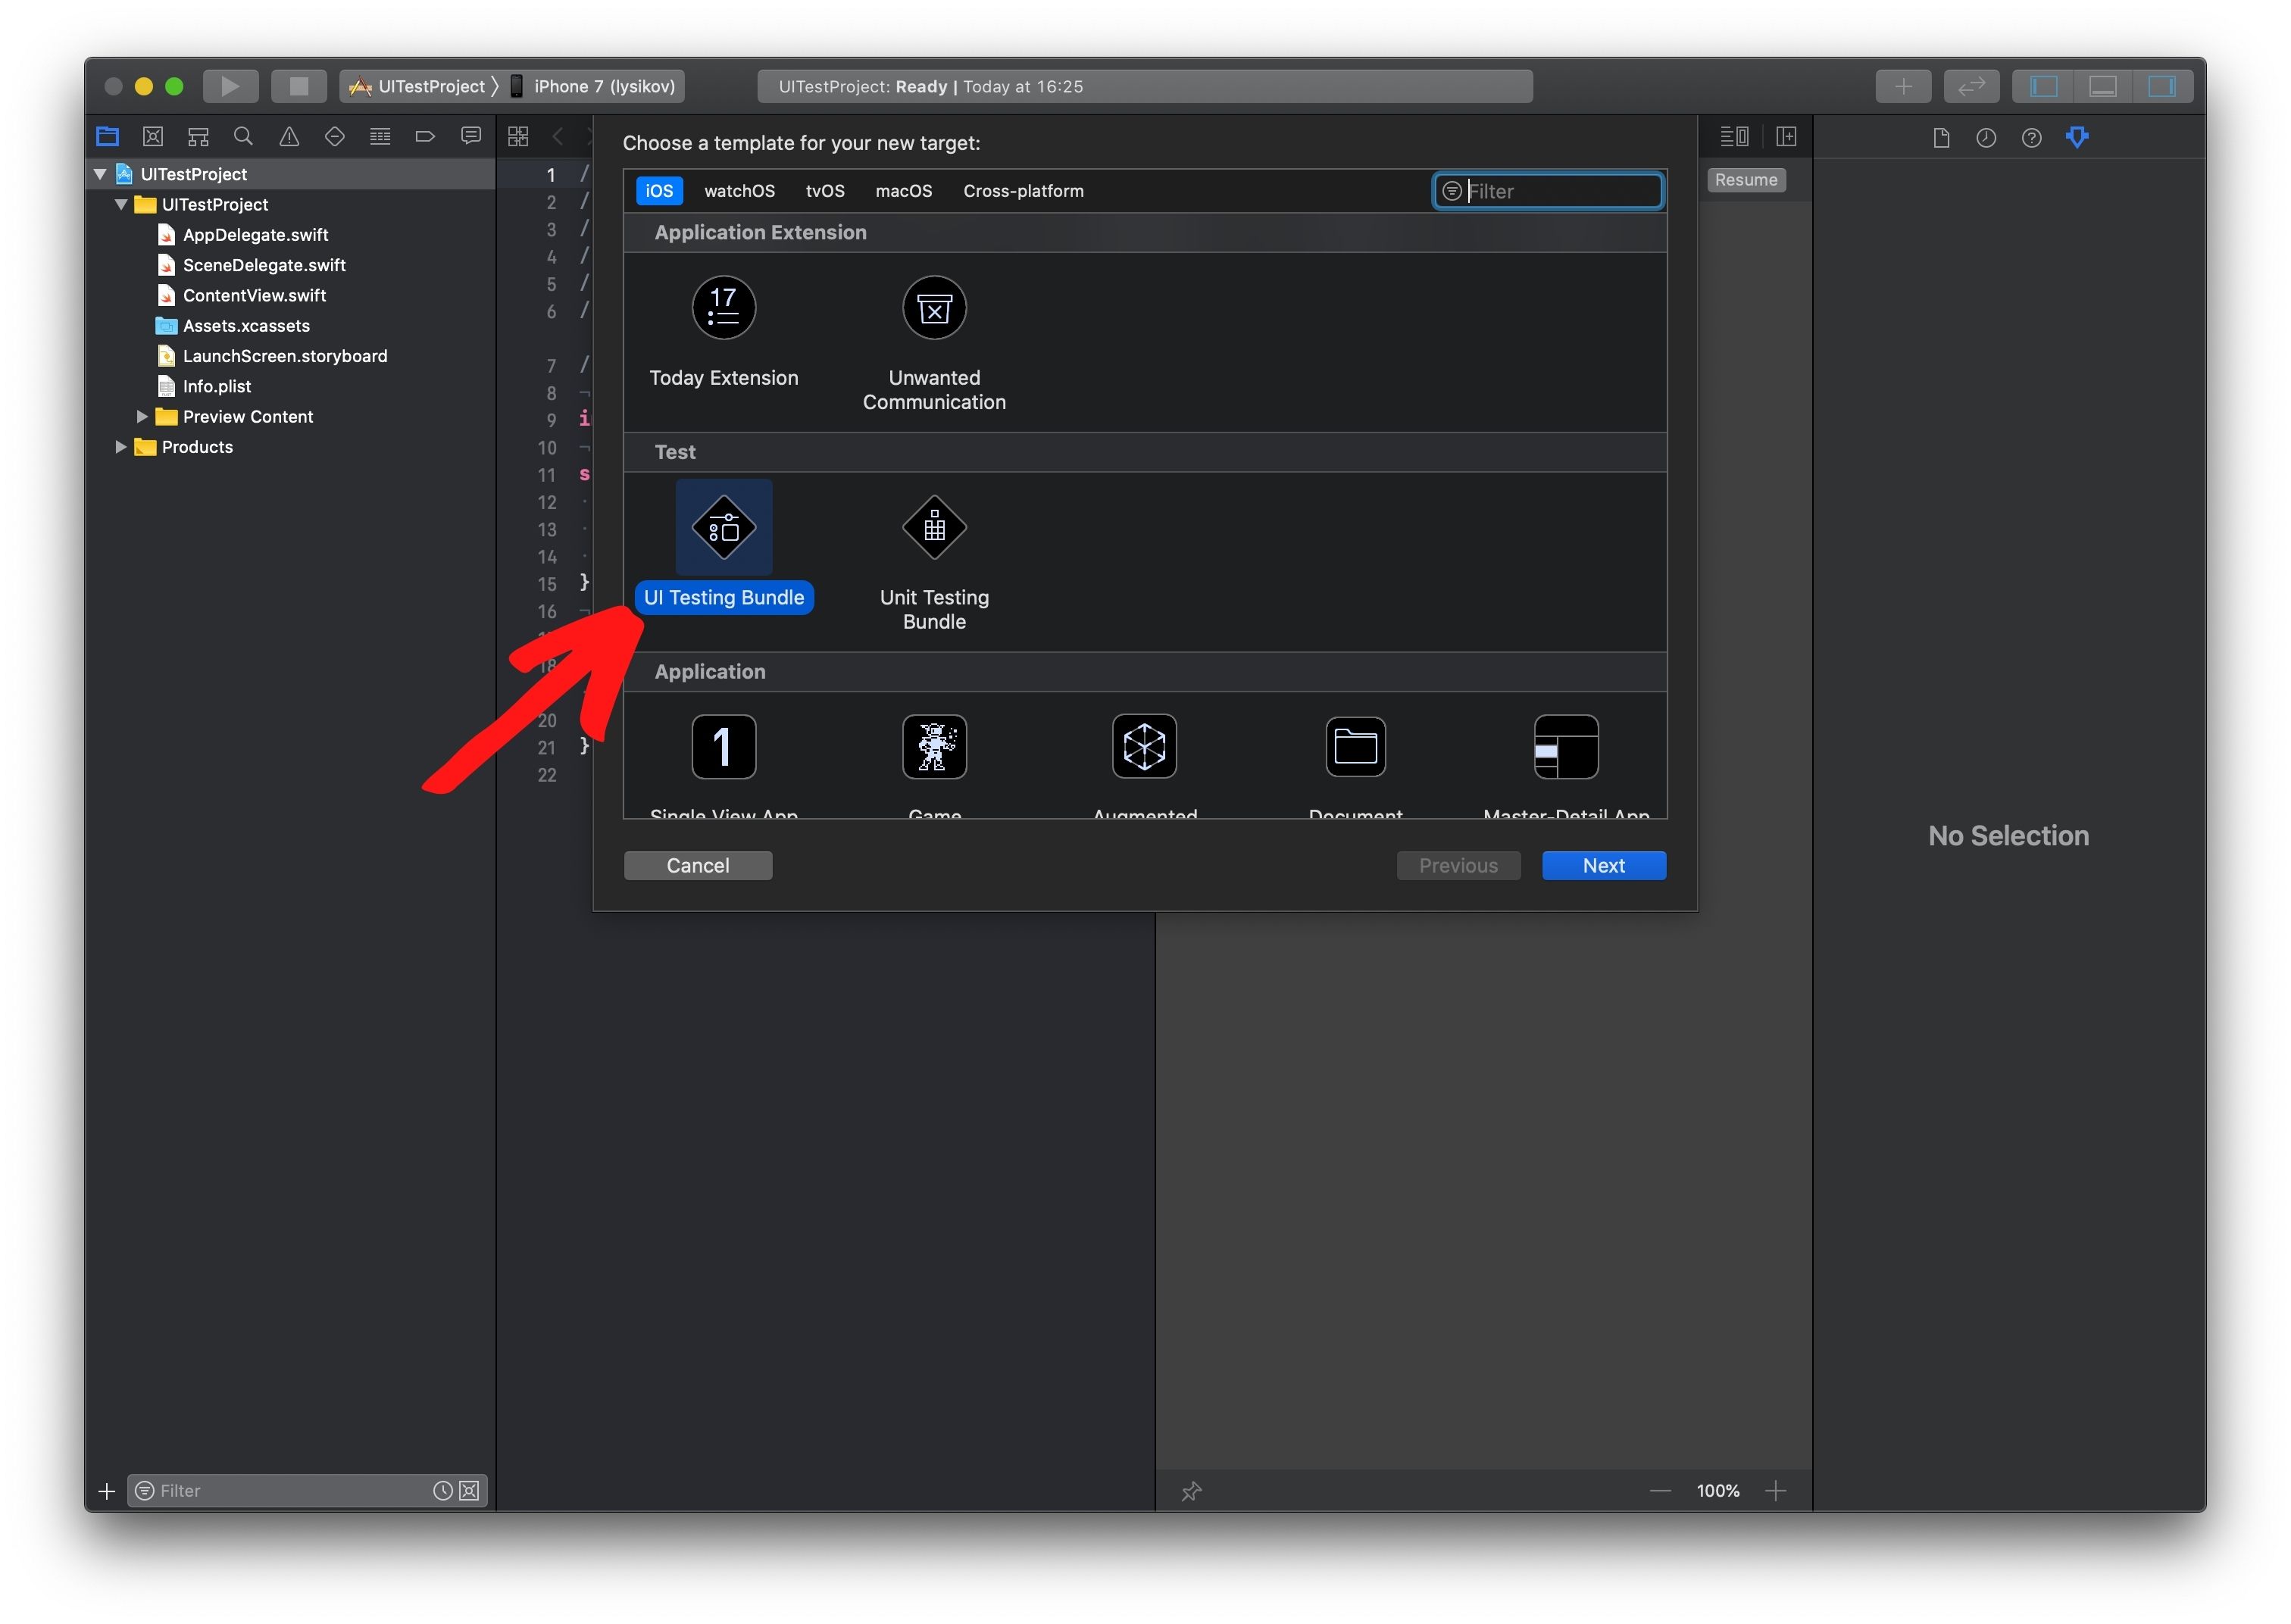
Xcode will create a new target with an empty UITest file. You will need it to write and run tests.
We prepared a project and figured out what kind of beast these ui tests are. Now we are ready to disassemble perhaps one of the basic things in autotests – this is Accessibilityidentifier, or as they say in everyday life, an ID specialist.
What is Accessibilityidentifier?
Accessibilityidentifier – This is a string identifying your ui element.
Accessibilityidentifier allows you to find the ui element you need when performing an autotest.
You can interact with ui-elements not only by accessibilityidentifier, but also by index, coordinates and other ways. But using accessibilityidentifier when interacting with ui makes your tests more reliable and saves you from the situation when you added a new element to the screen, changed the position of the current ones or changed the name of the element – as a result of which your tests started to fail.
Setting id to Objects
Let’s consider several ways of assigning accessibilityidentifier to objects, depending on the project implementation.
Storyboard project
Select storyboard.
Expand the Utilities.
Select Identity Inspector.
Select your object on the storyboard.
Activate Enabled.
Enter the name identifier (in the example: button).

Project implemented via SwiftUI
Select the required View.
Add .accessibility (identifier: “nameOfID”) method to the desired object.

A project implemented through code
Select the required ViewController.
Set the accessibilityidentifier in viewDidLoad to the required object.
import UIKit

class ViewController: UIViewController {

    @IBOutlet weak var button: UIButton!

    override func viewDidLoad() {
        super.viewDidLoad()

        button.accessibilityIdentifier = "button"
    }

}
Finding id of Objects
We figured out how to assign accessibilityidentifier to objects, now we will look at several ways how to find the desired object id.
Accessibility Inspector
Native Xcode tool. It allows you to determine if the desired object has an id without running the test itself.
To use it, you need:
Build the application on the simulator and run it.
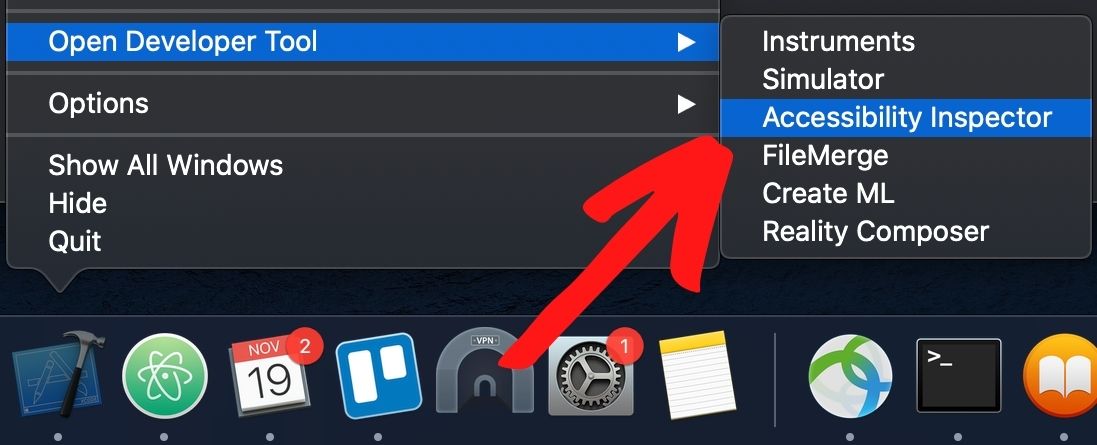
Click Xcode.
Click Open Developer Tools.
Click the Accesibility Inspector.
In the Accessibility Inspector, select your simulator with the running application.
Click on the target icon.
Tap on the item of interest in the application.
Further information about the selected object will be displayed:
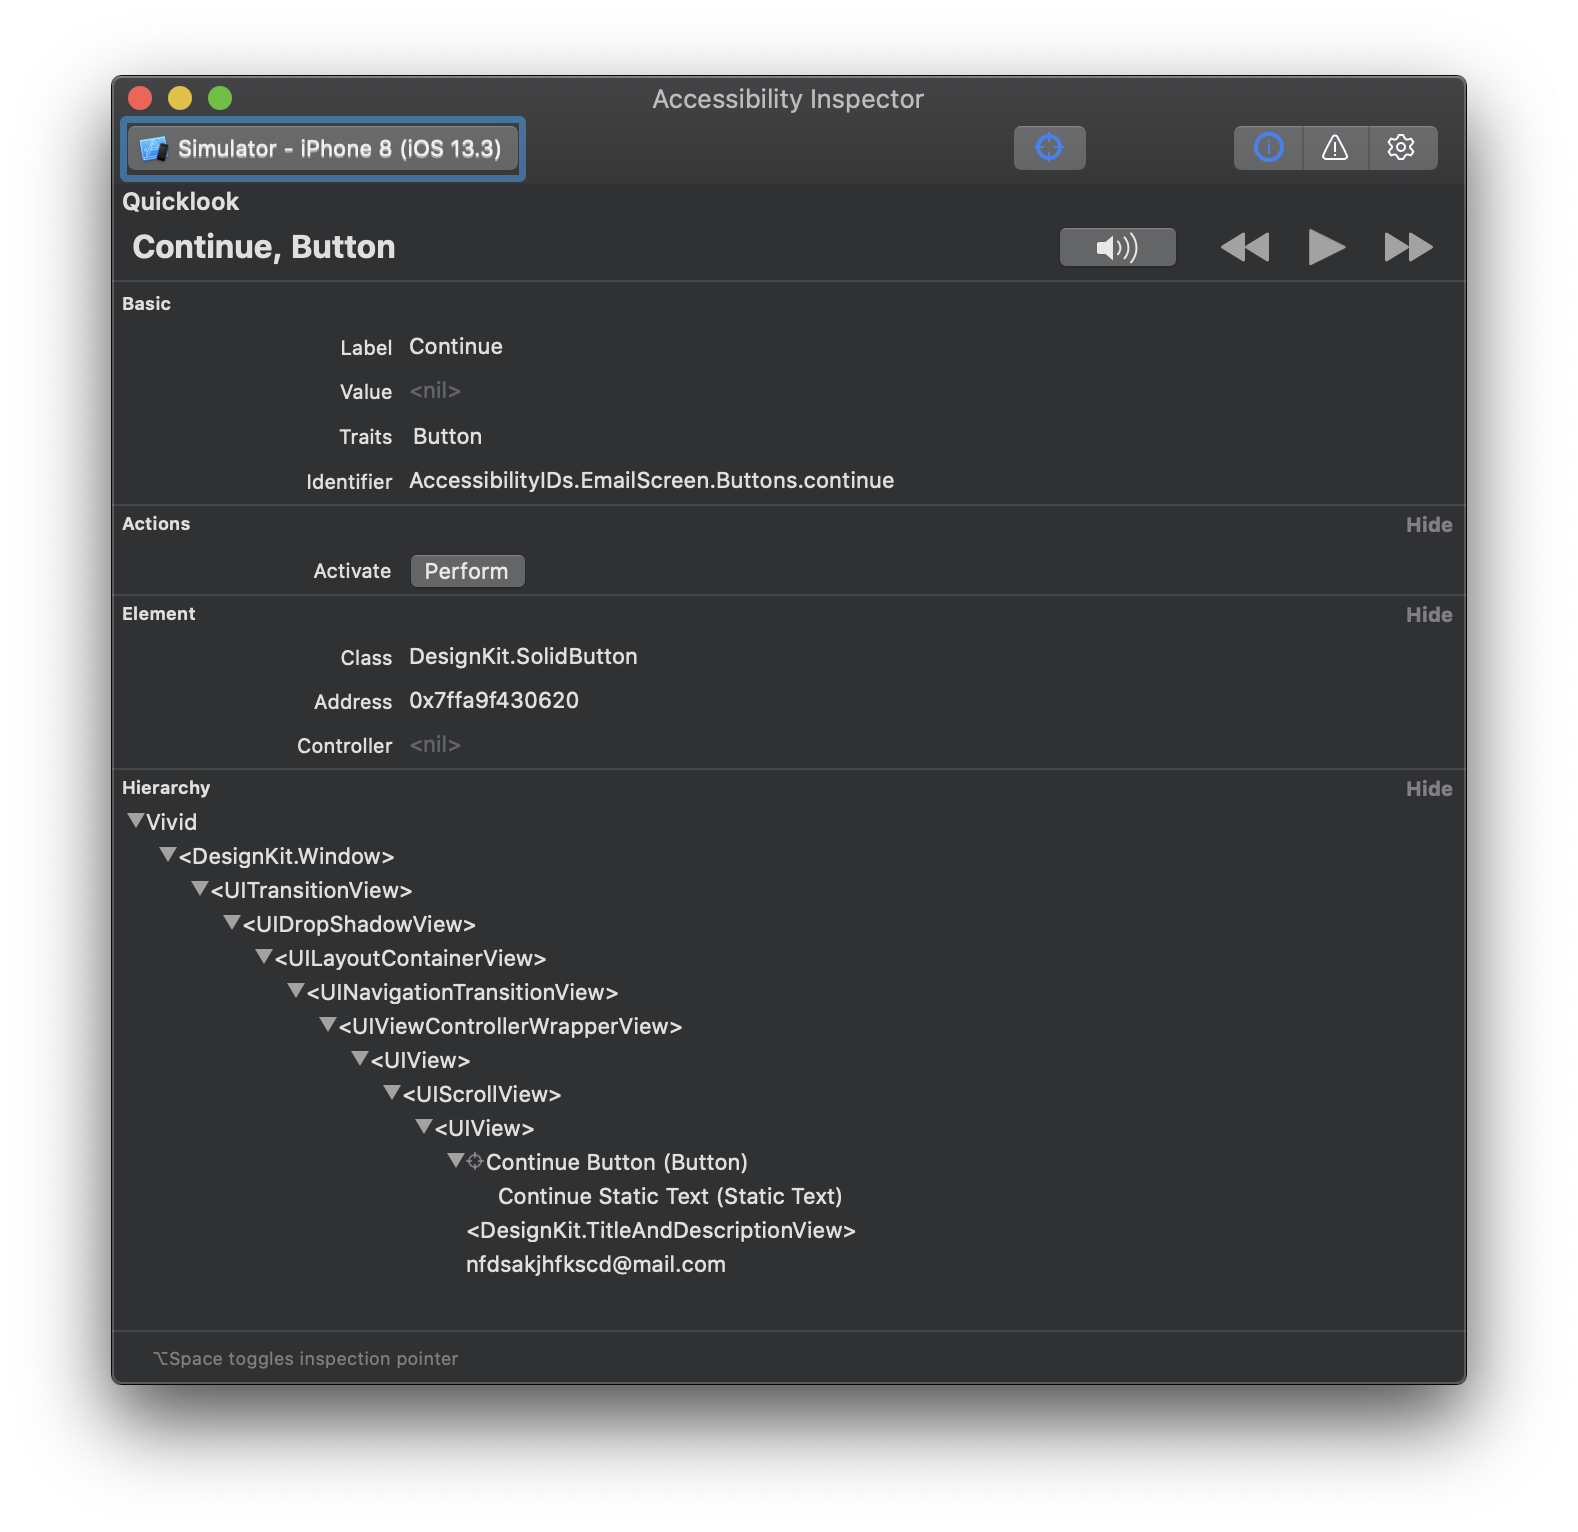
Basic
Label – The text value that is in the selected object.
Value – The value that is in the selected object. For example, filled text in TextFields.
Traits – Object name (For example: Button, Static Text).
Identifier – The id name of the selected object.
Actions:
Actions that can be performed with the object are displayed here. This can be swipe, tap, and others.
Element:
Class – The class of the selected object.
Address – The address of the object in memory.
Controller – the View Controller in which the object is located.
Hierarchy:
The section that displays the hierarchy of objects on the screen. This section is useful when you cannot select this object with the cursor and you can fall into it through the hierarchy to find out the id.
Console (lldb)
To use this method, you need to set a breakpoint in your test script and at the time of execution, when the breakpoint is triggered, write to the debug console:
po XCUIApplication().debugDescriptionWhere po is a print object command to print information about an object.
XCUIApplication is a class that allows you to launch an application and interact with its ui elements.
debugDescription – Property that displays the hierarchy of items on the screen.
Attributes: Application, pid: 67835, label: 'UiTestssProjects'
Element subtree:
 →Application, 0x6000026290a0, pid: 67835, label: 'UiTestssProjects'
    Window (Main), 0x600002629180, {{0.0, 0.0}, {375.0, 667.0}}
      Other, 0x600002629260, {{0.0, 0.0}, {375.0, 667.0}}
        Other, 0x600002629340, {{0.0, 0.0}, {375.0, 667.0}}
          Other, 0x600002629420, {{0.0, 0.0}, {375.0, 667.0}}
            Button, 0x600002629500, {{40.0, 156.0}, {46.0, 30.0}}, label: 'Button'
              StaticText, 0x6000026295e0, {{40.0, 162.0}, {46.0, 18.0}}, label: 'Button'
            StaticText, 0x6000026296c0, {{144.0, 161.0}, {42.0, 21.0}}, label: 'Label'
            Button, 0x6000026297a0, {{40.0, 216.0}, {46.0, 30.0}}, identifier: 'ButtonID', label: 'Button'
              StaticText, 0x600002629880, {{40.0, 222.0}, {46.0, 18.0}}, label: 'Button'
            Switch, 0x600002629960, {{183.0, 245.0}, {51.0, 31.0}}, value: 1
            Button, 0x600002629a40, {{40.0, 268.0}, {46.0, 30.0}}, label: 'Button'
              StaticText, 0x600002629b20, {{40.0, 274.0}, {46.0, 18.0}}, label: 'Button'
            TextField, 0x600002629c00, {{133.0, 374.0}, {97.0, 34.0}}
    Window, 0x600002629ce0, {{0.0, 0.0}, {375.0, 667.0}}
      Other, 0x600002629dc0, {{0.0, 0.0}, {375.0, 667.0}}
        Other, 0x600002629ea0, {{0.0, 0.0}, {375.0, 667.0}}
Path to element:
 →Application, 0x6000026290a0, pid: 67835, label: 'UiTestssProjects'
Query chain:
 →Find: Target Application 'fox.UiTestssProjects'
  Output: {
    Application, pid: 67835, label: 'UiTestssProjects'
  }
In this hierarchy, we see what the elements are on the screen, their coordinates, the text in them, the value, and, most importantly, the identifier.
Test Recorder
Test recorder is a native Apple tool that writes test scripts for you. You just need to run it and click the necessary steps on the simulator in the running application.
To make the recorder active you need:
UI test target (link) in your project;
A test class with a method that starts with test.
To use this method, it is enough to click on record in the method of your test and click on the object you need on the simulator. If this object has an id, it will be displayed in the generated code, if not, you can see how to refer to the desired object in an alternative way.

Conclusion:
Ui tests are a great tool for improving the quality of your product, but not always necessary. To understand the feasibility of its application in your project, you can refer to the articles, which provide specific points when it is necessary or not necessary to do this. Here’s an example like this articles
In the next article, we will talk about what ui elements are in an iOS application and how to interact with them when writing ui tests.