Development of fast and modern sites based on Next.js using GraphQL & WordPress
Introduction
Next.js – modern framework based on React.jswhich is gaining a lot of traction among developers and provides tools for different kinds of page rendering.
WordPress is a popular headless CMS used for various projects – from simple blogs to complex applications.
We had access to the live site admin panel on WordPressan awl in the code and an irresistible desire to experiment with Next.js.
Solution based on article (and template) Vercel Using Headless WordPress with Next.js and Vercel.
It turned out to be a fairly fast application with approximately small labor costs.
TLDR
MVP approach
We had a main goal – an experiment with a stack Next.js-GraphQL-WordPress to gain practice and better understand the possibilities.
Because everything else was decided brazenly steal copy to save time:
-
blog design borrowed from kod.ru (blog about Telegram, TON and Pavel Durov’s projects)
-
landing design borrowed from ton.org (blockchain with same roots)
-
content taken from wpcraft.ru – because there was access to the admin panel
As a result, we got a kind of hybrid of these 3 projects, which allowed us, on the one hand, to get the experiment as close to reality as possible, on the other hand, to do without unnecessary costs for design and content.
Backend: WordPress + GraphQL
WordPress, perhaps the easiest way to build a backend, but in our case we took a ready-made working site that already had some content. And immediately went to the setting GraphQL.
Setting up GraphQL based on WordPress
The setup process will take a conditional 5 minutes:
-
go to the admin panel, in the plugins section
-
find plugin WPGraphQL – installed
-
specify GraphQL Endpoint, other settings – default
Frontend: Next.js + TypeScript
Create a project
official documentation For Next.js applications are recommended create-next-app.
In our examples we use typescript and the pages folder. It will work similarly with the experimental app directory, incl. on a clean JavaScript.
npx create-next-app@latest --typescriptWe select the necessary options, wait for the installation of all dependencies and get the basic structure of the application.
Go to the project folder (if not already) and in the terminal execute npm run dev. If you didn’t miss anywhere, the server should start on port 3000 (by default):
ready - started server on 0.0.0.0:3000, url: <http://localhost:3000>
event - compiled client and server successfully in 469 ms (170 modules)
We go to the specified address, make sure that everything works.
Now we have a simple Next.js application.
Forming a GraphQL query
plugin WPGraphQL in CMS WordPress provides an IDE for generating and testing requests.
Open wp-admin and find GraphQL.
Query Composer is a graphical query editor, it contains a tree structure of all available CMS fields. Here we can select the required fields, set the selection conditions, sorting and get a ready-made query.
For example, we want to get the 5 most recently added posts in the “development” category:
-
click Query Composer, find posts in the tree, expand
-
check the first box and set the value to 5
-
expand where, select categoryName and specify “development”
-
then expand the nodes and select the required fields: slug, title, excerpt, date
-
The image URL is a little deeper – featureImage/node/sourceUrl
Next, we start the execution of the query with the Execute Query button (or Ctrl + Enter) and in the right section we see the result of the query.

Thus, you can form all the necessary queries, check what data they return, examine the data structure, etc.
If you do not specify the first parameter, then WPGraphQL will return 10 posts.
The maximum number of posts returned is 100, even if you specify first: 1000.
And if you need to get more than 100 posts? WPGraphQL plugin author saysthat large queries can lead to client and server performance issues and suggests using pagination.
Adding an interface
Now we know the structure of the returned data and can describe the interfaces:
// types.ts

export interface IPostPreview {
  slug: string;
  title: string;
  excertp: string;
  featuredImage: {
    node: {
      sourceUrl: string;
    }
  }
  date: string;
}

export interface IPost extends IPostPreview {
  content: string;
}
Getting data from CMS WordPress
Everything is ready to receive data on the client side.
Let’s add a function getPostsusing the method fetch:
// wp-api.ts

export async function getPosts() {

  // определяем Content-Type для JSON
  const headers = { 'Content-Type': 'application/json' };

  // формируем GraphQL запрос
  const query = `
    query FavoriteBlogs {
      posts {
        nodes {
          slug
          title
          excerpt
          date
          featuredImage {
            node {
              sourceUrl
            }
          }
        }
      }
    }
  `;

  // Первым аргументом метода fetch указываем GraphQL ендпоинт,
  // который мы определили в настройках CMS.
  // Второй аргумент - объект запроса.
  const res = await fetch('<https://wpcraft.ru/graphql>', {
    headers,
    method: 'POST',
    body: JSON.stringify({
      query,
    }),
  });

  // получаем JSON из объекта Promise<Response>
  const json = await res.json();

  // возвращаем посты
  return json.data?.posts.nodes;
}
Headers and response processing will be needed in all requests, so it makes sense to put this code in a wrapper function fetchDatawhich will accept the request text and return the data:
// wp-api.ts

async function fetchData(query: string) {
  const headers = { 'Content-Type': 'application/json' };

  const res = await fetch('<https://wpcraft.ru/graphql>', {
    headers,
    method: 'POST',
    body: JSON.stringify({
      query,
    }),
  });
  const json = await res.json();

  return json.data;
}

export async function getPosts() {
  const data = await fetchData(`
    query getPosts{
      posts {
        nodes {
          slug
          title
          excerpt
          date
          featuredImage {
            node {
              sourceUrl
            }
          }
        }
      }
    }
  `);
  return data.posts.nodes as IPostPreview[];
}
And because we didn’t specify a parameter first, WPGraphQL will return us 10 posts.
Structure and routing
We want to make a page that will have a list of posts.
Clicking on a post should open a page with the content of the post.
Each page with a post will have its own unique URL, which will be generated dynamically using slug.
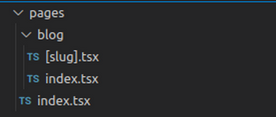
Now in the pages directory we have a file index.tsx is the main page that opens at http://localhost:3000/. Route – /.
Add the file to the pages directory [slug].tsx – here we will draw each individual post. Route – /some-meaningful-post-title

If we want to place, say, a landing page on the main page, and display the list of posts on another route, say, through the prefix /blogwe can create a blog directory inside pages, add to it index.tsx for a list of posts (route – /blog) And [slug].tsx for each post (route – /blog/uniq-post-slug).
Here is more details about routing in Next.js.
Page generation options in Next.js
Next.js supports different ways of generating pages, consider SSR and SSG.
ISG differs from SSG in a couple of parameters within the same functions, so ISG will not be considered in this article.
// [slug].tsx

import styles from './slug.module.scss';-
SSR (server side generation)
Post List Page
Get a list of posts with
getServerSidePropspassing through props to the page component Home:// pages/index.ts // опишем явно какие пропсы ожидаем в Home interface IHomeProps { posts: IPostPreview[]; } export default function Home({ posts }: IHomeProps) { return ( <main> {posts.map((post) => ( // используем Link из 'next/link' <Link key={post.slug} href={/${post.slug}}> {post.title} </Link> ))} </main> ); } // тип GetServerSideProps экспортируем из 'next' export const getServerSideProps: GetServerSideProps = async () => { // тип IPostPreview[] переменной posts можно не указывать, // т.к. мы явно указали в getPost какого типа данные мы возвращаем const posts: IPostPreview[] = await getPosts(); return { props: { posts, }, }; }Now a clickable list of post titles is displayed on the page, clicking on a post opens the page [slug].tsx, URL changes to
http://localhost:3000/[slug].Post content page
Let’s add a function
getPostBySlugwith its help we will receive a post with content to display on the post page.// wp-api.ts export async function getPostBySlug(slug: string) { const data = await fetchData(` query getPostBySlug { post(id: "${slug}", idType: SLUG) { title content excerpt slug featuredImage { node { sourceUrl } } date } `}); return data.post as IPost; }Now everything is ready to receive the post and generate the page:
// [slug].ts

// опишем явно какие пропсы ожидаем в Post
interface IPostProps {
  post: IPost;
}

export default function Post({ post }: IPostProps) {

  return (
    <>
      {post && (
        <article>
          <h1>{post.title}</h1>
          <div dangerouslySetInnerHTML={{__html: post.content}} />
        </article>
      )}
    </>
  );
}

export const getServerSideProps: GetServerSideProps = async (context) => {
  // params может быть undefined, slug может быть string | string[] | undefined
  // поэтому укажем явно какой тип мы передаём в slug
  // это немного "костыль", но пока так
  const slug = context.params?.slug as string;

  // тип для переменной post не указываем, т.к. в getPostBySlug указали
  // какого типа данные возвращаем
  const post = await getPostBySlug(slug);

  return {
    props: {
      post
    }
  }
}
At this stage, when you click on the title of the main page article, we should see the article in its entirety. But the content will look bad, because. we did not set any styles for him.
Styling content:
// slug.module.scss

.content {
  p,
  ul,
  ol,
  blockquote {
    margin: 1.5rem 0;
  }
  a {
    cursor: pointer;
    text-decoration: underline;
  }
  ul,
  ol {
    padding: 0 0 0 1rem;
  }
  ul {
    list-style-type: disc;
  }
  ol {
    list-style-type: decimal;
  }
  pre {
    white-space: pre;
    overflow-x: auto;
    padding: 1rem;
    font-size: 1.25rem;
    line-height: 1.25;
    border: 1px solid rgb(156 163 175);
    background-color: rgb(243 244 246);
  }
  code {
    font-size: 0.875rem;
    line-height: 1.25rem;
  }
  figcaption {
    text-align: center;
    font-size: 0.875rem;
    line-height: 1.25rem;
  }
...
// [slug].tsx ... <div className={styles.content} dangerouslySetInnerHTML={{__html: post.content}} /> ...For now, we leave out the question of forwarding styles generated in WordPress using Gutenberg, because. the author himself has not yet figured out how to do it 🙂
Thus,
at this stage we have a list of posts, clicking on a post opens a page with the post content. The generation of all pages occurs on the side of the web server at the time of accessing the web server.
-
SSG (static generation)
Post List Page
We change
getServerSidePropson getStaticProps (with the appropriate type) and you’re done.It’s great, right? 🙂
// pages/index.ts

// опишем явно какие пропсы ожидаем в Home
interface IHomeProps {
  posts: IPostPreview[];
}

export default function Home({ posts }: IHomeProps) {

  return (
    <main>
      {posts.map((post) => (
        // используем Link из 'next/link'
        <Link key={post.slug} href={/${post.slug}}>
          {post.title}
        </Link>
      ))}
    </main>
  );
}

// тип GetStaticProps экспортируем из 'next'
export const getStaticProps: GetStaticProps = async () => {
  const posts = await getPosts();

  return {
    props: { posts },
  };
};
Post page
It’s a little more difficult here. Because The URL of the page depends on the specific slug of each post, we must determine all possible URLs in advance, during the assembly of the application.
For this, the function is used
getStaticPaths.Obtaining data for static content generation is carried out using the already familiar functiongetStaticProps.// [slug].ts // опишем явно какие пропсы ожидаем в Post interface IPostProps { post: IPost; } export default function Post({ post }: IPostProps) { return ( <> {post && ( <article> <h1>{post.title}</h1> <div dangerouslySetInnerHTML={{__html: post.content}} /> </article> )} </> ); } export const getStaticPaths: GetStaticPaths = async () => { const posts = await getPosts(); // создаём массив путей для каждого поста const paths = posts.map((post) => ({ params: { slug: post.slug }, })); return { // возвращаем массив путей paths, // fallback может быть true, false или 'blocking' // подробней тут: <https://nextjs.org/docs/api-reference/data-fetching/get-static-paths> fallback: false, }; } export const getStaticProps: GetStaticProps = async (context) => { const slug = context.params?.slug as string; const post = await getPostBySlug(slug); return { props: { post } } }Now, during the build, we generate the main page with a list of posts and all pages with posts. If in WordPress 200 posts, then the web server will generate 201 pages.
Publishing the application on Vercel
We have a page with posts, you can open each post and see the content, which means you can share our application with the rest of the world.
GitHub repository
If at this stage the repository is already running, then just push the code and move on.
If not yet, then:
-
create a repository on GitHub
-
open the terminal (from the IDE or as convenient), go to the project folder
-
execute commands:
git init
// user-name - имя пользователя github
// repo-name - название репозитория
// проще всего эту ссылку взять в созданном репозитории github
git remote add origin <https://github.com/[user-name]/[repo-name].git>
git branch -M main
git add .
// название коммита выбираем на свой вкус
git commit -m 'initial project'
git push -u origin main
If you didn’t miss anywhere, then you should see something like this in the terminal:
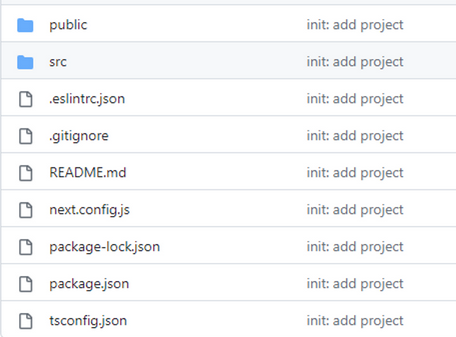
Enumerating objects: 26, done.
Counting objects: 100% (26/26), done.
Delta compression using up to 8 threads
Compressing objects: 100% (22/22), done.
Writing objects: 100% (26/26), 73.76 KiB | 8.20 MiB/s, done.
Total 26 (delta 0), reused 0 (delta 0), pack-reused 0
To <https://github.com/[user-name]/[repo-name].git>
 * [new branch]      main -> main
branch 'main' set up to track 'origin/main'.
And on the page https://github.com/[user-name]/[repo-name] files should appear, for example:
Now, after making changes to the code, we can push these changes to the repository:
git add .
git commit -m 'feat: add feature'
git push
Deploy to Vercel
-
Register for vercel.com
-
Finding a button Add new → project
-
In the block Import Git Repository press Adjust GitHub App Permissions
-
In the window that opens, enter the password from the github account to confirm access
-
After authentication, the application access settings will open in the same window.
-
We see Vercelscroll down to Repository accesschoose Only select repositories
-
Click Select repositoriesfind the desired repository and click Save
-
As soon as they saw the inscription GitHub Installation Complete – we close the window. Or don’t close it and it will close itself.
-
Back to the page vercel.com/newnext to the repository that appears, click Import
-
In the block Configure Project click Deploy and wait.
-
Within a minute, the application is assembled, if everything is ok, an inscription appears Congratulations!
Then you can follow the link and the page with the application will open, available to all Internet users.
Preview of changes (preview, pre-deploy)
The magic doesn’t end there 🙂
-
We go to the repository on github and create a new branch from main, for example, dev
-
In the IDE terminal, switch to the created branch, make changes to the code, push them to the github.
-
Create a PR (Pull request → New pull request, select base: main ← compare: dev and click Create pull request)
-
On the page Open a pull request enter a name, description (optional) and click Create pull request
-
After creating a pull request, vercel bot is launched, builds a new version of the application, taking into account all the commits of the pull request
-
If there are any errors during the build process, we will see a message about it
Let’s break the GraphQL query by accidentally removing the slug:
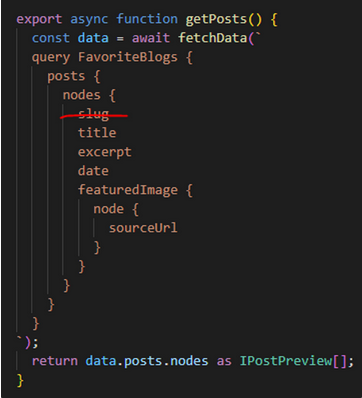
Let’s push the change to the repository (git add, git commit, git push) and make a PR:

We will see an error, and in Details you can see the build logs.
We fix the error, push a new commit, and inside the same PR we see how the vercel bot rebuilt the preview with a new commit and now the checkboxes are green and there is a link to the deployment preview:

-
Now we can open preview, perform manual testing, and if everything is ok – Merge pull request
-
If something is wrong, you can make changes to the code, push a new commit and see in the same PR whether the new build has been assembled and what the preview looks like
-
And so many times
-
After the Merge pull request, the application at the main address will receive all updates to the pull request
Total
Advantages and disadvantages
Advantages:
-
very fast site compared to the original on WordPress – pages open instantly thanks to ISR Next.js
-
layout through Next.js and components React.js doing much more convenient, pleasant and efficient than dealing with PHP
-
SEO support is much better than pure React.js
-
modern, fashionable, youth
Flaws
-
the cost of developing such a site is much higher than that of a simple one WordPress with ready-made themes
-
V WordPress With Gutenberg we can change content in real time, without code and programmers, here we often run into code and programmers – which can be critical for some projects
Afterword
The plans are to prepare the second part, if the topic turns out to be interesting to the community. In it, we will consider authorization, mutating methods (creating, editing and deleting posts), comments and sociality, forwarding styles Gutenberg.
Please write in the comments what can be improved, what aspects to consider, questions you have, etc. Given that we have two versions of the site, we can measure performance if more experienced comrades suggest a methodology and / or tools.
The code can be used as a template for your experiments, you can create an issue with requests for changes and adding functionality.
I thank the author of the idea and the owner of the backing, without him the experiment and this material would not have turned out.