Detecting facial expressions in the browser using deep learning and TensorFlow.js. Part 2

In the previous article, we learned how to use AI models to define the shape of faces. In this article, we will use face key landmarks to get more information about the face from images.
In this article, we will use face key landmarks to get more information about the face from images. We are using deep learning on tracked faces from the FER + dataset and will try to pinpoint a person’s emotions from facial points in the browser using TensorFlow.js.
By pairing our face tracking code with facial emotions dataset FER, we will train the second neural network model to determine human emotions by several three-dimensional key points.
You can download a demo version of this project. You might need to enable WebGL support in your web browser to get the performance you want. You can also download code and files for this series.
FER2013 Facial Emotion Data Tuning
We use the face tracking code from the previous article to create two web pages. One page will be used to train the AI model on the tracked face points in the FER dataset, while the other will load the trained model and apply it to the test dataset.
Let’s modify the final code from the face tracking project to train the neural network model and apply it to the face data. The FER2013 dataset consists of over 28,000 tagged face images; it is available on the website Kaggle… We have uploaded this version, in which the dataset has already been converted to image files, and placed it in the folder web / fer2013… We then updated the NodeJS server code to index.jsso that it returns a list of image links at http: // localhost: 8080 / data /… Therefore, you can get the complete JSON object if you start the server locally.
To keep things simple, we have stored this JSON object in a file web / fer2013.jsso that you can use it directly without starting the server locally. You can include it in other script files at the top of the page:
<script src="https://habr.com/ru/company/skillfactory/blog/544850/web/fer2013.js"></script>We’re going to be working with images, not webcam video (don’t worry, we’ll come back to video in the next article). Therefore, we need to replace the element<video> element <img>and rename its ID to “image”. We can also remove the function setupWebcamas it is not needed for this project.
<img id="image" style="
    visibility: hidden;
    width: auto;
    height: auto;
    "/>
Next, let’s add a utility function to set an image for the element, and another one to shuffle the data array. Since the original images are only 48×48 pixels in size, let’s set the larger output size to 500 pixels to get more detailed face tracking and be able to see the result in a larger canvas. We will also update the utility functions for lines and polygons to scale according to the output.
async function setImage( url ) {
    return new Promise( res => {
        let image = document.getElementById( "image" );
        image.src = url;
        image.onload = () => {
            res();
        };
    });
}

function shuffleArray( array ) {
    for( let i = array.length - 1; i > 0; i-- ) {
        const j = Math.floor( Math.random() * ( i + 1 ) );
        [ array[ i ], array[ j ] ] = [ array[ j ], array[ i ] ];
    }
}

const OUTPUT_SIZE = 500;
We will need some global variables: for a list of emotion categories, a list of aggregated data arrays FER, and an array index:
const emotions = [ "angry", "disgust", "fear", "happy", "neutral", "sad", "surprise" ];
let ferData = [];
let setIndex = 0;
Inside the async block, we can prepare and shuffle the FER data and resize the canvas element to 500×500 pixels:
const minSamples = Math.min( ...Object.keys( fer2013 ).map( em => fer2013[ em ].length ) );
Object.keys( fer2013 ).forEach( em => {
    shuffleArray( fer2013[ em ] );
    for( let i = 0; i < minSamples; i++ ) {
        ferData.push({
            emotion: em,
            file: fer2013[ em ][ i ]
        });
    }
});
shuffleArray( ferData );

let canvas = document.getElementById( "output" );
canvas.width = OUTPUT_SIZE;
canvas.height = OUTPUT_SIZE;
We need to update the code template one last time before training the AI model on one page and applying the trained model on the second page. Function needs to be updated trackFaceso that it works on the image element, not the video element. You also need to scale the bounding box and the face grid output to fit the canvas. We will set the increment setIndex at the end of the function to go to the next image.
async function trackFace() {
    // Set to the next training image
    await setImage( ferData[ setIndex ].file );
    const image = document.getElementById( "image" );
    const faces = await model.estimateFaces( {
        input: image,
        returnTensors: false,
        flipHorizontal: false,
    });
    output.drawImage(
        image,
        0, 0, image.width, image.height,
        0, 0, OUTPUT_SIZE, OUTPUT_SIZE
    );

    const scale = OUTPUT_SIZE / image.width;

    faces.forEach( face => {
        // Draw the bounding box
        const x1 = face.boundingBox.topLeft[ 0 ];
        const y1 = face.boundingBox.topLeft[ 1 ];
        const x2 = face.boundingBox.bottomRight[ 0 ];
        const y2 = face.boundingBox.bottomRight[ 1 ];
        const bWidth = x2 - x1;
        const bHeight = y2 - y1;
        drawLine( output, x1, y1, x2, y1, scale );
        drawLine( output, x2, y1, x2, y2, scale );
        drawLine( output, x1, y2, x2, y2, scale );
        drawLine( output, x1, y1, x1, y2, scale );

        // Draw the face mesh
        const keypoints = face.scaledMesh;
        for( let i = 0; i < FaceTriangles.length / 3; i++ ) {
            let pointA = keypoints[ FaceTriangles[ i * 3 ] ];
            let pointB = keypoints[ FaceTriangles[ i * 3 + 1 ] ];
            let pointC = keypoints[ FaceTriangles[ i * 3 + 2 ] ];
            drawTriangle( output, pointA[ 0 ], pointA[ 1 ], pointB[ 0 ], pointB[ 1 ], pointC[ 0 ], pointC[ 1 ], scale );
        }
    });

    setText( `${setIndex + 1}. Face Tracking Confidence: ${face.faceInViewConfidence.toFixed( 3 )} - ${ferData[ setIndex ].emotion}` );
    setIndex++;
    requestAnimationFrame( trackFace );
}
Now our modified template is ready. Make two copies of this code so that one page can be set for deep learning and the other page – for testing.
1. Deep study of facial emotions
In this first web page file, we are going to set training data, create a neural network model, and then train it and save the weights to a file. The code includes a pretrained model (see folder web / model), so if you want you can skip this part and go to part 2.
Add a global variable to hold the training data and a utility function to convert the emotion labels to a unitary vector so that we can use it for the training data:
let trainingData = [];

function emotionToArray( emotion ) {
    let array = [];
    for( let i = 0; i < emotions.length; i++ ) {
        array.push( emotion === emotions[ i ] ? 1 : 0 );
    }
    return array;
}
Inside the function trackFace we will take various key facial features, scale them relative to the size of the bounding box and add them to the training dataset if the face tracking confidence value is large enough. We’ve commented out some additional facial features to keep things simple, but you can add them back if you want to experiment. If you do, remember to map these functions when applying the model.
// Add just the nose, cheeks, eyes, eyebrows & mouth
const features = [
    "noseTip",
    "leftCheek",
    "rightCheek",
    "leftEyeLower1", "leftEyeUpper1",
    "rightEyeLower1", "rightEyeUpper1",
    "leftEyebrowLower", //"leftEyebrowUpper",
    "rightEyebrowLower", //"rightEyebrowUpper",
    "lipsLowerInner", //"lipsLowerOuter",
    "lipsUpperInner", //"lipsUpperOuter",
];
let points = [];
features.forEach( feature => {
    face.annotations[ feature ].forEach( x => {
        points.push( ( x[ 0 ] - x1 ) / bWidth );
        points.push( ( x[ 1 ] - y1 ) / bHeight );
    });
});
// Only grab the faces that are confident
if( face.faceInViewConfidence > 0.9 ) {
    trainingData.push({
        input: points,
        output: ferData[ setIndex ].emotion,
    });
}
Having compiled enough training data, we can pass it to the trainNet function… At the top of the function trackFace let’s end the face tracking loop and exit after 200 images and call the training function:
async function trackFace() {
    // Fast train on just 200 of the images
    if( setIndex >= 200 ) {
        setText( "Finished!" );
        trainNet();
        return;
    }
    ...
}
Finally, we come to the part we’ve been waiting for: let’s create a function trainNet and train our AI model!
This function will split the training data into an input array of key points and an output array of unitary emotion vectors, create a categorical TensorFlow model with several hidden layers, train for 1000 iterations, and load the trained model. To further train the model, the number of iterations can be increased.
async function trainNet() {
let inputs = trainingData.map( x => x.input );
let outputs = trainingData.map( x => emotionToArray( x.output ) );
// Define our model with several hidden layers
const model = tf.sequential();
model.add(tf.layers.dense( { units: 100, activation: "relu", inputShape: [ inputs[ 0 ].length ] } ) );
model.add(tf.layers.dense( { units: 100, activation: "relu" } ) );
model.add(tf.layers.dense( { units: 100, activation: "relu" } ) );
model.add(tf.layers.dense( {
units: emotions.length,
kernelInitializer: 'varianceScaling',
useBias: false,
activation: "softmax"
} ) );
model.compile({
optimizer: "adam",
loss: "categoricalCrossentropy",
metrics: "acc"
});
const xs = tf.stack( inputs.map( x => tf.tensor1d( x ) ) );
const ys = tf.stack( outputs.map( x => tf.tensor1d( x ) ) );
await model.fit( xs, ys, {
epochs: 1000,
shuffle: true,
callbacks: {
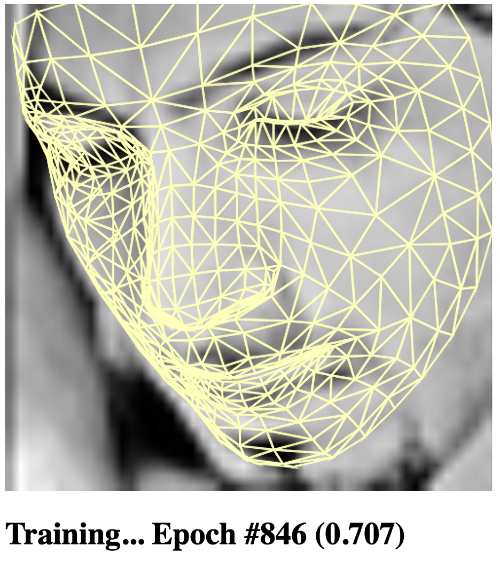
onEpochEnd: ( epoch, logs ) => {
setText( `Training... Epoch #${epoch} (${logs.acc.toFixed( 3 )})` );
console.log( "Epoch #", epoch, logs );
}
}
} );
// Download the trained model
const saveResult = await model.save( "downloads://facemo" );
}
That’s all! On this web page, an AI model will be trained to recognize facial expressions in various categories and you will receive a model to download and apply. This is what we will do next.
1. Finish straight
Here is the complete code for training the model on the FER dataset:
<html>
    <head>
        <title>Training - Recognizing Facial Expressions in the Browser with Deep Learning using TensorFlow.js</title>
        <script src="https://cdn.jsdelivr.net/npm/@tensorflow/tfjs@2.4.0/dist/tf.min.js"></script>
        <script src="https://cdn.jsdelivr.net/npm/@tensorflow-models/face-landmarks-detection@0.0.1/dist/face-landmarks-detection.js"></script>
        <script src="web/triangles.js"></script>
        <script src="https://habr.com/ru/company/skillfactory/blog/544850/web/fer2013.js"></script>
    </head>
    <body>
        <canvas id="output"></canvas>
        <img id="image" style="
            visibility: hidden;
            width: auto;
            height: auto;
            "/>
        <h1 id="status">Loading...</h1>
        <script>
        function setText( text ) {
            document.getElementById( "status" ).innerText = text;
        }

        async function setImage( url ) {
            return new Promise( res => {
                let image = document.getElementById( "image" );
                image.src = url;
                image.onload = () => {
                    res();
                };
            });
        }

        function shuffleArray( array ) {
            for( let i = array.length - 1; i > 0; i-- ) {
                const j = Math.floor( Math.random() * ( i + 1 ) );
                [ array[ i ], array[ j ] ] = [ array[ j ], array[ i ] ];
            }
        }

        function drawLine( ctx, x1, y1, x2, y2, scale = 1 ) {
            ctx.beginPath();
            ctx.moveTo( x1 * scale, y1 * scale );
            ctx.lineTo( x2 * scale, y2 * scale );
            ctx.stroke();
        }

        function drawTriangle( ctx, x1, y1, x2, y2, x3, y3, scale = 1 ) {
            ctx.beginPath();
            ctx.moveTo( x1 * scale, y1 * scale );
            ctx.lineTo( x2 * scale, y2 * scale );
            ctx.lineTo( x3 * scale, y3 * scale );
            ctx.lineTo( x1 * scale, y1 * scale );
            ctx.stroke();
        }

        const OUTPUT_SIZE = 500;
        const emotions = [ "angry", "disgust", "fear", "happy", "neutral", "sad", "surprise" ];
        let ferData = [];
        let setIndex = 0;
        let trainingData = [];

        let output = null;
        let model = null;

        function emotionToArray( emotion ) {
            let array = [];
            for( let i = 0; i < emotions.length; i++ ) {
                array.push( emotion === emotions[ i ] ? 1 : 0 );
            }
            return array;
        }

        async function trainNet() {
            let inputs = trainingData.map( x => x.input );
            let outputs = trainingData.map( x => emotionToArray( x.output ) );

            // Define our model with several hidden layers
            const model = tf.sequential();
            model.add(tf.layers.dense( { units: 100, activation: "relu", inputShape: [ inputs[ 0 ].length ] } ) );
            model.add(tf.layers.dense( { units: 100, activation: "relu" } ) );
            model.add(tf.layers.dense( { units: 100, activation: "relu" } ) );
            model.add(tf.layers.dense( {
                units: emotions.length,
                kernelInitializer: 'varianceScaling',
                useBias: false,
                activation: "softmax"
            } ) );

            model.compile({
                optimizer: "adam",
                loss: "categoricalCrossentropy",
                metrics: "acc"
            });

            const xs = tf.stack( inputs.map( x => tf.tensor1d( x ) ) );
            const ys = tf.stack( outputs.map( x => tf.tensor1d( x ) ) );
            await model.fit( xs, ys, {
                epochs: 1000,
                shuffle: true,
                callbacks: {
                    onEpochEnd: ( epoch, logs ) => {
                        setText( `Training... Epoch #${epoch} (${logs.acc.toFixed( 3 )})` );
                        console.log( "Epoch #", epoch, logs );
                    }
                }
            } );

            // Download the trained model
            const saveResult = await model.save( "downloads://facemo" );
        }

        async function trackFace() {
            // Fast train on just 200 of the images
            if( setIndex >= 200 ) {//ferData.length ) {
                setText( "Finished!" );
                trainNet();
                return;
            }
            // Set to the next training image
            await setImage( ferData[ setIndex ].file );
            const image = document.getElementById( "image" );
            const faces = await model.estimateFaces( {
                input: image,
                returnTensors: false,
                flipHorizontal: false,
            });
            output.drawImage(
                image,
                0, 0, image.width, image.height,
                0, 0, OUTPUT_SIZE, OUTPUT_SIZE
            );

            const scale = OUTPUT_SIZE / image.width;

            faces.forEach( face => {
                // Draw the bounding box
                const x1 = face.boundingBox.topLeft[ 0 ];
                const y1 = face.boundingBox.topLeft[ 1 ];
                const x2 = face.boundingBox.bottomRight[ 0 ];
                const y2 = face.boundingBox.bottomRight[ 1 ];
                const bWidth = x2 - x1;
                const bHeight = y2 - y1;
                drawLine( output, x1, y1, x2, y1, scale );
                drawLine( output, x2, y1, x2, y2, scale );
                drawLine( output, x1, y2, x2, y2, scale );
                drawLine( output, x1, y1, x1, y2, scale );

                // Draw the face mesh
                const keypoints = face.scaledMesh;
                for( let i = 0; i < FaceTriangles.length / 3; i++ ) {
                    let pointA = keypoints[ FaceTriangles[ i * 3 ] ];
                    let pointB = keypoints[ FaceTriangles[ i * 3 + 1 ] ];
                    let pointC = keypoints[ FaceTriangles[ i * 3 + 2 ] ];
                    drawTriangle( output, pointA[ 0 ], pointA[ 1 ], pointB[ 0 ], pointB[ 1 ], pointC[ 0 ], pointC[ 1 ], scale );
                }

                // Add just the nose, cheeks, eyes, eyebrows & mouth
                const features = [
                    "noseTip",
                    "leftCheek",
                    "rightCheek",
                    "leftEyeLower1", "leftEyeUpper1",
                    "rightEyeLower1", "rightEyeUpper1",
                    "leftEyebrowLower", //"leftEyebrowUpper",
                    "rightEyebrowLower", //"rightEyebrowUpper",
                    "lipsLowerInner", //"lipsLowerOuter",
                    "lipsUpperInner", //"lipsUpperOuter",
                ];
                let points = [];
                features.forEach( feature => {
                    face.annotations[ feature ].forEach( x => {
                        points.push( ( x[ 0 ] - x1 ) / bWidth );
                        points.push( ( x[ 1 ] - y1 ) / bHeight );
                    });
                });
                // Only grab the faces that are confident
                if( face.faceInViewConfidence > 0.9 ) {
                    trainingData.push({
                        input: points,
                        output: ferData[ setIndex ].emotion,
                    });
                }
            });

            setText( `${setIndex + 1}. Face Tracking Confidence: ${face.faceInViewConfidence.toFixed( 3 )} - ${ferData[ setIndex ].emotion}` );
            setIndex++;
            requestAnimationFrame( trackFace );
        }

        (async () => {
            // Get FER-2013 data from the local web server
            // https://www.kaggle.com/msambare/fer2013
            // The data can be downloaded from Kaggle and placed inside the "web/fer2013" folder
            // Get the lowest number of samples out of all emotion categories
            const minSamples = Math.min( ...Object.keys( fer2013 ).map( em => fer2013[ em ].length ) );
            Object.keys( fer2013 ).forEach( em => {
                shuffleArray( fer2013[ em ] );
                for( let i = 0; i < minSamples; i++ ) {
                    ferData.push({
                        emotion: em,
                        file: fer2013[ em ][ i ]
                    });
                }
            });
            shuffleArray( ferData );

            let canvas = document.getElementById( "output" );
            canvas.width = OUTPUT_SIZE;

            canvas.height = OUTPUT_SIZE;


            output = canvas.getContext( "2d" );
            output.translate( canvas.width, 0 );
            output.scale( -1, 1 ); // Mirror cam
            output.fillStyle = "#fdffb6";
            output.strokeStyle = "#fdffb6";
            output.lineWidth = 2;


            // Load Face Landmarks Detection
            model = await faceLandmarksDetection.load(
                faceLandmarksDetection.SupportedPackages.mediapipeFacemesh
            );

            setText( "Loaded!" );

            trackFace();
        })();
        </script>
    </body>
</html>
2. Detecting facial emotions
We have almost reached our goal. Applying the emotion detection model is easier than training it. On this web page, we are going to download a trained TensorFlow model and test it on random faces from the FER dataset.
We can load the emotion detection model into a global variable right below the face landmark detection model loading code. After training your model in Part 1, you can update the path to match where your model was saved.
let emotionModel = null;

(async () => {
    ...
    // Load Face Landmarks Detection
    model = await faceLandmarksDetection.load(
        faceLandmarksDetection.SupportedPackages.mediapipeFacemesh
    );
    // Load Emotion Detection
    emotionModel = await tf.loadLayersModel( 'web/model/facemo.json' );
    ...
})();
After that, we can write a function that applies the model to the input data of the key points of the face and returns the name of the detected emotion:
async function predictEmotion( points ) {
    let result = tf.tidy( () => {
        const xs = tf.stack( [ tf.tensor1d( points ) ] );
        return emotionModel.predict( xs );
    });
    let prediction = await result.data();
    result.dispose();
    // Get the index of the maximum value
    let id = prediction.indexOf( Math.max( ...prediction ) );
    return emotions[ id ];
}
So that we can pause for a few seconds between test images, let’s create a wait utility function:
function wait( ms ) {
    return new Promise( res => setTimeout( res, ms ) );
}
Now, to put it into action, we can take the keypoints of the tracked face, scale them to a bounding rectangle to prepare as input, run emotion recognition, and display the expected and detected result with 2 second intervals between images.
async function trackFace() {
    ...

    let points = null;
    faces.forEach( face => {
        ...

        // Add just the nose, cheeks, eyes, eyebrows & mouth
        const features = [
            "noseTip",
            "leftCheek",
            "rightCheek",
            "leftEyeLower1", "leftEyeUpper1",
            "rightEyeLower1", "rightEyeUpper1",
            "leftEyebrowLower", //"leftEyebrowUpper",
            "rightEyebrowLower", //"rightEyebrowUpper",
            "lipsLowerInner", //"lipsLowerOuter",
            "lipsUpperInner", //"lipsUpperOuter",
        ];
        points = [];
        features.forEach( feature => {
            face.annotations[ feature ].forEach( x => {
                points.push( ( x[ 0 ] - x1 ) / bWidth );
                points.push( ( x[ 1 ] - y1 ) / bHeight );
            });
        });
    });

    if( points ) {
        let emotion = await predictEmotion( points );
        setText( `${setIndex + 1}. Expected: ${ferData[ setIndex ].emotion} vs. ${emotion}` );
    }
    else {
        setText( "No Face" );
    }

    setIndex++;
    await wait( 2000 );
    requestAnimationFrame( trackFace );
}
Done! Our code should start identifying emotions in the FER images according to the expected emotion. Give it a try and see how it works.
2. The home stretch
Take a look at the complete code for applying the trained model to images from the FER dataset:
<html>
    <head>
        <title>Running - Recognizing Facial Expressions in the Browser with Deep Learning using TensorFlow.js</title>
        <script src="https://cdn.jsdelivr.net/npm/@tensorflow/tfjs@2.4.0/dist/tf.min.js"></script>
        <script src="https://cdn.jsdelivr.net/npm/@tensorflow-models/face-landmarks-detection@0.0.1/dist/face-landmarks-detection.js"></script>
        <script src="https://habr.com/ru/company/skillfactory/blog/544850/web/fer2013.js"></script>
    </head>
    <body>
        <canvas id="output"></canvas>
        <img id="image" style="
            visibility: hidden;
            width: auto;
            height: auto;
            "/>
        <h1 id="status">Loading...</h1>
        <script>
        function setText( text ) {
            document.getElementById( "status" ).innerText = text;
        }

        async function setImage( url ) {
            return new Promise( res => {
                let image = document.getElementById( "image" );
                image.src = url;
                image.onload = () => {
                    res();
                };
            });
        }

        function shuffleArray( array ) {
            for( let i = array.length - 1; i > 0; i-- ) {
                const j = Math.floor( Math.random() * ( i + 1 ) );
                [ array[ i ], array[ j ] ] = [ array[ j ], array[ i ] ];
            }
        }

        function drawLine( ctx, x1, y1, x2, y2, scale = 1 ) {
            ctx.beginPath();
            ctx.moveTo( x1 * scale, y1 * scale );
            ctx.lineTo( x2 * scale, y2 * scale );
            ctx.stroke();
        }

        function drawTriangle( ctx, x1, y1, x2, y2, x3, y3, scale = 1 ) {
            ctx.beginPath();
            ctx.moveTo( x1 * scale, y1 * scale );
            ctx.lineTo( x2 * scale, y2 * scale );
            ctx.lineTo( x3 * scale, y3 * scale );
            ctx.lineTo( x1 * scale, y1 * scale );
            ctx.stroke();
        }

        function wait( ms ) {
            return new Promise( res => setTimeout( res, ms ) );
        }

        const OUTPUT_SIZE = 500;
        const emotions = [ "angry", "disgust", "fear", "happy", "neutral", "sad", "surprise" ];
        let ferData = [];
        let setIndex = 0;
        let emotionModel = null;

        let output = null;
        let model = null;

        async function predictEmotion( points ) {
            let result = tf.tidy( () => {
                const xs = tf.stack( [ tf.tensor1d( points ) ] );
                return emotionModel.predict( xs );
            });
            let prediction = await result.data();
            result.dispose();
            // Get the index of the maximum value
            let id = prediction.indexOf( Math.max( ...prediction ) );
            return emotions[ id ];
        }

        async function trackFace() {
            // Set to the next training image
            await setImage( ferData[ setIndex ].file );
            const image = document.getElementById( "image" );
            const faces = await model.estimateFaces( {
                input: image,
                returnTensors: false,
                flipHorizontal: false,
            });
            output.drawImage(
                image,
                0, 0, image.width, image.height,
                0, 0, OUTPUT_SIZE, OUTPUT_SIZE
            );

            const scale = OUTPUT_SIZE / image.width;

            let points = null;
            faces.forEach( face => {
                // Draw the bounding box
                const x1 = face.boundingBox.topLeft[ 0 ];
                const y1 = face.boundingBox.topLeft[ 1 ];
                const x2 = face.boundingBox.bottomRight[ 0 ];
                const y2 = face.boundingBox.bottomRight[ 1 ];
                const bWidth = x2 - x1;
                const bHeight = y2 - y1;
                drawLine( output, x1, y1, x2, y1, scale );
                drawLine( output, x2, y1, x2, y2, scale );
                drawLine( output, x1, y2, x2, y2, scale );
                drawLine( output, x1, y1, x1, y2, scale );

                // Add just the nose, cheeks, eyes, eyebrows & mouth
                const features = [
                    "noseTip",
                    "leftCheek",
                    "rightCheek",
                    "leftEyeLower1", "leftEyeUpper1",
                    "rightEyeLower1", "rightEyeUpper1",
                    "leftEyebrowLower", //"leftEyebrowUpper",
                    "rightEyebrowLower", //"rightEyebrowUpper",
                    "lipsLowerInner", //"lipsLowerOuter",
                    "lipsUpperInner", //"lipsUpperOuter",
                ];
                points = [];
                features.forEach( feature => {
                    face.annotations[ feature ].forEach( x => {
                        points.push( ( x[ 0 ] - x1 ) / bWidth );
                        points.push( ( x[ 1 ] - y1 ) / bHeight );
                    });
                });
            });

            if( points ) {
                let emotion = await predictEmotion( points );
                setText( `${setIndex + 1}. Expected: ${ferData[ setIndex ].emotion} vs. ${emotion}` );
            }
            else {
                setText( "No Face" );
            }

            setIndex++;
            await wait( 2000 );
            requestAnimationFrame( trackFace );
        }

        (async () => {
            // Get FER-2013 data from the local web server
            // https://www.kaggle.com/msambare/fer2013
            // The data can be downloaded from Kaggle and placed inside the "web/fer2013" folder
            // Get the lowest number of samples out of all emotion categories
            const minSamples = Math.min( ...Object.keys( fer2013 ).map( em => fer2013[ em ].length ) );
            Object.keys( fer2013 ).forEach( em => {
                shuffleArray( fer2013[ em ] );
                for( let i = 0; i < minSamples; i++ ) {
                    ferData.push({
                        emotion: em,
                        file: fer2013[ em ][ i ]
                    });
                }
            });
            shuffleArray( ferData );

            let canvas = document.getElementById( "output" );
            canvas.width = OUTPUT_SIZE;

            canvas.height = OUTPUT_SIZE;


            output = canvas.getContext( "2d" );
            output.translate( canvas.width, 0 );
            output.scale( -1, 1 ); // Mirror cam
            output.fillStyle = "#fdffb6";
            output.strokeStyle = "#fdffb6";
            output.lineWidth = 2;


            // Load Face Landmarks Detection
            model = await faceLandmarksDetection.load(
                faceLandmarksDetection.SupportedPackages.mediapipeFacemesh
            );
            // Load Emotion Detection
            emotionModel = await tf.loadLayersModel( 'web/model/facemo.json' );

            setText( "Loaded!" );

            trackFace();
        })();
        </script>
    </body>
</html>
What’s next? Will this allow us to define our emotions on the face?
In this article, we combined the output of the TensorFlow face detection model with an independent dataset to create a new model that can extract more information from the image than before. The real test would be to apply this new model to detect emotions on any face.
In the next article in this series, we will use the webcam video of our face to find out if the model can respond to facial expressions in real time. See you tomorrow at the same time.

Find out the detailshow to get a Level Up in skills and salary or an in-demand profession from scratch by taking SkillFactory online courses with a 40% discount and a promotional code HABR, which will give another + 10% discount on training.
Other professions and courses
PROFESSION
COURSES