bspwm. Installation and configuration. Artix
Bspwm is a minimalistic, fast and highly configurable tiling window manager that represents windows as layers of a binary tree. Multiple monitors supported. Has a simple setup.
As a quick installation solution, you can use my installation script.
What will be used:
-
bspwm – Tiling window manager.
-
sxhkd – Hot key daemon for X.
-
dmenu – Dynamic menu for X.
-
polybar – A tool for creating status bars.
-
picom – Window composer for X.
These components are light and fast, contain a small number of dependencies.
You can easily replace some of the components with more beautiful ones:
-
Instead of dmenu you can use Rofi, but you should take into account the power of your machine. on a weak machine, this menu may open for several seconds.
-
Instead of picom, you can use its fork picom-jonaburg-git from AUR. It adds a blur effect, rounded edges.
Note. This guide will not cover “beautiful” system design. Wallpapers, icons, fonts you can put yourself.
Installation
All components are configured in config files located in the user’s home directory. That’s why don’t use root user, but create a new one. Otherwise, you may encounter problems such as running applications in sandbox mode (browsers, applications on electron).
User creation
We create a user. Replace “user_name” with your desired username.
useradd -m -G wheel user_nameThe -G wheel switch means that the user will be a member of the wheel group. This is necessary to execute commands as the superuser (sudo).
Set a password for the user:
passwd user_nameIn order for the group to have the right to execute commands as the superuser, you need to change the /etc/sudoers file:
nano /etc/sudoersFind and uncomment the line:
# %wheel ALL=(ALL:ALL) ALLPackages and programs
Basic packages to install:
pacman -S bspwm sxhkd dmenu polybar picomYou also need to download a terminal emulator. My choice fell on lightweight xfce4-terminal:
pacman -S xfce4-terminalFor convenience, download the browser. As a browser I use qutebrowser. It is designed to be used without a mouse. If you need a regular browser, then download firefox.
pacman -S qutebrowserXorg
pacman -S xorg xorg-xinitThe xorg group contains a large number of packages and fonts inside.
If you want an easier installation, then it is worth downloading certain packages:
-
xorg-server – Xorg x server
-
xorg-xinit – For using xinit and startx.
-
xorg-xset – User settings utility.
-
xorg-xsetroot – Set the background of the root window to the given pattern or color.
-
xorg-xrandr – A utility for setting up RandR (configuring monitors).
-
xorg-xrdb – Database utility for xorg server
pacman -S xorg-server xorg-xinit xorg-xset xorg-xsetroot xorg-xrandr xorg-xrdbxorg-server and xorg-xinit must be downloaded
Since the fonts are not installed, install gnu free fonts:
pacman -S gnu-free-fontsVideo driver
-
xf86-video-amdgpu is a new, free driver for AMD video cards.
-
xf86-video-ati is an old free driver for AMD.
-
xf86-video-intel – Driver for Intel integrated graphics.
-
xf86-video-nouveau is a free driver for NVIDIA cards.
-
xf86-video-vesa is a free driver that supports all cards, limited functionality. For a virtual machine.
-
xf86-video-qxl – free virtual video card driver, limited functionality. For a virtual machine. (Not available in Artix packages)
-
nvidia is a proprietary driver for NVIDIA.
In this case, you need to look at your machine and the manufacturer of the video card.
Since I’m using a virtual machine, I install xf86-video-vesa:
pacman -S xf86-video-vesaConfiguration
I will perform all operations with configs not from the root user. The “~” symbol in a file\directory path means /home/{user} (home directory). If you need to install config files for a specific user, replace “~” with the desired user’s home directory.
Some config files will be stored in ~/.config. If this directory does not exist, then create it:
mkdir ~/.configbspwm
Let’s create a folder for the local config:
mkdir ~/.config/bspwmCopy the config file to your home directory:
cp /usr/share/doc/bspwm/examples/bspwmrc ~/.config/bspwmNow let’s open it and change it:
nano ~/.config/bspwm/bspwmrcA little about application rules. The rule itself looks something like this:
bspc rule -a qutebrowser desktop='^2'Using such a rule, you can explicitly specify on which desktop to run the application or its initial state
Work tables
This line specifies 10 desktops on the main monitor:
bspc monitor -d I II III IV V VI VII VIII IX XIf you are the owner of several monitors, then you can distribute desktops across them.
First, find out the names of the monitors in the system:
xrandrNow we can add a desktop setting for a specific monitor:
bspc monitor {Монитор} -d {Рабочие столы}It might turn out something like this:
bspc monitor DVI-I-1 -d I II III IVbspc monitor DVI-I-2 -d V VI VIIbspc monitor DP-1 -d VIII IX XColors, borders, padding
Borders and padding:
bspc config border_width         2
bspc config window_gap          12
Frame color in different states:
bspc config normal_border_color "#0A1F32"
bspc config active_border_color "#2D384A"
bspc config focused_border_color "#344756"
Space color when selecting new window position:
bspc config presel_feedback_color "#595B82"Window focus hover:
bspc config focus_follows_pointer true
bspc config pointer_modifier    super
Split ratio. What percentage will remain of the parent window when a new one is opened.
bspc config split_ratio 0.52Padding and borders when one window is open:
bspc config borderless_monocle   true
bspc config gapless_monocle      true
Sxhkd
Let’s create a folder for the local config:
mkdir ~/.config/sxhkdCopy the config file to your home directory:
cp /usr/share/doc/bspwm/examples/sxhkdrc ~/.config/sxhkdNow let’s open it and change it:
nano ~/.config/sxhkd/sxhkdrcAll that is minimally needed to be done is to change the launch of the terminal to the desired one:
super + Return
  xfce4-terminal
You can add hotkeys yourself according to this syntax:
Клавиша_Модификатор + Клавиша
  Команда
If you need to execute a command with different arguments, then we use the following syntax:
Клавиша_Модификатор + {Клавиша1, Клавиша2}
  Команда {Аргумент1, Аргумент2}
In this case, “Key1” corresponds to “Argument1”, and so on.
Polybar
Let’s create a folder for the local config:
mkdir ~/.config/polybarCopy the config file to your home directory:
cp /usr/share/doc/polybar/examples/config.ini ~/.config/polybar/configNow let’s create a boot script:
nano ~/.config/polybar/launch.shIn this file we write:
killall -q polybar # Отключение бара, если он включен
echo "---" | tee -a /tmp/example_bar.log # Просмотр логов
polybar example >> /tmp/example_bar.log # Запуск бара example и запись его лога
The name of the bar is written in the config file
To make the bar automatically start, add this line to end file ~/.config/bspwm:
$HOME/.config/polybar/launch.shNote. You can put autorun in different places, for example in xinitrc, but for me, somehow, polybar breaks bspwm with this approach.
Colors
At the beginning of the configuration, a description of the color of the bar is usually placed:
[colors]
background = #222
background-alt = #444
foreground = #dfdfdf
foreground-alt = #f0f0f0
primary = #646464
secondary = #646464
alert = #646464
underline = #c0c0c0
in this case, these are neutral dark colors
bar
The first line should be the heading bar/Name
[bar/base]Optional binding to a specific monitor (this way you can put different bars on each monitor):
monitor = ${env:MONITOR:HDMI-1}Size setting:
width = 100%
height = 27
;offset-x = 1%
;offset-y = 1%
radius = 8.0
fixed-center = true
Colors:
background = ${colors.background}
foreground = ${colors.foreground}
Line setting:
line-size = 2
line-color = #f00
Frame setting:
border-size = 4
border-color = #00000000
Fonts:
font-0 = fixed:pixelsize=10;1
font-1 = unifont:fontformat=truetype:size=8:antialias=false;0
font-2 = siji:pixelsize=10;1
Indents:
padding-left = 0
padding-right = 5
module-margin-left = 1
module-margin-right = 2
Location of modules:
modules-left = bspwm
modules-center = xwindow
modules-right =  pulseaudio eth wlan xkeyboard date
Modules
Polybar supports additional modules that you can make yourself in any interpreted language.
The syntax of a module is based on the header, type, launch location, and settings. For example kernel version module:
[module/info-kernel]
type = custom/script
exec = uname -r
interval = 1024
The community has written many modules. Repository with modules.
Choose any you like and download. For example:
~/.config/polybarMake the file executable:
chmod +x ~/.config/polybar/script.shAdd your module to the polybar config:
[module/{ИМЯ}]
type = custom/script
exec = ~/.config/polybar/script.sh
Switching between bars:
If you do not want to overload one bar with many modules, then in the polybar configuration file create 2 bar settings (you can simply copy and change the name with a set of modules):
[bar/base]
modules-left = bspwm
modules-center = xwindow
modules-right =  pulseaudio eth wlan xkeyboard date
; ОСТАЛЬНЫЕ НАСТРОЙКИ

[bar/additional]
modules-left = info-kernel
modules-center =
modules-right = filesystem memory cpu
; ОСТАЛЬНЫЕ НАСТРОЙКИ
Now create 2 scripts to launch the bars:
# ~/.config/launch.sh
killall -q polybar
echo "---" | tee -a /tmp/polybar-base.log
polybar base >>/tmp/polybar-base.log

# ~/.config/launch-additional.sh
killall -q polybar
echo "---" | tee -a /tmp/polybar-additional.log
polybar additional >>/tmp/polybar-additional.log
Let’s make them executable:
chmod +x ~/.config/launch.sh
chmod +x ~/.config/launch-additional.sh
Now let’s add hotkeys for switching bars to the sxhkd configuration:
# base bar
super + F1
  $HOME/.config/polybar/launch.sh

# additional bar
super + F2
  $HOME/.config/polybar/launch-additional.sh
You can read more about configuration in wiki.
xinitrc
Copy the config file to your home directory:
cp /etc/X11/xinit/xinitrc ~/.xinitrcNow let’s open it and change it:
nano ~/.xinitrcDelete everything after the line “fi” at the end of the file. In my case it is:
# twm &
# xclock -geometry 50x50-1+1 &
# xterm -geometry 80x50+494_51 &
# xterm -geometry 80x20+494-0 &
# exec xterm -geometry 80x66+0+0 -name login
We replace these commands with:
setxkbmap -option grp:alt_shift_toggle us,ru    # Смена языка. Такой подход не совсем "правильный"
picom -f &                                      # Запуск picom
xsetroot -cursor_name left_ptr                  # Установка стандартного курсора
exec bspwm                                      # Запуск bspwm
After changing the xinitrc configuration, you can try starting the environment with:
startxTo exit the environment press super+alt+q.
Monitor setup
In order for monitors to display correctly, you need to specify their configuration for xrandr. There are two variations on how to do this.
Arandr
An easy option is to download Arandr, it is designed to provide a simple visual interface for XRandR.
pacman -S arandrSince the program is graphical, we launch it.

Approximately such an interface will be displayed. You can adjust the position of the monitors with the mouse. If you right-click on the monitor, a menu will appear where there are additional settings. We can set the orientation, resolution for each monitor, and also make one of the monitors the main one.
After configuration, you need to save the script. Click on Layout > Save as. We give the name of the file, for example, display.sh.
Making the file executable:
chmod +x .screenlayout/display.shManual setting
If you do not want to install unnecessary applications, then you can do everything “manually”.
We display a list of monitors:
xrandrIn addition to the list of monitors, information is displayed about what resolutions monitors can have, their orientation, hertz, etc.
# Screen 0: minimum 320 x 200, current 1280 x960, maximum 8192 x 8192
# Virtual-1 connected primary 1280x960+0+0 (normal left inverted right x axis y axis) 0mm x 0mm
#   800x600     60.00 + 60.32
#   2560x1600   59.99
#   2560x1440   59.95
#   1920x1440   60.00
#   1856x1392   60.00
#   1792x1344   60.00
#   1920x1200   59.88
#   1920x1080   59.96
#   1600x1200   60.00
#   1680x1050   59.95
#   1400x1050   59.98
#   1280x960    60.00*
#   1360x768    60.02
#   1280x800    59.81
#   1152x864    75.00
#   1280x768    59.87
#   1280x720    59.86
#   1024x768    60.00
#   640x480     59.94
# Virtual-2 disconnected (normal left inverted right x axis y axis)
# Virtual-3 disconnected (normal left inverted right x axis y axis)
# Virtual-4 disconnected (normal left inverted right x axis y axis)
# Virtual-5 disconnected (normal left inverted right x axis y axis)
# Virtual-6 disconnected (normal left inverted right x axis y axis)
# Virtual-7 disconnected (normal left inverted right x axis y axis)
# Virtual-8 disconnected
Now you can configure monitors with the command:
xrandr --output {Монитор} --mode {Разрешение} In my case it looks like this:
xrandr --output Virtual-1 --mode 1280x960The auto argument allows you to automatically set the permission:
xrandr --output Virtual-1 --autoIf there are multiple refresh rates in the list, they can be changed using the rate argument:
xrandr --output Virtual-1 --auto --rate 60To make the monitor the primary one, use the primary argument:
xrandr --output Virtual-1 --auto --primaryIf you need to change the monitor orientation, then use the rotate argument:
xrandr --output Virtual-1 --auto --rotate normalIt is not necessary to set up multiple monitors with different commands, xrandr supports setting up multiple monitors with a single command:
xrandr --output Virtual-1 --auto --output Virtual-2 --autoYou can turn off the monitor with the off argument:
xrandr --output HDMI-1 --off --output HDMI-2 --autoIf you have decided on the setting, then save the command to a file.
Create a .screenlayout directory if it’s not present:
mkdir ~/.screenlayoutNow let’s write the configuration command to the display.sh file. In my case it looks like this:
echo "xrandr --output Virtual-1 --primary --mode 1280x960 --rotate normal" >> .screenlayout/display.shMaking the file executable:
chmod +x .screenlayout/display.shautorun
Autostart will be done using xinit. Add the line to the .xinitrc file:
$HOME/.screenlayout/display.sh  # Куда-нибудь сюда
picom -f &
xsetroot -cursor_name left_ptr
exec bspwm
Betterlockscreen
This component is optional, but it is useful if you need to lock the system with a keyboard shortcut.
Installation
Betterlockscreen is installed from the AUR, if you don’t have yay installed then you need to install it.
Download yay from the repository:
git clone https://aur.archlinux.org/yay.git Go to the installed directory:
cd yay Assembling the package:
makepkg -si Now install betterlockscreen itself with yay:
yay -S betterlockscreenSetting
If you run betterlockscreen with no arguments, it will print a description of all the arguments. Let’s consider some:
Adding an image:
The -u –update
betterlockscreen -u ~/.config/betterlockscreen/wallpaper.jpgYou can also further customize the display of effects:
-
–dim
Dim the image in percentage (0-100) -
–blur
Image blur amount (0.0-1.0) -
–color
Fill background color with HEX palette
For example:
betterlockscreen -u ~/.config/betterlockscreen/wallpaper.jpg --dim 20 --blur 0.5It is now possible to launch a lock screen with various effects using the -l –lock
betterlockscreen -l blur You can also set the image as desktop wallpaper:
betterlockscreen -u ~/downloads/wallpaper.jpg
betterlockscreen -w
Let’s add a hotkey to launch the lock screen to the sxhkd configuration:
alt + shift + x
  betterlockscreen -l blur
Launch and control
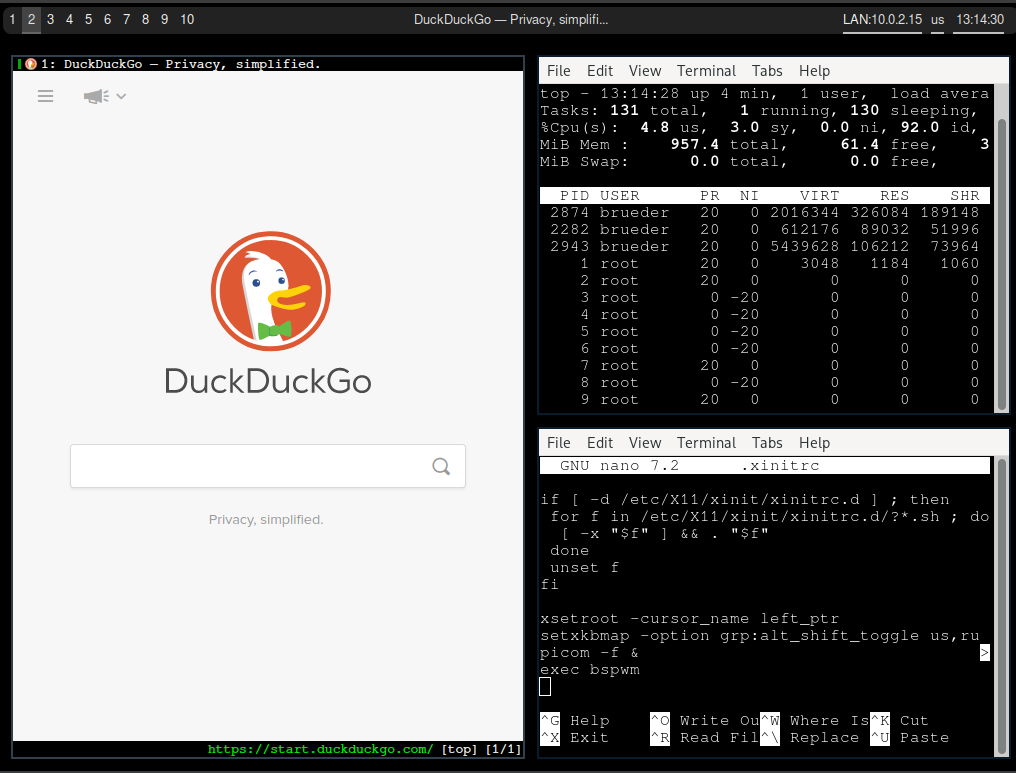
Since I am not considering solutions using a display manager, the launch will be done from the console:
startxThis command launches our graphical environment on X. At work it looks like this:
Standard sxhkd hotkeys:
|
Shortcut |
Action |
|---|---|
|
super + Return |
Terminal launch |
|
super + space |
Run dmenu |
|
super + Escape |
Restart sxhkd config |
|
super + alt + {q,r} |
Exit/restart bspwm |
|
super + {_,shift + }w |
Close and kill the application |
|
super+m |
Switching to monocle mode and back to tiled |
|
super+y |
Send the newest marked node to the newest pre-selected node |
|
super+g |
Swap current node and largest window |
Status and flags:
|
Shortcut |
Action |
|---|---|
|
super + f |
Set window mode (focused, floating) |
|
super + ctrl + {m,x,y,z} |
Set node flag (marked,locked,sticky,private) |
Focus and move:
|
Shortcut |
Action |
|---|---|
|
super + {_,shift + }{h,j,k,l} |
Focus on a node in the selected direction |
|
super + {p,b,comma,period} |
Focus nodes in a different path(workspace) |
|
super + {_,shift + }c |
Focus on the next/previous window in the current desktop |
|
super + bracket{left,right} |
Focus on next/previous desktop in current monitor |
|
super + {grave,Tab} |
Focus on last node/desktop |
|
super + {o,i} |
Focus on an older or newer node in the focus history |
|
super + {_,shift + }{1-9,0} |
Switch to the desktop or drag the active window onto it |
Preselection:
|
Shortcut |
Action |
|---|---|
|
super + ctrl + {h,j,k,l} |
Selecting the direction of the open window |
|
super + ctrl + {1-9} |
Select the desktop where the new window will open |
|
super + ctrl + space |
Cancel preselection for focused node |
|
super + ctrl + shift + space |
Cancel preselection for focused desktop |
Move and resize:
|
Shortcut |
Action |
|---|---|
|
super + alt + {h,j,k,l} |
Enlarge a window by moving one of its sides |
|
super + alt + shift + {h,j,k,l} |
Shrink a window by moving one of its sides |
|
super + {Left,Down,Up,Right} |
Moving floating windows |
Literature
BSPWM Installation and configuration
[14а] | Arch Linux: BSPWM – Part 1
[14b] | Arch Linux: BSPWM – Part 2