Asynchronous Jobs in Django with Celery
If your application has any lengthy process, you can process it not in the standard request / response stream, but in the background.
For example, in your application, the user must send a thumbnail image (which, most likely, will need to be edited) and confirm the email address. If your application processes the image and then sends an email for confirmation in the request handler, then the end user will have to wait for some reason to complete both tasks before reloading or closing the page. Instead, you can transfer these operations to the task queue and leave it to a separate process for processing to immediately send a response to the user. In this case, the end user will be able to do other things on the client side while processing in the background. In this case, your application will also be able to freely respond to requests from other users and clients.
Today we’ll talk about the setup and configuration process. Celery and Redis to handle long-running processes in a Django application to solve such problems. We will also use Docker and Docker Compose to link all the pieces together and see how to test Celery jobs with unit and integration tests.
By the end of this guide, we will learn:
- Integrate Celery in Django to create background jobs.
- Pack Django, Celery, and Redis with Docker.
- Run processes in the background using a separate workflow.
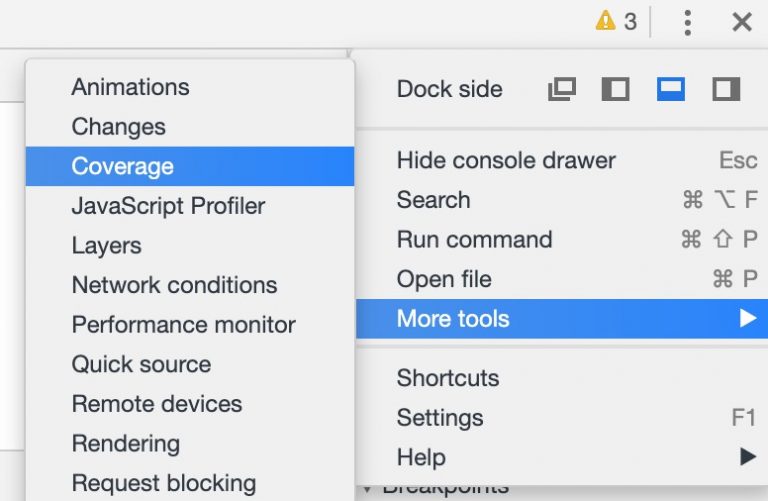
- Save Celery logs to a file.
- Tune Flower to monitor and administer Celery jobs and workers.
- Test Celery jobs with unit and integration tests.
Background Tasks
To improve the user experience, lengthy processes should run in the background outside the normal HTTP request / response stream.
For instance:
- Sending letters for confirmation;
- Web scaping and crawling;
- Data analysis;
- Image processing;
- Report Generation.
When creating an application, try to separate tasks that should be performed during the life of the request / response, for example, CRUD operations, from tasks that should be performed in the background.
The working process
Our goal is to develop a Django application that uses Celery to handle lengthy processes outside the request / response cycle.
- The end user generates a new job by sending a POST request to the server.
- In this view, the job is added to the queue, and the job id is sent back to the client.
- Using AJAX, the client continues to query the server to check the status of the job, while the job itself is running in the background.

Project creation
Clone a project from the repository django-celery and execute checkout by tag v1 in the branch master:
$ git clone https://github.com/testdrivenio/django-celery --branch v1 --single-branch
$ cd django-celery
$ git checkout v1 -b master
Since in total we need to work with three processes (Django, Redis, worker), we use Docker to simplify the work, connecting them so that we can run everything with one command in one terminal window.
From the project root, create images and launch Docker containers:
$ docker-compose up -d --buildWhen the build is complete, go to localhost: 1337:

Make sure the tests pass successfully:
$ docker-compose exec web python -m pytest

======================================== test session starts ========================================
platform linux -- Python 3.8.2, pytest-5.4.1, py-1.8.1, pluggy-0.13.1
django: settings: core.settings (from ini)
rootdir: /usr/src/app, inifile: pytest.ini
plugins: django-3.8.0
collected 1 item

tests/test_tasks.py .                                                                         [100%]

========================================= 1 passed in 0.47s =========================================
Let’s take a look at the structure of the project before moving on:
├── .gitignore
├── LICENSE
├── README.md
├── docker-compose.yml
└── project
    ├── Dockerfile
    ├── core
    │   ├── __init__.py
    │   ├── asgi.py
    │   ├── settings.py
    │   ├── urls.py
    │   └── wsgi.py
    ├── entrypoint.sh
    ├── manage.py
    ├── pytest.ini
    ├── requirements.txt
    ├── static
    │   ├── bulma.min.css
    │   ├── jquery-3.4.1.min.js
    │   ├── main.css
    │   └── main.js
    ├── tasks
    │   ├── __init__.py
    │   ├── apps.py
    │   ├── migrations
    │   │   └── __init__.py
    │   ├── templates
    │   │   └── home.html
    │   └── views.py
    └── tests
        ├── __init__.py
        └── test_tasks.py
Job launch
Event handler in project/static/main.js subscribed to a button click. By clicking on the server sends an AJAX POST request with the appropriate job type: 1, 2 or 3.
$('.button').on('click', function() {
  $.ajax({
    url: '/tasks/',
    data: { type: $(this).data('type') },
    method: 'POST',
  })
  .done((res) => {
    getStatus(res.task_id);
  })
  .fail((err) => {
    console.log(err);
  });
});
On the server side, a view has already been configured to process the request in project/tasks/views.py:
def run_task(request):
    if request.POST:
        task_type = request.POST.get("type")
        return JsonResponse({"task_type": task_type}, status=202)
And now the fun begins: we tie Celery!
Celery Setup
Let’s start by adding Celery and Redis to the file. project/requirements.txt:
celery==4.4.1
Django==3.0.4
redis==3.4.1

pytest==5.4.1
pytest-django==3.8.0
Celery uses message broker – Rabbitmq, Redis or AWS Simple Queue Service (SQS) – to simplify communication between Celery worker and web application. Messages are sent to the broker, and then processed by the worker. After that, the results are sent to the backend.
Redis will be both a broker and a backend. Add Redis and Celery Worker to File docker-compose.yml in the following way:
version: '3.7'

services:
  web:
    build: ./project
    command: python manage.py runserver 0.0.0.0:8000
    volumes:
      - ./project:/usr/src/app/
    ports:
      - 1337:8000
    environment:
      - DEBUG=1
      - SECRET_KEY=dbaa1_i7%*3r9-=z-+_mz4r-!qeed@(-a_r(g@k8jo8y3r27%m
      - DJANGO_ALLOWED_HOSTS=localhost 127.0.0.1 [::1]
      - CELERY_BROKER=redis://redis:6379/0
      - CELERY_BACKEND=redis://redis:6379/0
    depends_on:
      - redis

  celery:
    build: ./project
    command: celery worker --app=core --loglevel=info
    volumes:
      - ./project:/usr/src/app
    environment:
      - DEBUG=1
      - SECRET_KEY=dbaa1_i7%*3r9-=z-+_mz4r-!qeed@(-a_r(g@k8jo8y3r27%m
      - DJANGO_ALLOWED_HOSTS=localhost 127.0.0.1 [::1]
      - CELERY_BROKER=redis://redis:6379/0
      - CELERY_BACKEND=redis://redis:6379/0
    depends_on:
      - web
      - redis

  redis:
    image: redis:5-alpine
pay attention to celery worker --app=core --loglevel=info:
celery workeris used for launch worker Celery--app=coreused to runcoreapplications Celery (which we will shortly define);--loglevel=infodefines logging level information.
Add the following to the project settings module so that Celery uses Redis as a broker and backend:
CELERY_BROKER_URL = os.environ.get("CELERY_BROKER", "redis://redis:6379/0")
CELERY_RESULT_BACKEND = os.environ.get("CELERY_BROKER", "redis://redis:6379/0")
Then create a file sample_tasks.py at project/tasks:
# project/tasks/sample_tasks.py
import time
from celery import shared_task
@shared_task
def create_task(task_type):
time.sleep(int(task_type) * 10)
return True
Here, using the decorator shared_task we have defined a new Celery task function called create_task.
Remember that the task itself will not be executed from the Django process, it will be performed by the Celery worker.
Now add the file celery.py at "project/core":
import os

from celery import Celery


os.environ.setdefault("DJANGO_SETTINGS_MODULE", "core.settings")
app = Celery("core")
app.config_from_object("django.conf:settings", namespace="CELERY")
app.autodiscover_tasks()
What’s going on here?
- First you need to set the default value for the environment
DJANGO_SETTINGS_MODULEso Celery knows how to find a Django project. - Then we created a Celery instance named
coreand placed in a variableapp. - Then we loaded Celery configuration values from the settings object from
django.conf. We used namespace = “CELERY” to prevent collisions with other Django settings. Thus, all configuration settings for Celery must begin with a prefixCELERY_. - Finally,
app.autodiscover_tasks()tells Celery to search for jobs from applications defined insettings.INSTALLED_APPS.
Change project/core/__init__.pyso that the Celery application is automatically imported when starting Django:
from .celery import app as celery_app


__all__ = ("celery_app",)
Job launch
Refresh the view to start the job and send the id:
@csrf_exempt
def run_task(request):
    if request.POST:
        task_type = request.POST.get("type")
        task = create_task.delay(int(task_type))
        return JsonResponse({"task_id": task.id}, status=202)
Do not forget to import the task:
from tasks.sample_tasks import create_taskCollect images and deploy new containers:
$ docker-compose up -d --buildTo start a new task, do:
$ curl -F type=0 http://localhost:1337/tasks/You will see something like this:
{
  "task_id": "6f025ed9-09be-4cbb-be10-1dce919797de"
}
Job Status
Return to the client side event handler:
$('.button').on('click', function() {
  $.ajax({
    url: '/tasks/',
    data: { type: $(this).data('type') },
    method: 'POST',
  })
  .done((res) => {
    getStatus(res.task_id);
  })
  .fail((err) => {
    console.log(err);
  });
});
When the response returns from the AJAX request, we will send getStatus() with job id every second:
function getStatus(taskID) {
  $.ajax({
    url: `/tasks/${taskID}/`,
    method: 'GET'
  })
  .done((res) => {
    const html = `

        ${res.task_id}
        ${res.task_status}
        ${res.task_result}
      `
    $('#tasks').prepend(html);

    const taskStatus = res.task_status;

    if (taskStatus === 'SUCCESS' || taskStatus === 'FAILURE') return false;
    setTimeout(function() {
      getStatus(res.task_id);
    }, 1000);
  })
  .fail((err) => {
    console.log(err)
  });
}
If the answer is yes, then a new row will be added to the DOM table. Update view get_statusto return status:
@csrf_exempt
def get_status(request, task_id):
    task_result = AsyncResult(task_id)
    result = {
        "task_id": task_id,
        "task_status": task_result.status,
        "task_result": task_result.result
    }
    return JsonResponse(result, status=200)
Import Asyncresult:
from celery.result import AsyncResultUpdate containers:
$ docker-compose up -d --buildRun a new task:
$ curl -F type=1 http://localhost:1337/tasks/Then remove task_id from the answer and call updated get_statusTo see the status:
$ curl http://localhost:1337/tasks/25278457-0957-4b0b-b1da-2600525f812f/

{
    "task_id": "25278457-0957-4b0b-b1da-2600525f812f",
    "task_status": "SUCCESS",
    "task_result": true
}
You can see the same information in the browser:

Logs Celery
Update service celery at docker-compose.yml so that the Celery logs go to a separate file:
celery:
  build: ./project
  command: celery worker --app=core --loglevel=info --logfile=logs/celery.log
  volumes:
    - ./project:/usr/src/app
  environment:
    - DEBUG=1
    - SECRET_KEY=dbaa1_i7%*3r9-=z-+_mz4r-!qeed@(-a_r(g@k8jo8y3r27%m
    - DJANGO_ALLOWED_HOSTS=localhost 127.0.0.1 [::1]
    - CELERY_BROKER=redis://redis:6379/0
    - CELERY_BACKEND=redis://redis:6379/0
  depends_on:
    - web
    - redis
Add a new directory to “Project” and call her “Logs”. Then add to this new directory put the file celery.log.
Update:
$ docker-compose up -d --buildYou should see how the log file is locally populated after configuration volume:
[2020-03-25 19:42:29,586: INFO/MainProcess] Connected to redis://redis:6379/0
[2020-03-25 19:42:29,599: INFO/MainProcess] mingle: searching for neighbors
[2020-03-25 19:42:30,635: INFO/MainProcess] mingle: all alone
[2020-03-25 19:42:30,664: WARNING/MainProcess]
    /usr/local/lib/python3.8/site-packages/celery/fixups/django.py:202:
    UserWarning: Using settings.DEBUG leads to a memory
    leak, never use this setting in production environments!
    warnings.warn('''Using settings.DEBUG leads to a memory
[2020-03-25 19:42:30,667: INFO/MainProcess] celery@6d060151bfeb ready.
[2020-03-25 19:43:07,103: INFO/MainProcess]
    Received task: tasks.sample_tasks.create_task[632792bb-5030-4f03-a0d8-e91979279729]
[2020-03-25 19:43:17,099: INFO/ForkPoolWorker-2]
    Task tasks.sample_tasks.create_task[632792bb-5030-4f03-a0d8-e91979279729]
    succeeded in 10.027462100006233s: True
Flower Dashboard
Flower Is a lightweight web-based tool for monitoring Celery in real time. You can track running tasks, increase or decrease the pool of workers, display graphs and statistics, for example.
Add it to requirements.txt:
celery==4.4.1
Django==3.0.4
flower==0.9.3
redis==3.4.1

pytest==5.4.1
pytest-django==3.8.0
Then add the new service to docker-compose.yml:
dashboard:
  build: ./project
  command:  flower -A core --port=5555 --broker=redis://redis:6379/0
  ports:
    - 5555:5555
  environment:
    - DEBUG=1
    - SECRET_KEY=dbaa1_i7%*3r9-=z-+_mz4r-!qeed@(-a_r(g@k8jo8y3r27%m
    - DJANGO_ALLOWED_HOSTS=localhost 127.0.0.1 [::1]
    - CELERY_BROKER=redis://redis:6379/0
    - CELERY_BACKEND=redis://redis:6379/0
  depends_on:
    - web
    - redis
    - celery
And test:
$ docker-compose up -d --buildGo to localhost: 5555 to view the dashboard. You should see one worker:
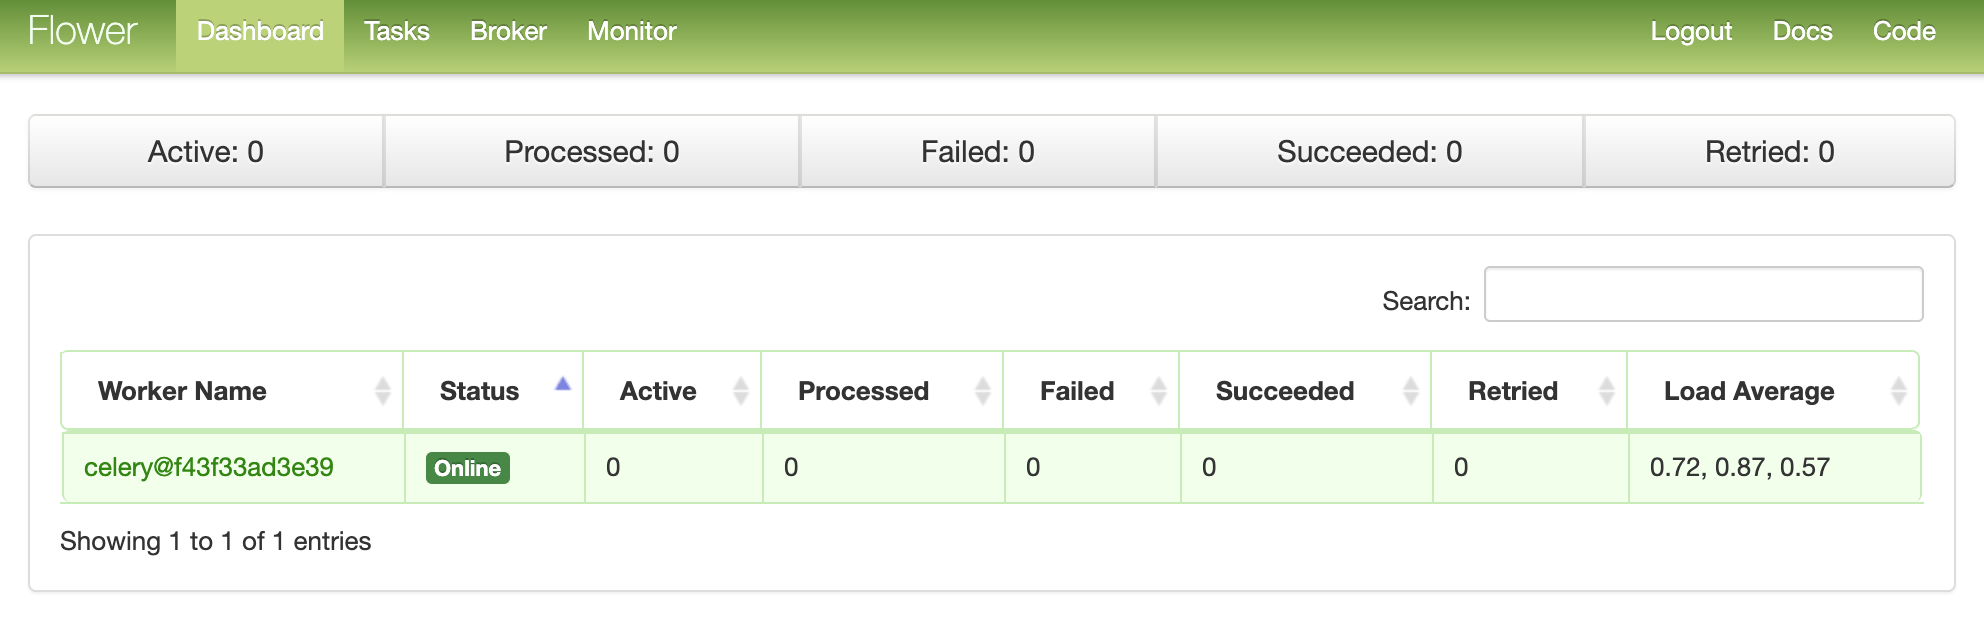
Run a few more tasks to test the dashboard:

Try adding more workers and see how it affects performance:
$ docker-compose up -d --build --scale celery=3Tests
Let’s start with the simplest test:
def test_task():
    assert sample_tasks.create_task.run(1)
    assert sample_tasks.create_task.run(2)
    assert sample_tasks.create_task.run(3)
Add the test case above to project/tests/test_tasks.py and add the following import:
from tasks import sample_tasksRun this test:
$ docker-compose exec web python -m pytest -k "test_task and not test_home"This test will take about a minute:
======================================== test session starts ========================================
platform linux -- Python 3.8.2, pytest-5.4.1, py-1.8.1, pluggy-0.13.1
django: settings: core.settings (from ini)
rootdir: /usr/src/app, inifile: pytest.ini
plugins: django-3.8.0, celery-4.4.1
collected 2 items / 1 deselected / 1 selected

tests/test_tasks.py .                                                                         [100%]

============================ 1 passed, 1 deselected in 62.43s (0:01:02) =============================
It is worth noting that in assert’s above we used the method .run instead .delay to run tasks directly without using Celery worker.
Want to use stubs (mock) to speed up the process?
@patch('tasks.sample_tasks.create_task.run')
def test_mock_task(mock_run):
    assert sample_tasks.create_task.run(1)
    sample_tasks.create_task.run.assert_called_once_with(1)

    assert sample_tasks.create_task.run(2)
    assert sample_tasks.create_task.run.call_count == 2

    assert sample_tasks.create_task.run(3)
    assert sample_tasks.create_task.run.call_count == 3
Import:
from unittest.mock import patch, callTest:
$ docker-compose exec web python -m pytest -k "test_mock_task"

======================================== test session starts ========================================
platform linux -- Python 3.8.2, pytest-5.4.1, py-1.8.1, pluggy-0.13.1
django: settings: core.settings (from ini)
rootdir: /usr/src/app, inifile: pytest.ini
plugins: django-3.8.0, celery-4.4.1
collected 3 items / 2 deselected / 1 selected

tests/test_tasks.py .                                                                         [100%]

================================== 1 passed, 2 deselected in 1.13s ==================================
See? Now much faster!
What about full integration testing?
def test_task_status(client):
    response = client.post(reverse("run_task"), {"type": 0})
    content = json.loads(response.content)
    task_id = content["task_id"]
    assert response.status_code == 202
    assert task_id

    response = client.get(reverse("get_status", args=[task_id]))
    content = json.loads(response.content)
    assert content == {"task_id": task_id, "task_status": "PENDING", "task_result": None}
    assert response.status_code == 200

    while content["task_status"] == "PENDING":
        response = client.get(reverse("get_status", args=[task_id]))
        content = json.loads(response.content)
    assert content == {"task_id": task_id, "task_status": "SUCCESS", "task_result": True}
Remember that this test uses the same broker and backend as in development. You can create a new instance of Celery for testing:
app = celery.Celery('tests', broker=CELERY_TEST_BROKER, backend=CELERY_TEST_BACKEND)Add import:
import jsonAnd make sure the tests are successful.
Conclusion
Today we introduced the basic configuration of Celery to perform long-term tasks in an application on Django. You should send any processes to the processing queue that could slow down the code on the user side.
Celery can also be used to perform repetitive tasks and decompose complex resource-intensive tasks in order to distribute the computational load on several machines and reduce the execution time and the load on the machine that processes client requests.
All code you can find in this repository.