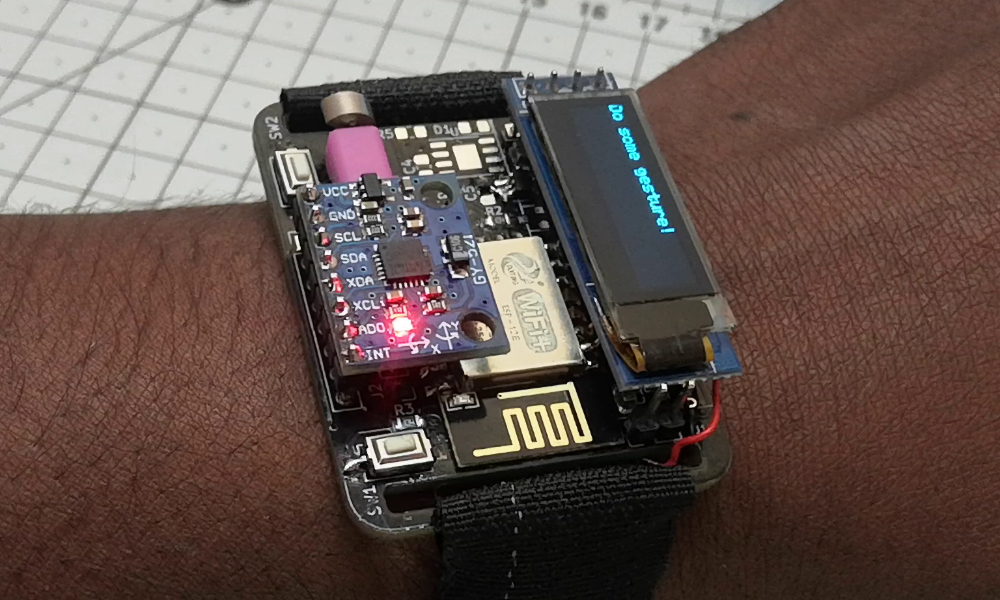
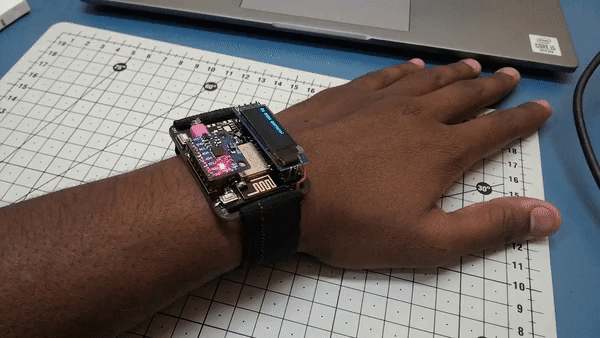
A watch for gesture detection based on machine learning, ESP8266 and Arduino
The world is definitely getting better every day thanks to gesture-based technologies because they are intuitive, easy to use and make interacting with the gadgets and things around you futuristic and fantastic! So, to be trendy, we’ll grab a homemade sports watch, dive into Machine Learning and see if we can use it to figure out what gesture we’re doing, and maybe we can use that in future projects, for example, implement sending e- mail with a wave of your hand. Further under the cut – real geek porn with a bunch of pictures, get ready.
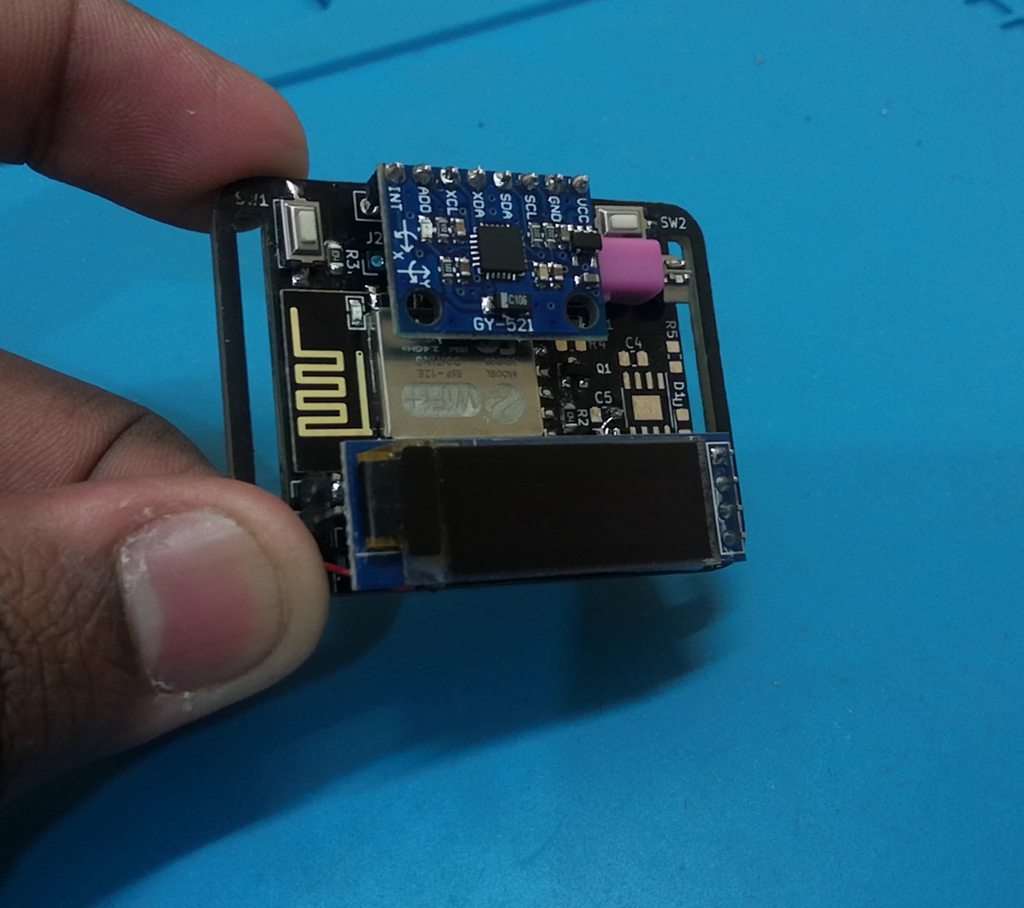
- Esp12E
- OLED display
- MPU6050
- Tactile motor (precise)
- Tactile motor (alternative)
- 3.3V regulator
- Battery 105mah
- Velcro
- Pin headers
- Angled pin headers
- Wires
- FTDI
- USB male connector
- Printed circuit board
- Soldering iron
- Lead for soldering
- Styrofoam sheets
Step 1. Telling!
Since I removed a number of watch functions that I originally planned (such as heart rate monitoring and micro-USB for charging), I decided to spend more time finishing the software part. I thought about adding some machine learning to the project; it should be easy compared to electronics: I’ll be dealing with a simple set of code – copy-paste from StackOverflow. At least that’s what I thought.
But I was wrong: By implementing machine learning-based gesture detection, I just went crazy. I hated it all. Not because it was difficult, it was just very frustrating to collect data and train the model.
If you would like to learn more about implementing machine learning in an embedded system, check out two links: TinyML and definition of gestures… The first explains how to use TensorFlow in TinyML with Arduino, and the second explains how to use basic ML algorithms on Arduino. I have mentioned the last link many times because the material is easy to understand and also works with microcontrollers with very little memory, such as the Arduino NANO and UNO.
Step 2. Assembling the PCB


Assembly should be very easy and fast this time thanks to the PCBs, and for that I thank PCBWay for sponsoring this gorgeous black PCB for this project.
I assembled all the SMD components for the project and then arranged them in such a way that I can easily access them without fiddling. Then I just soldered the rest!
Just follow the circuit diagram and solder the components on the PCB accordingly. To make soldering easier, move away from soldering small SMD components [резистор, конденсатор, регулятор] to larger components with through holes [MPU6050, OLED]… While soldering, I also secured the Lipo battery between the board and the OLED with 3M tape.
I find it difficult to find a suitable regulator for projects, so in my past projects I just used AMS1117: it’s cheap and easy to find. On the board, I gave two options, you can use MCP1700 or LSD3985. In my case, I use LSD3985 and ignore the MCP1700, but you can use any option. If you need an exact diagram, take a look here…
Step 3. Programming the clock


To make programming easier, I have allocated some space on the PCB so that you can simply plug in the FTDI module to start programming. To program the board, you must first put esp8266 in blinking mode, so when connecting to a PC, just hold down the button that is connected to the esp12E GPIO-0.
To check if the board is working, just upload the code Github and check if all functions such as NTP time, click wake up and change screen operation work. If everything works fine, then you are done with the hardware.
Step 4. Machine learning? Part 1
Machine learning sounds quirky and complicated, but trust me, some algorithms in ML are more intuitive than some other non-ML-based algorithms. Review this linkif you want to know more.
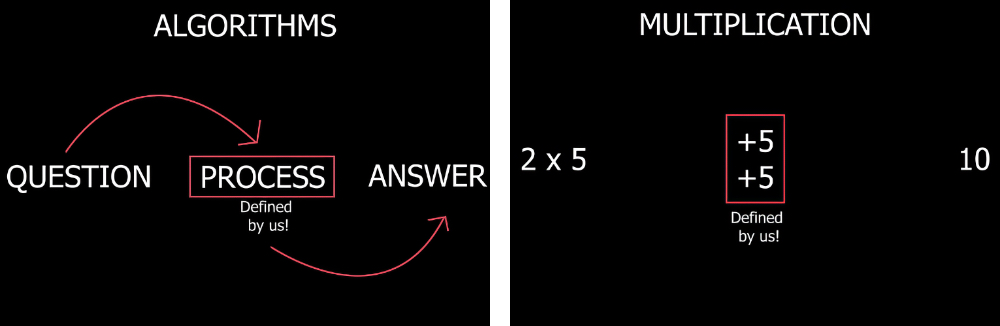
In most cases, when an algorithm needs to find an answer to a question, it needs to know the sequence of processes that it must perform in order to get the final result. A simple example is multiplication.
If you want to find the answer to a multiplication problem (say, 2 times 5), you can simply tell the computer to do a few additions to get the answer. As you can see, we are telling the computer what to do to get the answer.
Step 5. Machine learning? Part 2

ML works a little differently: we just ask the computer a bunch of questions and appropriate answers and ask it to figure out a way or find a process so that it can answer any new question without manual programming.
Take, for example, finding an apple in a photograph, it is very easy for a person to do, but it is quite difficult to write an algorithm and make a computer understand all the functions that an apple has; it is possible, but extremely tedious and difficult. Instead, if we could write an algorithm that can learn on its own just by looking at thousands of images of apples and learn on our own, wouldn’t that be great? Another good thing about using machine learning is that they can come up with a new way to find apples in a photo that we didn’t even think about. So ML is a pretty interesting area to explore.
Note! I’m not the right person to explain machine learning and artificial intelligence, I’m just writing what I’ve learned.
Step 6. Classification


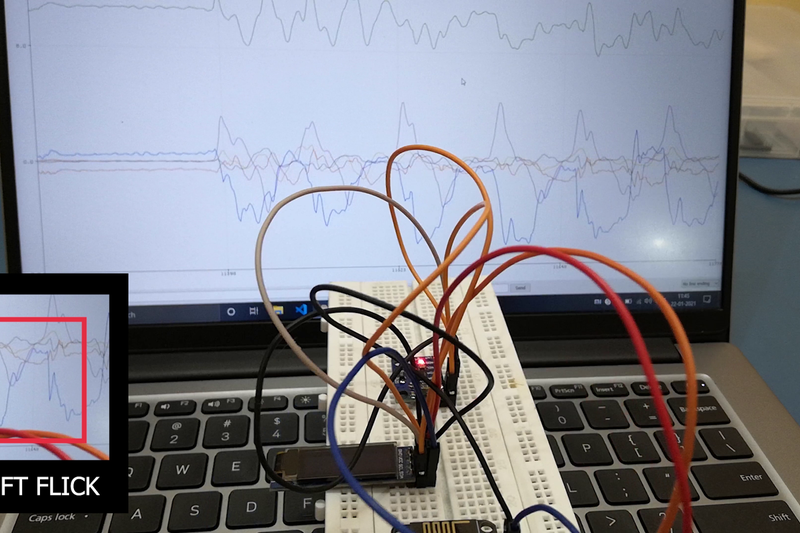
There are many ways and techniques in machine learning to solve a problem, and in our case, to detect gestures, I will use one of the methods called classification… Why is classification needed? Look at the picture above to see the accelerometer and gyroscope data on a serial plotter. The data seems to be predictable from a human point of view, as soon as you realize that the movement repeats for a long time. Now, if I do the same movement outside the screen, you can still guess what the movement is just by looking at the graph, and the best part is that you can do it even for other gestures and movements. This is because our brains give different names to different patterns.
Likewise, if we can show this data pattern to the ML algorithm several times, it will try to understand this data and distribute it into different groups. Or, as is fashionable now, you can say that the algorithm classifies a sample of data into different classes. So, the next time the ML algorithm sees a similar pattern in the data, it will figure out what the movement or gesture is. For this reason, we need to make a classification. I chose random forest algorithm for this classification problem.
Step 7. Collecting data for training the model from sensors


Since we now have a basic understanding of machine learning, we can start by collecting the data that we will use to train our ML algorithm. In the tutorial I followed, collecting data was clunky: through a port monitor. It would be very difficult for me to do the same because I would have to wear the device on my wrist during the gesture. To solve this problem, I made the data collection wireless. I used the esp8266 built-in flash memory and, for better convenience, displayed the data collection and storage status on the OLED display. If you want to do the same, compile and download the file Data_collection.ino on your watch.
After you have downloaded the code to test it, keep your hand still as soon as the device starts up; it first calibrates the accelerometer and gyroscope. Once the calibration is complete, you can start collecting data! Just press the button to which the GPIO-0 is connected and the device will create a new tag, and then just move your hands to record the movement. Trying to wirelessly collect data was definitely worth it! It became much easier to collect each movement (about 25-30 times), it did not cause problems. The more samples you have, the better the algorithm will perform.
Step 8. Data processing


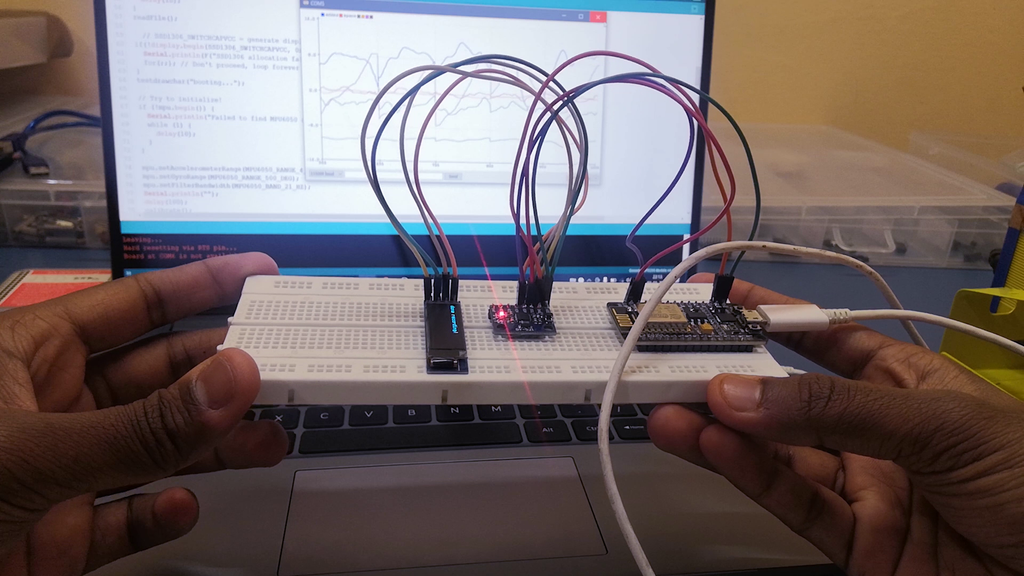
Now you can dump the collected data to the port monitor: just turn off the circuit, plug in FTDI and press the program button again while the monitor is open on your PC. Actions dump all data to the monitor. Then just copy and paste them into a text file. Each movement will be separated by the phrase “New feature” so you know which data is associated with which movement.
Then split the text file into 3 CSV files using Excel, swipe left, swipe right and clap. We have finished collecting data.
This data should not be used directly; they need to be processed: remove noise so that the algorithm predicts more accurately. But I don’t do anything that complicates the whole project, so I just skip it all and go straight to learning the algorithm.
Step 9. Train the model


This is the part where you train your machine learning algorithm to recognize the gesture.
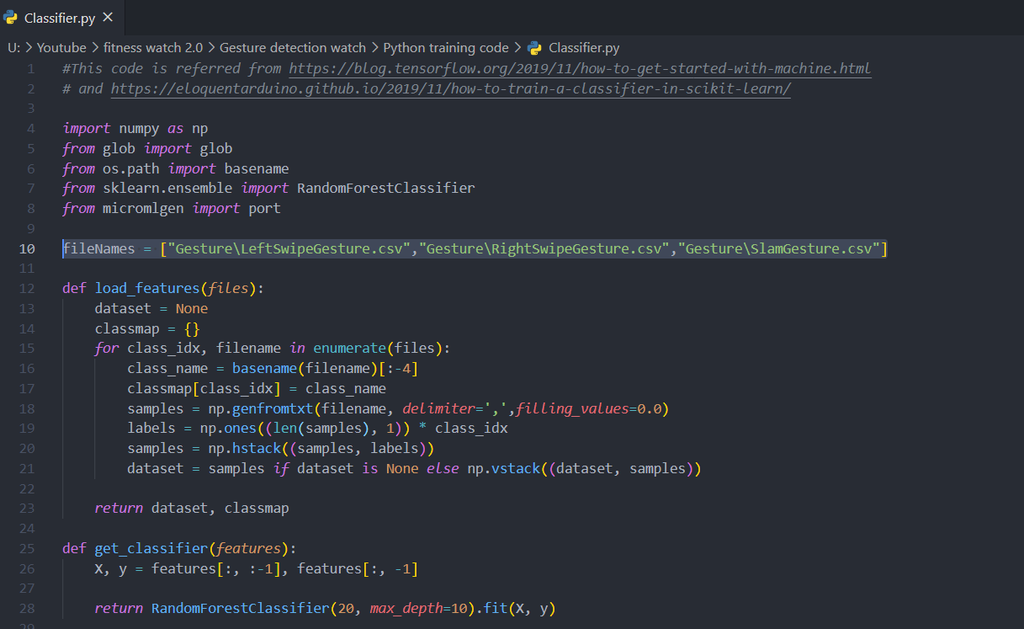
For training, I use a python script that trains the model and converts it to a C file, and this file, in turn, we can use with the arduino IDE. You can download this file from my repository on github and open the Classifier.py file inside the Python training code folder. In this code, we will read the csv files and train the model to learn gestures. we recorded before. If you have different filenames, just change the Python list called fileName to train the model based on the data you collect.
This code will create the file model.h. It contains a trained model that identifies the three gestures we have captured. If you just want to test the model, paste the model.h file into the Testing gesture detection folder and open the arduino file in that folder. Then just compile and download the code to watch.
Step 10. Model conclusions


Once the code is loaded into the microcontroller, the algorithm is not trained, it just uses the pretrained model we created earlier, this is called model inference.
After successfully loading the code, follow any gesture. The gesture you are performing should be indicated on the OLED display. In my case, the model worked 95% of the time, sometimes having difficulty finding the right swipe. Perhaps the data I collected was noisy, or maybe when I was collecting the data, I was gesturing wrong.
Anyway, for me 95% is good, there is a lot you can do with this recognition!
Step 11. Final thoughts

There are so many things you could improve if you want to implement this for a higher level project. For example, you can increase the sampling rate during data collection, increase the number of samples you collect, clean up the data after collection, use signal processing to remove noise, and so on. But from a novice hobbyist point of view, even this implementation of a machine learning model in the microcontroller is of great importance! Want to learn how to use machine learning – come to study, and the promo code HABR, giving 10% in addition to the discount on the banner, will help you with this.
- Machine Learning Course
- Course “Mathematics and Machine Learning for Data Science”
- Course “Machine Learning and Deep Learning”
- Data Scientist Profession
- Data Analyst profession
- Java developer profession
- JAVA QA engineer
- Frontend developer profession
- Profession Ethical hacker
- C ++ developer profession
- Profession Unity Game Developer
- Profession Web developer
- The profession of iOS developer from scratch
- Profession Android developer from scratch
COURSES
- Data Engineering Course
- Python for Web Development Course
- Course “Algorithms and Data Structures”
- Data Analytics Course
- DevOps course